
First Looks For the Month of March 2003
| B-52 | Published by Fiddlers Green |
| Designer: | Chip Fyn & Shahram Tahmasebi |
| Description: | USAAF Heavy Bomber |

Kit: This very large model is available from Fiddlers Green in three different formats. It is available across the internet as a download, on their Mega CD with many more models and in printed format. The model is 97% of WSAM (1/60 scale) which gives it a scale of about 1/58. This makes it a large model but one that will fit in with a 1/50 scale collection. The model is provided in three different color schemes, all black, camouflage and bare silver. Also provided are the X-15 and cruise missile, both of which were launched from this aircraft. I received the models over the Internet and printed the camouflage model out. It took 11 sheets of card stock and five sheets of regular paper to get everything printed out. The 11 sheets of card stock and one sheet of paper, with the wing spars, contain all the parts for construction. There is one sheet of instructions provided.
Construction: Construction of the fuselage is of the standard Fiddlers method. Fiddlers uses no internal supports and includes the connecting tabs on one end of the fuselage section. You cut the fuselage sections out and then connect them together using the end tabs. It is recommended that you glue another piece of card stock to the section that the wing spar goes in to give it some extra strength. Once you have the sections glued together than glue the cockpit, radome and rear gun on to the fuselage. Cut out the tail section, gluing the blisters to the vertical stabilizer, and glue them to the rear of the fuselage. Cut the wing spars out and glue then to a heavier card stock and then glue them together. Insert the spar through the fuselage and then glue the wing skins over the spar. Construct the eight engines and four pylons, glue the pylons to the wing and then two engines to each pylon. Build the landing gear and glue to the bottom of the model and finish up by gluing the landing gear doors by the landing gear.
First Impressions: A very large model but it does not have that
many parts. It is buildable by a beginner to card modeling. Be careful when
forming the fuselage sections as there are no internal formers so you must shape
the sections to their correct shape as you build the fuselage.
| Tiger I Ausf.E | Published by Betexa |
| Designer: | Robert Navratil |
| Description: | German WWII Tank |

Kit: This 1/35 scale kit comes in a fold out which consists of three sheets of 13" by 8.5" card stock. All three sheets are printed on both sides as most of Betexa model Kits. The model appears to be very simplistic with no interior detail at all. The exterior seems to also be simplistic. The model parts are on about two and a half pages with the other half page being a set of diagrams to aid in construction of the model. The back side of the diagrams consists of a set of instructions but they are printed only in Chez. There is also a brief history and specifications of the tank on the back cover but again it is in Chez.
Construction: Looking at the parts and associated numbers, I can see no indication that anything is to be reinforced with heavier card stock. The entire hull is in one piece that you cut out score and shape. I would recommend that you do reinforce this part to give you some strength to the model. Cut out shape and glue together the hull. Cut out the bogie parts, again I recommend that you do reinforce the bogie parts with heavier card stock. Assemble the bogies and glue them to the sides of the hull. Cut the tracks out, they are printed on both sides, and wrap them around the bogies Cut out the parts for the turret and assemble the turret, then do the same for the main gun. You can put a pin or piece of dowel through the red "x" on the hull and turret to allow the turret to rotate. Finish the model by cutting out the hatch covers and other details and gluing around the hull.
First Impressions: A rather simple model that would be a good model to learn on. The lack of instructions in any language besides Chez will be a problem for those who do not read this language.
| Fiat 3000 | Published by Answer |
| Designer: | Tomasz Debicki |
| Description: | Italian WWII Tank |

Kit: A 1/35 Scale kit that contains two separate models. The models come in a booklet that contains four sheets of A3 card stock. Each model is on two sheets of the card stock. One of the models is in camouflage and the other one is olive drab all over. There is a half page of instructions and specification all in Polish. The other half of the page has a few diagrams on specific areas of construction. The rear cover has a three view of the completed tank with part locations marked on it and a few more diagrams on specific areas of construction. There is no interior detailing on this model.
Construction: There is no indication of parts to be reinforced on either page or the diagrams. If you wish to reinforce the model I would recommend that you reinforce the hull section. The tank hull is in one piece that you cut out, score and bend to shape. Once you have the hull complete you now start on the track and bogies which are very different than most tank models. The track system consists of a large bogie at the front and rear of the tank and then several smaller bogies that are enclosed in the bottom of the system. Once you have the bogie system completed cut the tracks out, glue them together and then run then around the bogie system. Build the turret and glue to the top of the hull and then build the gun and glue to the front of the turret. Finish your model up by constructing and gluing the detail parts to the hull in their appropriate places.
First Impressions: Each of the two models does not have very
many parts but the lack of good diagrams and instructions in a language other
than Polish will make it difficult for non Polish readers to construct. The
odd bogie and track configuration may cause problems for anyone without experience
in card modeling.
| Miles M.14A Magister | Published by Hobby Model |
| Designer: | Michal Grabowski |
| Description: | British WWII Basic Trainer |

Kit: A 1/33 Scale aircraft kit that comes in a booklet that contains six pages A4 in size. Four pages of card stock contain all the parts to build the model. Two pages printed on both sides contains a history, in Polish, and a set of very detailed diagrams to help in construction of the model. As far as I can see there are no instructions included in any language so anyone building the model will be dependent on the diagrams. It appears that all parts to be reinforced are marked with an "x" at the end of their identification number. Since this is a "wheels down" and open cockpit aircraft there are no wheel wells or canopy. The interior of the cockpits are very detailed.
Construction: Begin construction by cutting out all parts ending in "x" and reinforcing them with heavier card stock. Layout the center framing which will contain the wing spar and in which the cockpits will rest. Construct the two cockpits inside the frame and glue the cockpit skin over the frame. Glue the fuselage frame parts together, insert the cockpit section inside this frame and then glue the fuselage skins over the frame. Glue the tail section frames to the rear of the fuselage and then glue the tail skins over them. Build the wing frames, gluing the skins over the frame and then glue to the wing spars extending out from the cockpit area. Build the frame for the engine section, skin it and glue to the front of the model. Finish the model by building and placing the landing gear and propellers to their proper positions.
First Impressions: Another fine model by Michal, he had been recently been producing a nice line of trainers from all over the world in 1/33 scale. Not a model for a beginner, due to the methods of construction card modeling experience is required before attempting this model.
| Sd.Kfz. 252 | Published by GPM |
| Designer: | Grzegorz Pomorski |
| Description: | German WWII Halftrack with Ammo Carrier |

Kit: This 1/25 model comes in booklet form that contains 10 pages of A4 card stock and paper. Eight pages of card stock contains all the parts necessary to build the model while the two paper pages contain diagrams needed to build the model. The inside front cover contains pictures of the real vehicle along with history and specifications. Instructions are also included on this page, all of the above are in Polish. The inside rear cover contains a four view of the half track and a side view of the ammo carrier all have exterior parts marked on them. This is a very detailed model with detailing on the half track itself and the ammo carrier. Detailing includes crew compartment, engine compartment, suspension and tracks , ammo in the carrier and the half track and crew compartment.
Construction: Start this model by building the detail parts before the vehicle itself. Cut out the bottom hull section and interior walls for the crew compartment. Build the engine and radiator and glue into the bottom hull compartment. Build the crew positions and insert into the crew compartment and then build the ammunition box that goes in the crew compartment. Build the ammo to go in the box and the machine gun that is mounted on the side of the crew compartment. Now drop the crew compartment into the lower hull compartment. Cut the upper hull section out and glue over the lower hull and crew compartment. Build the transmission, bogies and wheels and glue to the bottom hull compartment. Build the tracks and run them around the bogies. Build the ammo carrier starting with the frame and wheels. Build the ammo box and mount it onto the frame, start building the ammo that will go into the ammo box.
First Impressions: A very detailed model that will take some time and a lot of patience to build. This is not a model for the beginner due to the many small and detailed parts that are included.
| Bf 109 G2 | Published by Betexa |
| Description: | German WWII Fighter |

Kit Another 1/33 scale model that has just been released by Betexa. This model comes in a fold out that contains three pages A4 in size. Betexa prints on both sides of the paper so if there is anything you want to save on the backside of the model you might want to photocopy them. The model itself is on two sheets of the card stock and the other sheet contains the formers for the model along with instructions and diagrams. There are diagrams on the back side of this section which should be left after the parts are cut out. The model does contain a detailed cockpit and wheel wells but these do not need to be used as there is a colored card stock canopy provided and retracted wheels are printed on the bottom of the wings.
Construction: Construction of the fuselage is similar to the Fiddlers Green method of construction. The entire fuselage is in one piece that you cut and fold to get its shape. There are no internal frames, the shape of the fuselage is supported by the cockpit and engine/propeller piece that is installed in the nose. Build the cockpit and nose piece first than cut and fold the fuselage. Insert the cockpit inside the fuselage and than roll and glue the fuselage around the cockpit. Install the nose piece in the fuselage section. Cut and reinforce the wing spar and glue to the bottom of the fuselage. Cut out the wheel wells from the wings and build the wheel wells and then roll and glue the wing around the wing spar. Reinforce the tail spars and glue to the rear of the model and then cut and roll the tail skins over the spars. Build the wind radiators and landing gear and glue to the bottom of the wing. Build the fuselage air intakes and exhaust and glue to the front of the nose. Finish the model by building the propeller.
First Impressions: A model that can be built on several
levels of difficulty. If built with out cockpit or wheel wells and landing gear
it is suitable for the beginner. For the more experienced builder there is plenty
of detail to keep you busy.
| P-47D-20 RA Thunderbolt | Published by Orlik |
| Designer: | Lukasz Fuczek |
| Description: | WWII USAAC Fighter |

Kit: A 1/50 scale kit of the "Razorback" version of the famous P-47 "D" version. The model comes in a booklet that contains four pages of card stock A4 in size. The four sheets of card stock contain all the parts necessary to build the model. The inside cover contains a history, specifications and instructions for the model all in Polish. The inside rear cover contains a series of diagrams that will assist you in building the model. The rear cover contains four pictures of the completed model from different angles, one with the propeller and cowl off to show the detailed engine that is included. This is a very detailed model and contains a detailed engine, cockpit and wheel wells. An option is given to those that do not want to detail the models with a colored card stock canopy and a engine bulkhead that replaces the detailed engine.
Construction: If you want to detail the model, start by building the engine and cockpit. The fuselage is built using a frame for the center part and the skins applied using a connector strip on one end. Build the center frame and insert the cockpit inside the frame if you are detailing the kit. Again, if you are detailing, build the engine and glue to the front of the frame. Cut your fuselage skins out gluing the connector strips to the end and glue over the frame. Build the cowling and glue to the front of the fuselage and the rear fuselage section to the rear of the frame. Build the frames for the tail and glue to the rear of the aircraft and then cut and glue the tail skins over the frame. Build the wing frames and then build and place the wheel wells inside the wings. When finished cut and glue the wing skins over the frame and finally glue the wings to the fuselage. Build the landing gear and propeller and glue to their proper position. If you want to build the fuel tank and bombs do so at this time and glue underneath the model.
First Impressions: The second of Orlik's models and this one is just as impressive as the first one. The detailing on this model is outstanding. Card modeling experience is recommended before attempting this project.
| Saturn 1.B & Apollo 7 | Published by Hobby Model |
| Designer: | Michal Grabowski |
| Description: | US Rocket |

Kit: Even at 1/72 scale this is a very large model. It comes in a booklet much like a drawing pad that contains eight sheets of paper and card stock that are 16 3/4 " by 11 1/2 ". Seven sheets of card stock contain the parts to build the model and one sheet contains a drawing of the completed rocket. This is not a detailed diagram and due to its size is on both sides of the sheet of paper. The model consists of three parts, the basic rocket, the space ship and the escape rocket. All parts to be reinforced are marked with a "*".
Construction: First thing to do is to cut out all the parts that are marked with "*" and glue them to a heavier card stock. Start by building the bottom or main section of the rocket. Build the inside center piece and then the bottom section that will glue to the bottom of the center piece. Build and glue the rocket motors and fins to the bottom section. Cut the pieces out that make the main bottom section and glue them around the center piece and formers that are glued to the center piece. The top part of the rocket and the space ship are made up of three sections that are connected together using the former and end connector method. Build all three sections and then use the connector strips to connect these sections together. At this point you can glue this section to the top of the main section or just place it on top. Detailing is provided for the breakaway point for both the top and bottom section so they can be displayed separated. Build the attaching section to the emergency escape rocket and then build the rocket. Attach the completed assembly to the top of the rocket.
First Impressions: A very large and impressive model but the lack of instructions and detailed diagrams make it a model that is not for a beginner. The instructions are in Polish but even if you read this language they are very limited.
| Maly Kosciot Gotycki w Szczecinie Pomorzanach | Published by Modelik |
| Designer: | Ryszard Adamczewski |
| Description: | 15th Centry Gothic Church |

Kit: Another fine Church in the Modelik series. This model comes in a booklet that contains six pages of A4 card stock and paper. The four sheets of card stock contain all the parts needed to build the Church. Part of the base is located on the rear cover which makes it a total of five sheets of card stock. One sheet of paper contains views of the Church with parts marked on it and the second sheet has one of the base plates that is to be reinforced. The inside cover contains a history of the Church along with instructions for building it. Both of these are in Polish so this is no help if you can not read this language.
Construction: There are two base plates for this building. The Church appears to be built on a hill and one base plate is for the hill and the other for the courtyard and building itself. Cut the base plate for the hill out and glue to double reinforcement. Build the triangular supports for the courtyard base and glue to the base. Cut out the sides for the hill along with the stairs and glue to the base. Cut the courtyard base out from the back cover and single reinforce it, when finished glue to the triangular supports on the base. Cut the walls for the Church and glue to the courtyard base. Cut and fold the roof for the building and glue to the top of the walls. Build the tower and glue to the indicated end of the Church. Build the wall that goes around the Church and glue to the courtyard base in the indicated position.
First Impressions: A very nice looking building but the
lack of detailed diagrams and instructions in any other language other than
Polish will make this a difficult build if you do not read this language.
| Crusader Mk. II | Published by Answer |
| Designer: | Lukasz Wawozny |
| Description: | British WWII Tank |

Kit: A 1/35 scale tank that comes in a booklet that contains four sheets of card stock. The model itself comes on three and a half sheets of the card stock with the other half sheet contains pictures of other models this company has released. The front inside cover contains a history, some specifications and instructions all in Polish on one half of the page. The other half of this page contains diagrams that will help with construction. The rear inside cover contains a side and top view of the completed model with parts marked to assist in construction. There is no interior detail on this model, all detail is on the outside. Parts are included to allow you to build the turret so that it will rotate.
Construction: Cut out the formers that are located on the top half of the last card stock sheet in the booklet. Reinforce these with a heavier card stock and assemble these into the frame for the hull of the tank. Cutout the part that contains the bottom and hull sides and glue to the frame. Cut out the top of the hull and glue over the top of the frame. Cut out all the parts to build the bogies and construct them. Glue the bogies to the hull and then build your tracks and wrap around the bogies. Build the fenders that go around the top of the track and wheels and glue to the hull sides. If you want the turret to rotate then build the part that will insert into the top of the hull and bottom of the turret. Cut out, fold and glue the turret together and place or glue on the top of the hull. Build the main gun and attach to the front of the turret. Finish the model by detailing the hull.
First Impressions: Another nice 1/35 scale tank in this series.
Due to lack of instruction and diagrams, this is not a model for a beginner.
You will need some card modeling experience before attempting this model.
| Skoda Octavia | Published by Air Design |
| Description: | Rally Car |
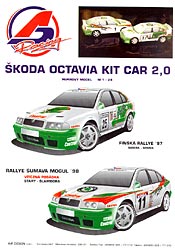
Kit: A rally car kit that comes from the Chez Republic. The kit comes in plastic wrap and contains three sheets of heavy glossy A3 paper along with one sheet that has the picture shown on one side and instructions and diagrams on the other side. Instructions are in Chez and the diagrams are kind of simple, not too much detail shown. There appears to be parts to build two different versions of the car. I thought at first it was two separate cars but there appears to be only one frame. There is no interior of the vehicle, the windows being of card stock so you can not see inside. Nor is there any detail underneath the car, the frame being black underneath.
Construction: Cut out all the parts to make the frame for the car and glue them to a heavy card stock for reinforcement. Glue these pieces together to make the internal frame of the vehicle. Cut the parts out to make the sides "this includes the windows, and glue them together" when finished glue to each side of the frame. Build the top, hood and rear of the car and glue to the frame. Build the spoiler and glue to the rear of the car. Build wheels and wheel supports and glue into the wheel wells on the sides of the car. Finish up by detailing the car as indicated in the diagrams.
First Impressions: A rather simple little car that should not require much expertise to build. The only problem I see with the construction is the lack of detailed diagrams.
| BZ-1 "Gil" | Published by Orlik |
| Designer: | Bartlomiej Kolek |
| Description: | Early Polish Heliocopter |

Kit: This model comes in a booklet form that contains four pages of A4 card stock and paper. Two pages of card stock contain all the exterior parts for the model while one sheet of paper contains the internal components to make the model. There is one sheet of paper included that has detailed diagrams on both sides to assist in construction of the model. The inside front cover has a history of the aircraft along with specifications. Instructions are on the front inside and rear inside covers but are in Polish as are the history and specifications. The inside and outside rear covers have some very nice pictures of the completed model. This is an open cockpit aircraft so there is no canopy but there is a detailed cockpit. Rotor blades can be built so that they rotate.
Construction: There are two basic parts to build in this model, the fuselage and the main rotor. Cut out all the parts on the paper sheet marked with "*" and glue them to a heavier card stock. You will now have two sets of formers, one for the fuselage and one for the rotor. Assemble the framing for the fuselage and cut and glue the exterior parts to make the fuselage. Now do the same for the main rotor blade. Build the rotor hub and attach the main rotor blades to the hub, then insert into the fuselage. If you wish the rotor to rotate do not glue, if you do not want it to rotate than glue to the fuselage. Build the tail rotor and attach to the rear of the fuselage. Build the landing gear and attach to the bottom of the fuselage.
First Impressions: A very rare and unusual model. Does
not appear to be too difficult to build and does have a nice set of diagrams
to help. Should be buildable by anyone with a modicum of card modeling experience.
This column does not cover all the new card model aircraft and ships that have been released this month. It contains only those models that have been sent to me by dealers and designers for review or that I have purchased for review. Due to space restrictions, some models sent in for review may be held over until next month.
Thanks to the following for providing kits for inspection and review:
