First Looks For the Month of November 2003
| P-51B Mustang | Published by Maly Modelarz |
| Designer: | Zbigniew Salapa |
| Description: | USAAC WWII Fighter |

Kit: A 1/33 kit that comes in a booklet. The booklet contains eight pages of A4 paper and card stock. There are four pages of card stock that contains all the external parts for the model. One sheet of formers on regular paper that is to be glued to a heavier card stock. Three pages, printed on both sides, of instructions and detailed diagrams. The instructions are in Polish but the diagrams should be enough for non-Polish readers to complete the model. This is the most detailed Maly model that I have seen. It has detailed cockpit, wheel wells and landing gear. There is no card stock canopy as the assumption is that you will use a clear canopy to show off the detailed cockpit. You are given the option of making all flying surfaces movable if you want to. Two bombs are provided that can be glued to the mounts under the wings.
Construction: Start building your model by building the cockpit. This should be done before you build the fuselage, as it must be installed as you proceed. Do not try and install the cockpit after the fuselage is built. Construction of the fuselage is of the frame and connecting strip method. This kit does not contain the connecting strips so you will have to cut these from spare card stock. Build each fuselage section with a frame and connecting strip in one end, When all the sections are finished, glue the sections together using the connecting strips. Build the wing frames and the wheel wells. Install the wheel wells inside the frame and then cut and glue the wing sections over the frame. As you do this you will be given a choice of whether or not to have movable ailerons. If so, follow the diagrams provide on how to build the aileron. Build the tail section either with movable flyable surfaces or as one piece if you do not want the surfaces to move. Finish your model by building the landing gear, propeller and spinner.
First Impressions: A very detailed model.
Most Maly models allow different levels of skill to build the model. This is
not the case in this model, you will need card modeling experience to successfully
complete this model. The detailing and printing of this model is as good as
any other card model being produced today. This is the best Maly Modelarz model
I have seen yet.
| SdKfz. 250/9 neu | Published by Answer |
| Designer: | Krzystof Okrajek |
| Description: | WWII German Half Track |

Kit: A 1/25 vehicle that comes in a booklet that contains 10 pages of A4 paper and card stock. The model comes on one sheet of paper plus six sheets of card stock. The other three sheets in the booklet are detailed construction diagrams, two of which are printed on both sides of the paper. The inside front cover contains a history of the vehicle and instructions both printed in Polish. The inside back cover contains a five view of the vehicle. This is a very detailed model, it contains the interior, the engine and all the accessories that were carried on the vehicle. The detailing of the engine and suspension appear to be outstanding. Parts to be reinforced are marked with an "*" and those to be rolled are marked with a distinctive design.
Construction: Go through the booklet and cut all the parts out that are marked with an "*" and glue them to a heavier card stock. Start building by constructing the frame. Build the suspension for the front wheels and the back tracks and mount them to the bottom of the frame. Build the engine and transmission and glue to the top of the frame. Start building the cab and gun compartment being sure to put all the details inside before gluing the roof on. You can build the doors on the engine compartment so that they open and display the engine. You can also do the same for the back door and top turret doors if you want to display the detail inside the compartment. Build the gun and traverse then build the turret around these pieces, when finished glue the turret to the top of the cab. You can build the gun so that it moves or if you do not want it to you can glue everything in place. There is quite a bit of detail inside the vehicle but if you do not want to build it you can leave all the doors glued shut. Finish up your model by building all the lights, tools and other accessories and glue to the appropriate places on the vehicle.
First Impressions: A very nice and highly detailed
vehicle. This is not a model for the beginner and you should have some card
modeling experience before attempting this model.
| USS Porter | Published by Modelik |
| Designer: | Piotr Turalski |
| Description: | WWII USN Destroyer |

Kit: A 1/200 kit that comes in booklet form. The booklet contains 13 A4 pages, eight of which are card stock, Two pages of formers on regular paper to be glued to a heavier card stock. There are four pages of detailed diagrams, three of which are printed on both sides. The other page of diagrams has instructions on building the model in Polish. The inside front cover contains a history and specifications of the ship, again in Polish. The model can be built as either a full hull or waterline model. If you decide to build the full hull version, propellers, shafts and rudder are provided.
Construction: Cut out the formers on the two sheets of regular paper and glue them to a heavier card stock. Decide if you want to build the full hull model or the waterline version and glue the appropriate formers together to make the hull frame. I recommend that you "spot glue" or "pin" the frame to a piece of wood or plastic to prevent warping as you build the frame. Cut the decks out and glue to a heavier card stock and then glue the deck to the top of the frame. After all of this dries you can remove the frame from the piece of wood or plastic as it should be strong and straight. Cut the hull sides and rear out and glue between the base and deck. If you are building the full hull model you should now glue the red below the waterline parts of to the frame. Also if you are building the full hull model you can now build the shafts, propellers and rudder and glue to the bottom of the ship. Now build the superstructure and gun tubs on the deck. Build the main guns and gun turrets and glue to the deck and superstructure. Build the 40mm and 20mm guns and glue into the gun tubs. Build the torpedo tubes and depth charges and glue to the proper position of the ship. Finish up by building the funnels and mast.
First Impressions: A very well designed
and detailed ship. This is not a model for a beginner and you should have card
ship model building experience before attempting this model. It will take time
and patience but will be one you will be proud to display.
| JAS39 | Published by PModel |
| Designer: | K. Gondou |
| Description: | Swedish Fighter |

Kit: A 1/50 scale kit that is delivered through the Internet as a PDF file. You will need Adobe Reader and a color printer to print the model out. The card stock recommend by the designer is 120 to 160g/m2. I use 90# Exact Index that is 165g/m2 and it seems to work very well. The model consists of seven pages in A4, 11.69 by 8.28 inch, in size. I recommend that you use legal size, 8.5 by 14 inch, card stock to print the model out. You can use smaller size card stock by using the "print to size" feature in Adobe but the model will no longer be in scale. All instructions are in Japanese but there are three pages of detailed instructions to lead you through construction of the model. The diagrams are numbered and you must follow these numbers as you build the model. The way that Mr. Gondou has designed these models you can not build the models in separate sections as you are normally used to. The model does not have a cockpit and the canopy is of colored card stock. The model come with a very nice stand so that you are given the choice of leaving the landing gear extended or retracted.
Construction: Construction of these models use what I call the "integrated" method. In this method you start building the model with part #1 and proceed through the last part in the kit. Each step is documented in the diagrams that are provided with the model. I can not emphasize this enough, you must follow these steps in order or you can not build the model. I recommend that you study the diagrams carefully before starting. You will start by building the forward part of the fuselage until you get to the part where the wings are attached. At this point you will glue the wings to the forward fuselage and then continue to build the fuselage from there. As you get to the rear of the fuselage you will glue the tail section into the fuselage and then continue to finish the fuselage. If you decided to build the model with the landing gear down you will now build the landing gear and wheels and glue the finished assembly into the wheel wells. Build the under wing mounts and the missiles that go on them and glue under the wing.
First Impressions: This is one of the early
models from this company. The model uses no internal formers and the diagrams
are not broken down. I just purchased their latest model, the F-20, and it has
many formers and the diagrams are much easier to follow. As you go through this
companies models you can see the growth and improvement in each model they have
produced.
| PAH-2 Tiger | Published by Modelik |
| Designer: | Janusz Oles |
| Description: | European Attack Helicopter |

Kit: a 1/33 scale kit that comes in booklet form. The booklet contains four pages in A4 format. About 1/3 of the inside back cover contains formers that are to be glued to heavier card stock. The rest of the back cover contains detailed drawing showing part locations of the model. The rear cover has a three view, which also shows part locations. The inside front cover contains a history of the aircraft along with instructions both are in Polish. The kit does contain a detailed cockpit but does not have a card canopy. It is assumed that you will build the cockpit and use some type of transparent material to make the canopy. This model is in German markings.
Construction: Construction of the fuselage is of the butt and glue method. Build each fuselage section with a former in both ends and when all the sections are done glue them together to complete the fuselage. Build the cockpit and install it in the fuselage section it belongs in before you glue the formers in each end. Build the stub wings and tail section and glue onto the fuselage. Build the landing gear and wheels and glue to the bottom of the model. Build the main and tail rotors, if you want them to rotate do not glue to the model. I recommend that you use a piece of thin wire or dowel inside the rotor blades to give them strength. Place them in their positions with a pin, wire or piece of dowel.
First Impressions: This is a very nice model with
large pieces which makes it ideal for your first card model. Follow the diagrams
and you will wind up with a model you will be proud to display.
| Pz.Kpfw.III Ausf.G | Published by GPM |
| Designer: | Grzegorz Pomorski |
| Description: | German WWII Tank |

Kit: a 1/33 scale kit that comes in a booklet. The booklet contains 16 pages in A4 format. 12 of the pages are card stock that contains the parts for the tank. Two pages of formers are printed on regular paper, these are to be glued to a heavier card stock. There are two pages, printed on both sides, of detailed diagrams that will assist in the construction of the tank. The inside back page contains a five view that shows the outside parts numbered. The model contains a detailed interior that shows the engine, transmission and crew compartment. The outside of the tank is covered with detailed accessories that really set the model off.
Construction: Start construction by gluing the formers to heavier card stock. Cut these formers out and build the frame for the hull. Build the hull around the frame and then start construction of the interior. Build the suspension and bogie wheels and glue to the bottom of the hull. Construct the tracks and position them around the bogies. Do not put the top of the hull on until you have completed the interior. Construct the engine and transmission gluing those into the hull. Build the crew compartment with all the accessories inside the hull. After you have finished the interior place the top of the hull over the interior. Do not glue this section if you want to show the interior, if you decide not to detail the interior and do not want to display it then glue the piece on. Start building the turret, this is very detailed also. Build the main gun and hatches, you have the choice of building the extended hatch for water crossing or the regular hatch. Now build the turret itself installing the gun and hatches in the turret. The hatches on the hull and turret of the tank can be left in the open position to display the detailed interior. Start building the accessories that are positioned all over the tank. There are quite a few of these and they are very detailed. Finish the model by positioning these accessories around the tank.
First Impressions: This is a highly detailed model
with a very detailed interior. There are lots of parts that can be made to elevate,
rotate or open and close. There are also many small parts that will require
good motor skills. This is not a model for a beginner nor is it one for someone
who does not have the time or patience for a model of this class.
| Seebaderschiff Seute Deern | Published by Passat Verlag |
| Designer: | Dr. Henning Budelmann |
| Description: | German Ship |

Kit: A 1/250 scale model that comes in a folder A4 in size. The inside of the back of the folder has a top view of the ship with parts marked. There are also three small detailed diagrams of different parts of the ship. Inside the folder are eight sheets of paper and card stock. Three sheets of paper printed on both sides contain basic card model building instructions, a history of the ship and a parts list. Three sheets of card stock contain all of the parts needed to build the ship. Also included are two extra sheets of blank card stock. All printing on the model is in German and I can not find anything that resembles instructions in any language. One of the card stock sheets has printing on both sides for parts that will be visible on both sides.
Construction: Construction of the ship is of standard method with the hull being built using the "egg crate" method. Cut all the formers out and glue them to a heavy card stock. Take the base and "spot" glue it to a piece of wood or plastic, this will insure a straight non-warped hull. Glue the formers to the base, then glue the decks to a heavier card stock and then to the top of the formers. Cut the sides of the hull out and glue between the base and the deck. At this point you can now remove the hull from the piece of wood or plastic. Build the super structure, masts, funnel and glue to the deck. Build the life boats and rafts and glue to their places on the deck and superstructure,
First Impressions: This does not appear
to be too difficult of a model to build but the lack of diagrams or instructions
may be a problem. Because of this it is essential that you have built several
ship card models so that you have an idea of how they go together before attempting
this model.
| Ratusz Staromiejski w Szczecinie | Published by Modelik |
| Designer: | Ryszard Adamczewski |
| Description: | 15th Century Church? |

Kit: I am not sure but I think this is a Polish church as it looked in the 15th century. Looking at the description, it is in Polish, I think it was originally built or started in the 12th century. The model is in 1/150th scale and comes in a A4 booklet. The booklet contains 12 sheets of card stock that contain all the parts to build the model. There are diagrams on the inside and outside of the rear cover to assist you in construction of the model. History of the building and instructions on how to build the model are on the inside of the front cover, both are in Polish. All the parts to be reinforced with heavier card stock are marked with a star.
Construction: First thing to do is to cut out and glue all parts with a star to heavier card stock. Cut out and glue together the base, the building will then be built on this base. Cut out the four walls and glue them to the base. There ar many windows areas that will be cut out and then there are actual windows that have been glued to the heavier card stock will be glued behind the cutouts. Cut out the roof and glue to the walls. Now build the facades that are on each end of the building and glue to the open ends of the roof. Build the extensions with windows that go on the roof of the building and then build the chimney and glue to the top of the roof.
First Impressions: The building does not
seem to be that difficult to build but I am concerned by the lack of diagrams.
The instructions are in Polish which may be enough for Polish readers to build
the model but the lack of diagrams will defiantly be a hindrance to non-Polish
readers.
| Jak-52 | Published by Hobby Model |
| Designer: | Michael Grabowski |
| Description: | Russian Trainer/Sports Plane |

Kit: A 1/33 scale kit that comes in a booklet that contains four A4 pages. Two of the pages are card stock that contain parts to build the model. The other two pages contain diagrams to help you through the construction of the kit. One of the two paper pages contains the template to make the transparent cockpit as well as wheel and propeller parts .Landing gear is fixed on this aircraft so no wheel wells are provided but the landing gear is quite detailed. A detailed cockpit is provided.
Construction: Construction of the fuselage uses two different methods. Part of the fuselage is built using the butt and glue method while the other part is built with the connecting strip former method. Cut and glue the formers to a heavier card stock. Before beginning to construct the sections build the cockpit. As you build the sections install the cockpit inside the indicated fuselage section. Build your fuselage sections using the method indicated and when finished glue the sections together to complete the fuselage. Cut out the wing spar and ribs and glue them to a heavier card stock. Glue the completed wing frame to the fuselage and then cut, roll and glue the wing skins over the frame. Do the same for the horizontal and vertical tail. Build the landing gear and propeller and glue to their proper positions. Finish your model by using the template provided to cut out a transparent canopy and gluing it over the cockpit.
First Impressions: Hobby Model classifies
this model as requiring a skill level of a one on a scale of three. I agree
and recommend this model for builders of any skill level.
| ORP Burza | Published by Maly Modelarz |
| Designer: | Zbigniew Salapa |
| Description: | 1930's Polish Destroyer |
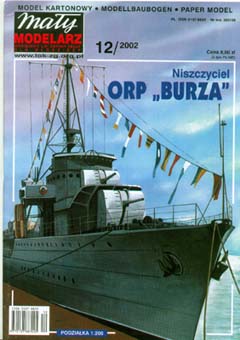
Kit: This 1/200 scale kit is of a destroyer that was built in the mid 1920's to the late 1930's and is now a museum ship in Poland. The kit comes in a booklet that contains 10 sheets of A4 stock. Eight of the sheets are card stock that contain the parts to build the model. The other two sheets are printed on both sides and contain the instructions to build the model along with detailed diagrams of different parts. All instructions are in Polish. Non-Polish readers will be dependent on the diagrams for assistance as they build the model. The bottom of the inside cover contains a diagram showing the construction of the hull. The kit contains parts to build either a full hull or waterline version of the ship. Parts are provided to build the shafts and propellers if you decide to build the full hull version.
Construction: Construction of the model is of the standard method used in construction of almost all card ship models. Decide if you want to build the waterline or full hull model and then cut out the formers needed to build the version that you decided on. Glue these formers to a heavier card stock to give them strength. Now glue the vertical and horizontal formers together to complete the frame. It is recommend that the formers be spot glued to a piece of wood or plastic to prevent warping. Cut the deck parts out and glue them to a heavier card stock and then glue the decks to the top of the frame. Cut the hull sides out and glue between the base and deck. At this point you can now remove the hull from the wood or plastic that you had spot glued it to. Build the superstructure and glue to the deck then build the turrets and gun tubs and glue to the deck and superstructure. Build the funnels and masts and glue to the deck and superstructure. Build the depth charge racks and depth charges and glue to the rear of the ship. If you built the full hull version build the shafts, propeller and rudder and glue to the bottom of the ship.
First Impressions: The model that I received
has some printing problems. The grays, particularly the dark gray of the deck
is not evenly colored. All other colors seem to be just fine. This is not a
model I would recommend for the beginner. You should have some card modeling
ship building experience before attempting this model.
| sIG-33 | Published by Answer |
| Designer: | Krzysztof Okrajek |
| Description: | 1933 Field Piece |

Kit: This 1/25 scale kit comes in a booklet that contains six pages. Three and a quarter of the pages are card stock and contain all the parts to build the model. The other three quarters of the card stock page contains a diagram of the carriage and shells with parts marked. Two pages contain detailed diagrams that will help with the construction of the model. The inside front cover contains a history of the gun along with instructions on how to build the model. All of this is in Polish so if you do not read this language, you will be dependent on the diagrams as you build the model. Parts to be reinforced with heavier card stock are marked with "*".
Construction: Cut out all the parts marked with "*" and glue to a heavier card stock. Start by building the gun carriage. Mount the axle through the carriage and then build and mount the wheels onto the axle. Build and mount the elevating wheel and other accessories for the carriage, Build the gun and breech and mount it to the carriage. Build the shield and mount it around the gun and carriage. Finish the model up by building the accessories, pick and shovels as well as the other parts, and glue them to the front of the shield.
First Impressions: An unusual model that contains many
small parts. You will need a steady hand and a good pair of scissors to finish
this model. The model does not appear too difficult to build if you have the
ability to cut out the many small parts.
| Willys Jeep | Published by Modelik |
| Designer: | Waldemar Rychard |
| Description: | WWII US Utility Vehicle |

Kit: This 1/25 vehicle kit comes in a booklet that contains 10 pages in A4 format. Six sheets are card stock, five of these sheets contain parts to build the model and the other sheet detailed diagrams. Two sheets of parts for the jeep are on regular paper. One sheet of the card stock and two sheets of the regular paper contain detailed diagrams on how to build the different parts of the jeep. The inside back cover contains a five view of the completed vehicle marked with the location of parts. The inside front cover contains a history, technical information of the jeep and it also contains instructions on building the vehicle. All of these are in Polish so non-Polish readers will be dependent on the diagrams when building the vehicle.
Construction: This is a very detailed model and the diagrams seem to indicate that the model should be built in subassemblies and then the entire model constructed from these subassemblies. Build the engine and transmission and the radiator. Then build the spring assemblies and windscreen. Build the jerry can and shovel/axe along with their mountings. Build the seats, axles, instrument panel and wheels. Now we are ready to start building the vehicle; build the frame of the jeep and mount the springs to the frame. Mount the engine and transmission to the bottom of the frame. Glue the axles to the springs and then the wheels to the axles. Build the engine and passenger compartment. Add the seats and instrument panel into the passenger compartment. Add the steering wheel, clutch and brake pedals to the inside of the passenger compartment. To the outside of the jeep now add the jerry can, spare tire and the shovel/axe along with their mounting.
First Impressions: This is a very detailed model
and not one that I would recommend for the beginner. If you do decide to build
this model make sure that you have the time and patience to do the model justice.
This is a model that you will be proud to display once it is finished.
| IJN Nagatsuki | Published by GerMir Models |
| Designer: | Grzegorg Nowak |
| Description: | Japanese Mutsuki Class Destroyer |

Kit: This 1/200 scale kit comes on a CD. When you get the CD you will be able to view the instructions and pictures but will not be able to print the model. The CD comes with a "Data Viewer" that must be used to print the files out. In order to print the file you must register the kit, to do this click on the registration button when the data viewer first comes up. This will send out an email to GerMir and in a couple of hours a key file will be mailed to you. Copy this key file into the GerMir directory and you will now be able to print the model out. The CD contains the following; three pages of history of the ship, three pages of assembly instructions. There are 17 pages of photos showing the construction of the model and 10 pages of photos of the completed model. Parts to build the ship comes on nine pages of card stock and two pages of paper. You can make the model as either a waterline or full hull model.
Construction: The hull of the ship is built using the standard egg crate method. Cut all the parts out that are on the two sheets of paper and glue them to a heavier card stock. Take the base plate and spot glue it to a piece of wood or plastic. Glue the horizontal and vertical formers to the base plate, using the wood or plastic will prevent the hull from warping in this stage of construction. Cut the decks out and glue these parts to a heavier card stock and then glue the deck to the top of the formers. Cut the hull sides out and glue between the deck and base plate. At this time you can remove the hull from the wood or plastic you spot glued it to and it should be straight with no warps. If you decide to build the full hull model you can now glue the formers to the bottom of the base plate and glue the red hull parts over the formers. You can now build and glue the propeller shafts and propellers to the bottom of the ship. Build the superstructure of the ship and then the guns and torpedo tubes to be mounted on the deck and super structure. Finish the model off by building and gluing the funnel and lifeboats to the deck.
First Impressions: Another great model from GerMir.
They seem to be concentrating on the unusual and rare models that other companies
have not done. These add much to any ship collection. Not a model for a beginner,
some card modeling experience is recommended.
| Zamek Breznice | Published by Betexa |
| Description: | 13th Century Gothic Fortress |
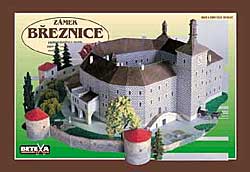
Kit: This model comes in a booklet 12.5 by 8.5 inches in size. The booklet contains 10 sheets of card stock that contains the parts to build the model. Betexa has included the history of the building along with instructions in three different languages. They are Czech, English and German. You may want to copy the history and instructions before starting the model as they are on the back of a sheet of parts. You might want to look through the booklet and see if you want to keep any of the great pictures. Betexa puts all text and pictures on the back side of the model parts so if you do not copy them they will be gone once you build the model.
Construction: Cut out the two parts that make up the base plate and glue them to a heavier card stock and glue the two parts together. Build the inner courtyard which includes the arcades, passageways and walls. Build the outer walls then proceed to build the roofs over the inner and outer walls. Build the main tower and attach to the outer wall. Build and add the chimneys to the indicated places on the roof. Build the bastions around the fort connecting them with the ramparts. Finally build the fountain and glue it into the inner courtyard. Betexa suggests that you go to a model train store and buy ground and lawn material along with model trees to place around the model. Pictures in the booklet show how well these set off the model.
First Impressions: Another great architectural
model by Betexa. With the instructions in three languages and the great diagrams
and pictures throughout the booklet, this should be buildable by anyone no matter
what card modeling experience you have.
| Shimakaze | Published by JSC |
| Designer: | Marian Katny |
| Description: | Japanese WWII Destroyer |
Kit: Another 1/400 scale kit from JSC. This kit comes in a booklet that contains two sheets of card stock that contain the parts to build the model. Instructions and history of the ship are contained on the inside of both the front and back covers. The back cover has a side and top view of the ship with the location of parts marked. There are also several detailed diagrams of specific parts on the back cover.
Construction: JSC uses a slightly different method of building their ship hulls. There is no base plate, to construct the frame you cut out the two main parts and fold them so that it forms a base for the deck and sides of the hull. You then glue the horizontal frame pieces to the deck and side portion of the frame. The problem you have with this method is that the position markings for these frames are on the opposite side of where the frame goes. When you get done you have a frame that has no base and the horizontal frames are exposed from the bottom. Cut the deck and hull sides out and glue them to the frame. Build the superstructure on the deck and then add the funnels. Build the gun turrets, torpedo tubes, gun tubs and anti aircraft guns and glue them to their proper places on the deck and superstructure. Add the masts and searchlights and you have finished your model.
First Impressions: A nicely done model
that will not be too difficult to build. The only warning I will give is that
just because you have built card model ships, do no assume that you know how
to build a JSC model. Because of the way that they build the hull frame, it
is a new learning experience if you have never built one of their ships before.
| Okz32 | Published by Answer |
| Designer: | Adrian Wandtke |
| Description: | Polish Steam Locomotive |

Kit: A 1/45 scale kit that comes in an A4 booklet. The booklet contains 14 pages, four pages printed on both sides that contains detailed diagrams on how to build the model and the other 10 pages contain the parts to build the model. The inside front and back covers contains the history of the locomotive, instructions and pictures of the completed model. All of these are in Polish so Non-Polish readers will be dependent on the diagrams for help in building the model. The model has a very detailed set of drivers and wheels as well as a detailed cab. Parts to be reinforced with heavy card stock are marked with "*" or for double reinforcing with a "**"
Construction: First thing to do is to cut all the parts out marked with "*" or "**" and glue them to a heavier card stock. Start by assembling the basic frame for the engine. Start building the suspension, drivers and wheels. When finished glue these to the frame. On one of the diagram pages there are diagrams showing sizes of rods that need to be cut to assemble the driver section. These along with the wheels can be made movable if you so desire. Build the cab section and the coal section and glue both of these to the frame. Build the boiler section along with the stacks that are on top and glue to the front of the cab and frame. Finish the model by building the lights, connectors and gluing them to their proper places on the locomotive.
First Impressions: This model is not very
intuitive. It might be clearer to someone with more knowledge of locomotives
then I have. Looking at the model and the diagrams that are provided, I see
this as a very difficult build. As I have said it might be easier for someone
who has a working knowledge of locomotives.
| Horsa | Published by Fiddlers Green |
| Designer: | Chip Fyn & Kancho Iliev |
| Description: | British WWII Glider |

Kit: Determining the scale of the kit I received is a little difficult. FG bases their scale on what they call the WSAM which is about 1/60 scale. This aircraft is 90% of WASM which is not to difficult to figure out but they provided only the large aircraft for download and the scale is for their regular size models. This model is available as a download from FG. When you purchase the model you will get the regular, large and a non-colored version. The large version I got prints out on five sheets of 8/12 by 11 inch card stock. The regular version will need less sheets of card stock. The files are provided to you in Adobe PDF format so you will need Adobe reader to print the models out with. You will, of course, need a color printer and some card stock also.
Construction: Fiddlers Green aircraft models have no internal formers. The shape of the model is determined by the design of each piece and the folding and bending you do as you assemble the model. Each fuselage section contains tabs on each end that will be used to connect the section to the next section of the fuselage. There is also a tab that runs along one side that will be used to glue the fuselage tube together. Cut out the four sections that make up the fuselage. Glue and shape the cockpit section and the other three sections and then glue the sections together to make the complete fuselage. After you get the fuselage sections glued together cut the indicated section out on the top. Then cut the wings out and fold them together and glue to the cut out section. Cut out and fold the tail pieces and glue them to the rear of the aircraft. Cut out and fold the struts for the tail and landing gear. I recommend that you use a piece of flat toothpick inside these to give them strength. Glue the struts to their proper places, then build the wheels and glue to the landing gear struts.
First Impressions: A model that we have not previously
seen in card and one that would be a good first model for someone learning how
to build card models. I would recommend that you get the smaller size rather
than the large size provided over the web. FG's models, since they have no internal
support lend themselves to the small models rather than the large ones.
This column does not cover all the new card model aircraft and ships that have been released this month. It contains only those models that have been sent to me by dealers and designers for review or that I have purchased for review. Due to space restrictions, some models sent in for review may be held over until next month.
Thanks to the following for providing kits for inspection and review:
