
Photos by the author


Tools
-----
My standard toolset: scissor, nail scissor, tweezer, steel rulers, platic
ruler, compasses (to score), different steel bars (to form), cutter and some
crayons (to color the cutting edges) small brush and opaque white (is not shown).
Hull
----
As most german ships, the construction of the hull is egg-crated and straight
forward. Only 15 parts form the framework. To
enhance framework, I added a wide strip of extra card on top of it.
The transom is applied as described. The forming of the side parts is
slightly difficult. I scored the part from the 6 cm from the rear at the
boundary between white and black. Then I molded the lower black part
according to the ribs. In contrary to my habit I applied the side parts (18,19)
before the deck (17). The join of 18,19 with transom (16) needs some trim
and coloring the cutting edges.


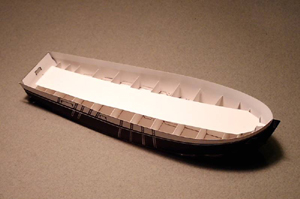


On both sides there was a small gap between the deck and the side parts. After applying some UHU (normal) to fill the gap I used some opaque white for retouching.
The handrail (20) needs some carefulness. I first glued the small straight part onto 16. Then, starting with the left side, I applied glue on the bottom side of 20 and striped it from stern to bow. Some irregularities up to 0.5 mm in shaping the hull's side (18,19) can be fixed with the hand rail.
Superstructure
--------------
Building the superstructure, cabin(21), skylight(22), hatchcover(23) and a hatchway(24),
is elementary.
For all masts, booms and beams I used UHU-hart to glue them together. Furthermore I used several thin wires(0.3mm), which I dipped into the UHU-hart, to stregthen the main mast and the bowsprit. Next time I will use a wooden core instead, because the wires were not strong enought to keep the mast straight.
The jib boom(26) with the bowsprit(27) have their base on the post (25). The mounting (29, 29a) for the both anchors (30,30a) run from (25) to the handrail. The main mast (31) is glued on the main decks marking. Keep the mast perpendicular to the base (not to the deck !). The belaying pin rail (32, 32a, 32b) will be applied around the base of the main mast.
The dolphin striker (44), which I made out of a toothpick, is applied under the bowsprit. Finnaly, the lifeboat (45, 45a, 45b, 45c) is simple. Form the main part (45) in boats shape before gluing it at both ends. The boat will be applied with two short threads under the cathead (29).


Rigging and Sails
-----------------
First I did all standing rigging. Due to the much slanted main mast I have to shorten
the main and the top sail to get a reasonable view again. After applying all sails, I give
the model one night to rest. At last, the running rigging and the flags are applied.
Full rigging is a hard work. I choose a relatively simple rigging, due to the simplicity of the cardwork. So I did only the essential standings and very few running rigging.


 >
>


Conclusion
----------
Although it is a simple model, the result is a nice little ship. You may enhance the model
on every step, depending on personal skills. I would recommend it to all beginners.
Summary:
| Model: | Gr�nland |
| Kit: | Deutsches Schiffahrtsmuseum Bremerhaven 1993 | Scale: | 1/100 |
| Difficulty: | Easy, rigging may become difficulty |
| Number of Parts: | 3 pages with approximately 50 parts |
| Instructions: | German description |
| Diagrams: | One photo of the original ship, only one overview schema |
| Fit: | Good |
| Coloring and Artwork: | Simple, but good enough |
