
First Looks For the Month of May 2003
| B-29 Superfortress | Published by GPM |
| Designer: | Grzegorz Pomorski |
| Description: | U.S.A.A.C. WWII Heavy Bomber |
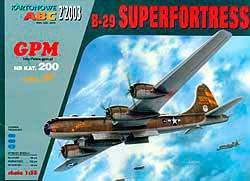
Kit: This 1/33 scale model is a re-release of an earlier GPM model. GPM has, over the last several years, been bringing all of their models up to present day standards. The model comes in an A3 booklet that contains 14 pages of card stock. There are two pages of formers on regular paper that are to be reinforced before installation. One page of history and instructions are supplied in Polish. Two sheets of diagrams are provided and one sheet of different parts of the completed model. A very detailed model with complete cockpit, wheel wells and bomb bays. The pressurized tunnel that allows movement from the front to the back of the aircraft is in the kit. The bomb bays can be left open and bombs are provided to be mounted in the bays. All clear sections are provided printed on card stock so you do not have to worry about the cockpit if you do not want to build it.
Construction: Start the construction with the fuselage, deciding if you want to detail the model first. If you are going to detail then build the cockpit and bomb bays. Then start building the fuselage sections. Most of the sections are built using the former connecting strip method. In this method you glue a connecting strip in one end of the section, roll and glue the section together and then glue a former in the end that contains the connecting strip. When the sections are completed glue the cockpit, bomb bays and wheel wells into the proper sections. Then glue all the sections together to complete the fuselage. Cut the formers out for the wings and assemble them through the fuselage. Cut and form the wing skin and glue around the wing formers. Build the four engines using the same techniques you used in building the fuselage and glue to the wings. Cut the reinforced tail formers and glue to the rear of the aircraft. Cut and form the tail sections and glue over the tail formers. Construct the landing gear and wheels and glue into the wheel wells. If you have left the bomb bays open, build the bombs and mount them into the bomb bay.
First Impressions: A very large model but one that gives you the option of how much detail that you want to put on the model. You can leave the bomb bay closed and use the card colored canopy to make a simpler model. If you want to spend the time detailing the model there is lots of detail to keep you busy for awhile.
| M997 Oshkosh | Published by Fly Model |
| Designer: | Piotr Mazurek |
| Description: | 8x8 Hemitt MLRS or Patriot Launcher |
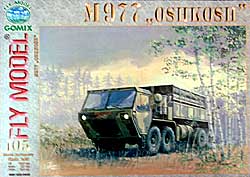
Kit: This 1/33 model comes in a A3 size booklet that contains nine sheets of colored card stock. Also included are two sheets of parts on regular paper, one sheet that contains the history and instructions and one sheet with a top and side view of the vehicle. Since the instructions are in Polish the three pages of detailed diagrams will be invaluable for those who do not read Polish. The model includes a detailed engine and transmission system as well as detailed suspension. The cab provided is quite detailed and there is a crane that is used to range the missile box provided. The missile box has six missile tubes inside it. Crane and missile box can be built to move if you so desire.
Construction: Start construction by building the frame of the vehicle. Build the engine, transmission and suspension systems and glue to the frame. Build your wheels and axles and glue to the bottom of the frame. Build the cab using both the inside and outside parts and then detail the inside of the cab with seats and controls for the vehicle. Cut the parts out and build the crane determining if you want the crane to move. Crane can be made to move both vertically and horizontally and you can use thread to represent the wire that attaches to the missile box. Finally build the missile box again determining if you want the box to be able to be elevated or fixed in one position.
First Impressions: A very nice looking kit that is quite detailed. Not a model for a beginner or for one who does not have the time to do the model justice.
| Roma | Published by GPM |
| Designer: | Grzrgorz Pomorski |
| Description: | Italian WWII Battleship |
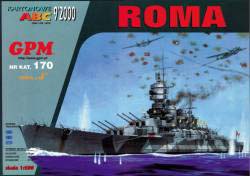
Kit: This 1/200 model comes in an A3 booklet. The booklet contains 15 pages of colored card stock, five sheets of formers to be reinforced and one sheet of formers on card stock. There is one page of history and instructions in Polish. Four pages of detailed diagrams are provided which will be particularly helpful to those who do not read Polish. The model can be built as a full hull or waterline model. Gomix carries several accessory sets for this model, A gun set that contains all 33 guns for the ship. A package that contains the masts and another package that contains the shafts. Kit contains two aircraft to be mounted on the aft catapult. All guns can be made to rotate and elevate. Forward part of the deck is very striking with the standard Italian red and white stripes.
Construction: Before starting construction decide if you want to build the full hull or waterline version. Now cut out the base plate, deck and formers that are needed for the version you intend to build and glue to a heavier card stock. Glue the reinforced horizontal and vertical formers to the base and then the deck to the top of the formers. Cut and glue the sides of the hull between the base and deck sections. If you are building the full hull version, cut the red below the waterline parts out and glue to the base and bottom formers. Build the superstructure parts and glue them to the deck. You have a choice of whether or not you want the guns to move or just build them in a fixed position. Build the three main gun turrets, four secondary battery turrets and anti-aircraft guns and glue to the correct position on the deck. Build the lifeboats, catapults and aircraft and mount on the deck. Finish your model by adding all the many detail parts that go all over the ship.
First Impressions: As with most of the other GPM ships I have seen this is an outstanding model. Not a model for a beginner, the builder should have card modeling ship building experience before attempting to build the model. Also you will need patience, as the model will take some time to finish.
| Nowy Wisnicz | Published by GPM |
| Description: | Chateau |
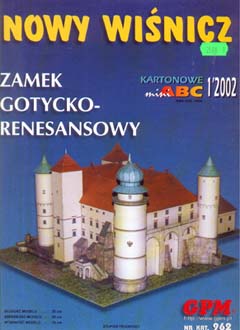
Kit: This 1/200 scale model comes in an A4 booklet that contains 12 pages of card stock. Also included are four pages of regular paper which are to be reinforced with heavier card stock. A page of instructions which are in Polish are provided. A page and a half of detailed diagrams are provided as a building aide. There is also a full page of color pictures of the finished model which will give you an idea of what the model should look like. There is a two page base provided on which the building will be mounted. The base has the brick and grass coloring.
Construction: Cut the base and the reinforced formers out. Glue the four former sides together that make the main building and then glue to the base. Glue the former for the base of the roof onto the main wall formers. Now cut the four formers that make the main roof out and glue to the base of the main roof. Then do basically the same thing to the smaller building that is attached to the main building side. Cut the sides and roof pieces out and glue to the frames that you just constructed. There are three round towers and two square towers that now are built and attached to the sides of the main building. Build the entryway and associated towers and glue to the front of the chateau and base.
First Impressions: The colors and marking on this model are outstanding. I am very impressed with the detail, which is down to the individual brick. This model has many parts and will take time and patience to build.
| 1:32 Trailer | Published by PK Graphica |
| Designers: |
Petr Knotek |
| Description: | Western-themed trailer |
| Reviewer: | Neil Linnell |
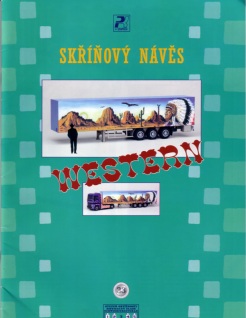
Kit: There is something a little bit odd about a European-style trailer with a mural of the American west on it's panels; one wonders if such a truck really exists. Regardless, this is a very nicely designed trailer model to match up with any 1/32 scale tractor model. The model is presented in booklet form with 6 pages of parts and construction diagrams on the inside cover. Instructions are in Czech but do give an indication of construction order.
Construction: Construction begins by building the trailer box.
Next, the trailer frame is built and attached to the trailer box. The wheels
are built and added, and final details finish the model. When complete, the
trailer will be around 17 inches in length.
First Impressions: A colorful and distinctive trailer
model, well designed and printed. An excellent choice to add to your favorite
tractor model.
PAH-2 Eurocopter - Tiger
Published by Tanie Hobby
Description:
Italian built Attack Helicopter
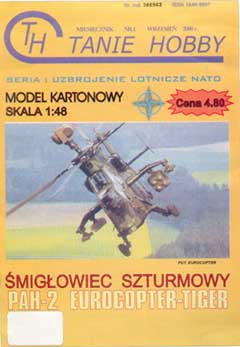
Kit: This 1/48 model comes in a booklet. Its size is A4. The model is on three pages of card stock. Instructions are in Polish but there is about half a page of diagrams which are detailed enough to lead you through the construction of the model. I have reviewed several of Taine's models before and have not liked the printing and coloring on the models. This is the first of their models that I have seen that the quality of the printing and coloring are acceptable. The only problems I see with this model are the German markings. The German cross looks as if it was hand drawn and is uneven. This model has a great deal of detail. This includes complete cockpits, rocket launchers and guns. The rotors can be made so that they will rotate. A card stock colored canopy is provided if you do not wish to detail the cockpit.
Construction: Cut all the formers out that are on the back cover and glue them to a heavier grade of card stock. Now assemble the formers to make the internal frame of the helicopter. If you wish to detail the cockpits do so at this point before skinning the model. Cut the outer skin of the model out and glue over the frame. Cut the parts out to build the tail section and glue to the rear of the model. Cut and glue the rotor blades over the frames that you reinforced previously and assemble the main and tail rotors. You can now decide if the rotors are to rotate or if you want them to stay in one place. Build the wheels and landing gear and glue to the bottom of the model. Build the stub wings, engines and rocket pods and glue to the side of the model.
First Impressions: Taine models have as much if not more detail than most of the 1/33 scale card models. Because of this these models require that you have card model building experience before you attempt to build them.
| Molt Taylors Aerocar | Published by Fiddlers Green |
| Designer: | Chip Fyn & Kancho Iliev |
| Description: | Combination Aircraft/Car |
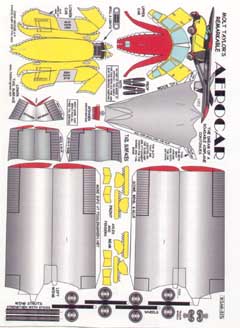
Kit: This model is available in two different formats. I received my copy across the Internet in PDF format but you can also purchase the model already printed. The model prints out on one sheet of 8 1/2 by 11 inch card stock. Included also is one sheet of instructions and history on another 8 1/2 by 11 inch paper. If you elect to get the models across the Internet you will need Acrobat reader and a color printer to print the model out on. This is a very colorful model, the car being done in yellow and a reddish brown. The wings and tail section are silver with the reddish brown tips. The model can be displayed in its flying mode or towing the wings and tail section.
Construction: Cut the top and bottom of the car out and using the tabs, glue each section together. When you have finished getting the shape correct on the sections glue the two sections together. Cut and form the axles and fenders out and glue to the sides of the car body. Cut the wheels out and glue them together, when finished glue the wheels inside the fenders. Cut and glue the grill and lights to the front on the car. Cut, roll and glue the rear fuselage section out. Now decide if you want to display the model with the wings in the flying position or as a trailer. If flyable, glue the fuselage section to the rear of the car. Build the wings and tail section and glue in the flyable position. If you want it in the tow position then fold and glue the fuselage, wing and tail section and attach to the rear of the car.
First Impressions: A great model for the beginner. Also would be a great project with your children or in a school setting.
| Santa Cruz Lighthouse | Published by Fiddlers Green |
| Designer: | J. Cookson |
| Description: | Lighthouse located on the coast of California |
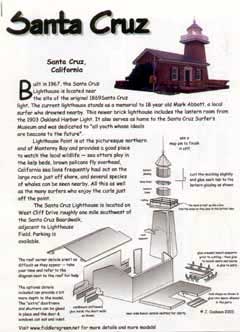
Kit: Another of the lighthouse series that is being published by Fiddlers Green. The model is available in either a printed format or downloadable across the Internet as a PDF file. The model I received was in the PDF format. If you get your model this way you will need Adobe Reader and a color printer to print the model out. The model is printed on one sheet of 8 1/2 by 11 card stock and comes with a sheet of paper that contains a history of the lighthouse as well as the instructions to build it. There is a detailed diagram on this sheet that shows how the parts are glued together.
Construction: Cut the walls out for the attached building and glue cardboard stiffeners where indicated. Cut, fold and glue the roof on top of the walls. Cut out the base of the tower, fold and glue the base together. When finished glue the base to the building. Cut and glue the deck and railing to the top of the tower base. Now build the lantern starting with its base working up to the glazing. Glue the roof of the lantern on top and finish with a pin to simulate the rod on top of the tower. Build the porch on the front of the building then finish up by building the benches and seats to the porch.
First Impressions: This is only one of a series of lighthouses across the coast of the U.S. What a great series to use to teach the history and geography of the U.S. The lighthouses are simple enough to be used in any grade.
| A-1 Skyraider | Published by Fly Model |
| Designer: | Tadeusz Grzelczak |
| Description: | USAF Vietnam era Ground Attack Aircraft |

Kit: This 1/33 scale aircraft is a re-release from Gomix/Fly Model. The model comes in an A3 booklet that contains three pages of colored card stock. There is a page of formers to be glued to a heavier card stock, which will give the aircraft internal strength. There is a brief set of instructions in Polish but you are provided with two sheets of very detailed diagrams. A detailed cockpit and wheels wells are provided. The dive brakes can be built either extended or against the fuselage, if you want further detail you can build the brakes so they move in and out. There is no colored card stock canopy but they do provide a template that will allow you to construct your own either out of card stock or transparent material. Gomix does provide a vacuformed canopy that will improve the looks of the completed model. The model is colored in standard Vietnam camouflage and has South Vietnamese markings.
Construction: Start by building the internal formers for the fuselage. The formers are built in two sections, forward and aft which are glued together after they have been skinned. The cockpit is built and installed in the forward section before you add the outer skin. Be careful as you skin the front part of the forward section as this is where you will build the intake and exhausts. The aft section takes a little finesse, the top of the skin near the fin must be cut and shaped to give the correct shape as the fuselage forms into the fin. Dive brakes and tail hook will be built and attached to the bottom of the aft section. After you have glued the two fuselage sections together, build the cowling and attach to the front. Build the wing frames, deciding if you want the wings folded or extended. Again if you are adventurous you can build the wings so that they move from the extended to folded positions. Build and insert wheel wells inside the inner part of the wing and then glue the outer skin to the wing. Build the frames for the tail section and glue the outer skin to the frame. Build the landing gear, wheels and propeller and glue to the proper position. Center line fuel tanks and bombs are provided and you can now build and attach these to the model.
First Impressions: One of the first Polish card models I built. It makes into a very impressive model. The shaping of the rear fuselage and intakes and exhaust on the forward section is the most difficult part of building this model. I would recommend previous card modeling experience before attempting this model.
| Baranow Sandomierski | Published by GPM |
| Description: | Polish Renaissance Castle |
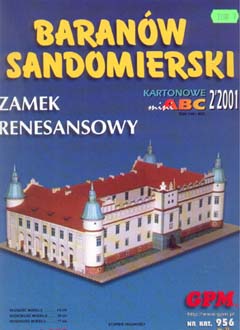
Kit: This model comes in an A4 booklet that contains 12 papes of card stock. Four pages of formers to be glued on to a sturdy card stock are provided. Two pages of diagrams are provided as well as a page of color photos of the completed model. There is about a page of history and instructions in Polish. Printing and coloring of the model is of the same high quality as all the GPM models that I have seen. A two page base is provided to display the model on.
Construction: Cut the base of the model out. Cut all the formers provided out and glue to a sturdy card stock. Start by building the inner walls of the courtyard. This consists of cutting out a lot of arches. Build the four outer walls and the four towers that glue to the point where the walls connect. Once the inner and outer walls are glued to the base build the entrance tower. The tower goes through the tower with the tall section on the outside of the wall. Now glue the roof formers on the top of the walls and then cut and glue the roof sections over the formers. There are a number of chimneys that need to be built and glued on all four of the walls. Build the skylights and position them on the four walls as shown in the diagrams. Finish the model by cutting and placing the decorations on the top of the front and back walls.
First Impressions: A very impressive model that will take time and patience to build. I would not recommend you attempt this model unless you have the time to put the effort into the model that it deserves.
| P-51D Mustang | Published by Halinski |
| Designer: | Marcin Grygiel |
| Description: | WWII USAAC Fighter |
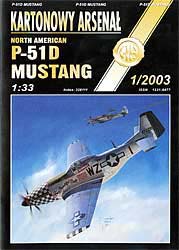
Kit: Halinski releases their models in a slightly different size than most card modeling companies. This booklet comes in a size that is slightly larger than A4 that contains four pages of colored card stock. There are two pages of formers on regular paper to be reinforced with a heavier card stock. Five pages of detailed diagrams are provided, all shadowed so that you can see the inside and outside of each piece. A detailed cockpit and wheel wells are provided. There is no card stock canopy provided as you are expected to have a transparent canopy on the model. Halinski makes a vacuformed canopy for the model but sadly it is not available in the U.S.. A template is provided so that you can make your own canopy. The printing on the model is a very nice glossy silver to give the model a metallic look.
Construction: Start this model by building the internal parts first. Build the cockpit and wheel wells, both of which are very detailed. Build the canopy and nose section along with the propeller. After you have finished the interior detail then start building the fuselage itself. Glue the skin around the completed cockpit you built in the step before. Build the frame for the rear fuselage section and then the frame for the tail section and glue to the rear section. Skin the rear section and the tail. Glue all the fuselage sections together. Build the frames for the wings, installing the wheel wells inside the frames. Cut and roll the wing skin around the frames and glue. Glue the completed wings to the fuselage. There are either fuel tanks or bombs that can be built and glued to the bottom of the wing.
First Impressions: Another wonderful model from Halinski. The interior detail of this model is awesome. Not a model for the beginner, the detail provided makes card modeling experience a necessity.
| Bf 109Z "Zwilling" | Published by DeWayne Barnett |
| Designer: | Marek Pacynski |
| Description: | Twin Fuselage version of the Me 109 |
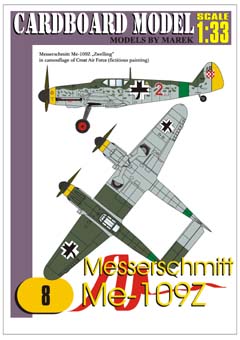
Kit: This 1/33 kit is the latest effort by Marek Pacynski. It continues his fine line of 1/33 models and is an unusual model with fictitious markings. This model was delivered to me by DeWayne Barnett in PDF format. You must have Adobe reader, a color capable printer and suitable card stock to print the model out. The model has a cover sheet, a sheet with a history of the aircraft, a sheet of diagrams and six sheets of parts for the model. Model has a detailed cockpit and wheel wells. A card stock canopy is provided but if you want to see the cockpit you will have to cut the blue parts of the canopy out and glue some type of transparent material in there. A bomb is provided to be glued to the center section of the wing.
Construction: You will build two almost identical fuselages. The only difference is that one of the fuselages will have the cockpit and canopy while the other will not. The fuselage is built using the butt and glue method. Build all the fuselage sections with formers in each end. Build and install the cockpit in the proper section. After the sections are finished glue the sections together to make the complete fuselage. The wing is built in three sections, the mid section and two outboard sections. Cut out and reinforce all the interior wing formers. Cut the skin for the wings and the parts for the wheel wells out. Glue the wheel wells into the wings before gluing the skin over the formers. Cut the formers out for the tail section and then cover the formers with the skin. Glue the rudders on and the elevator between the two rudders. Build the bomb and propellers for the model and glue to the proper position.
First Impressions: A very unique aircraft that will add to any collection. This aircraft is quite detailed and I would recommend card modeling experience before you attempt to build the model.
| Mig 17F | Published by Digital Card Models |
| Designer: | Gabriel Panait |
| Description: | Soviet Designed Jet Fighter |

Kit: This 1/72 kit was provided to me by Digital Card Models in PDF format across the Internet. The model will also be available on CD. In either case you will need an Adobe reader, a color printer and proper weight card stock to print the model out on. The kit contained two sheets of card stock that contains the two versions of the model. One sheet of diagrams and a sheet that contains the directions and parts to build the landing gear and cockpit. Parts are provided if you want to detail the cockpit and make a transparent canopy. There are no wheel wells, the landing gear is glued to the bottom of the wing. Two separate versions of the model are provided, An Egyptian version and a Vietnamese version.
Construction: The fuselage is built in sections with each section to be glued to the other with connecting strips. The only internal formers that are provided are the formers on each end of the cockpit. I would recommend that you build the cockpit even if you do not intend to put a transparent canopy on your model to give the fuselage strength and shape. Cut and shape the wings, they come in two sections that are glued together with a connecting strip, and glue the completed wing to the fuselage. Cut and fold the rudder and elevator and glue to the rear of the fuselage. Build the intake and exhaust and glue to the proper position. Cut the parts out to make the wheels and landing gear and assemble both. Glue the main gear to the bottom of the wing and the nose wheel to the front of the fuselage.
First Impressions: A very well done 1/72 scale model that we have not seen before. Since the model does not have internal supports you will need some practice to get the shape of the model correct.
| Katharina Dorothea Fritzen | CFM Publishing |
| Designer: | Rainer Blocksdorf & Thomas Pleiner |
| Description: | German Freighter 1950 - 1961 (Formaly British "Grainton" built in 1921) |
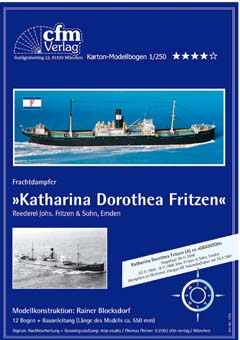
Kit: This 1/250 scale kit comes in a booklet form containing 22 A4 pages. There are two colored cover sheets showing pictures of the actual ship and one of the completed model. The model is in German except for one sheet of general instructions on building a card model that is in english. The booklet contains three pages of internal formers for the ship and eight pages of card stock that contains the parts to build the ship. There are two pages of detailed diagrams which will go a long way to helping you build the ship. Also included is a page of history of the ship and three pages of parts listings all in German. A very colorful model, the hull being done in black and lots of yellows and greens for the super structure, decks and other parts.
Construction: Construction of the hull is of the standard egg crate method. First thing to do is to reinforce all the internal formers, the base and the deck parts. Start by gluing the vertical and horizontal formers to the base. I suggest that you pin or spot glue the base to a piece of wood or plastic to insure that the hull does not warp. After you have the internal formers glued together then glue the reinforced deck to the top of the formers insuring that the deck is centered over the formers. Now glue the hull sides between the base and the deck. Once you have finished this step you can now remove the hull from the piece of wood or plastic as it should not warp beyond this point. Build the super structure of the ship fore and aft and in the center of the deck. At this point you will start detailing your model. Cut and glue hatches and winches to their proper places on the deck. Build your masts, you may want to consider using dowels as this will make it much easier. Build and place the lifeboats and davits in their proper places on the deck of the ship.
First Impressions: This ship has been upgraded and digitized by Thomas Pleiner who has done a terrific job. A beautiful model but you will need to be patient to do this model justice. Not a model for the beginner.
This column does not cover all the new card model aircraft and ships that have been released this month. It contains only those models that have been sent to me by dealers and designers for review or that I have purchased for review. Due to space restrictions, some models sent in for review may be held over until next month.
Thanks to the following for providing kits for inspection and review:
