Photos by the author
This is a bit of a mixture. It comes under the heading of a blast from the past although it is an obscure kit so may be a "new review" for many readers. It's not a full-blown construction review but it's more of a photo review, on the other hand there are more than a hand full of pictures. At the last count this review will have to be written in at least 3 parts.
I am sure of one thing it sure is an epic!
Right, after the confusion of the type of review, let me clarify a few points. This is a blast from the past because the kit was originally published in 1975 by Albatros and was the product of the renowned Richard Vyskovsky. Because it is so big over 3 feet long (1 meter) and there are a great number of parts (over 400) a simple list of pictures would not do justice to the kit. The kit also has some odd characteristics so the review will be about the same length as a construction review�. You have been warned!
Now for the background and the general bits about the kit. As you will note from the title, the kit covers the Castle district of Prague. It's more a fortified cathedral together will various administrative buildings, workshops and Palace accommodation. It comes in a card folder and contains over 20 A4 sheets of very closely packed parts. Some of the parts are so close that they have common edges or one line is the divide for tabs of two parts. This makes cutting out a little confusing. The cover is a single sheet folded into 3 A4 pieces. This contains the instructions and the cover has two photographs of the model. Because of the size of the model, the photos are a little indistinct. The instructions are in Czech and there are 17 drawings in the true Czech style. That is line drawings surrounded by the numbers with lines running to the part. Unfortunately there are cases where a part is not marked because it is buried behind another building.
I bought the kit from PMI and included are a set of instructions in English with PMI's logo at the end. I am most thankful for this because unlike the modern Czech kits, the build process is not numeric. It also brings out some interesting instructions. For example " To one side of the tower attach the other three". An instruction such as " to the previously prepared part A1 attach A2" This caused me a problem because there had been no earlier instruction to "prepare part A1"
The introduction says that the kit was originally designed for schools and was split into sections so that more than one child could work on the kit at any one time. Therefore the parts are identified with a letter to indicate the section (A-K) and a number. The main part will have a letter and number but subsidiary parts such as roofs have the same number, only smaller (More on this as we get going).
One last comment on the kit before we start with the pictures. If you decide to make this monster, buy a large economy box of blades. I have found that a number 11 blade becomes blunt after cutting out about 20 pieces due mainly to the "quality" of the card and it's thickness.
That's enough of the moaning, Lets brighten the review with some pictures.
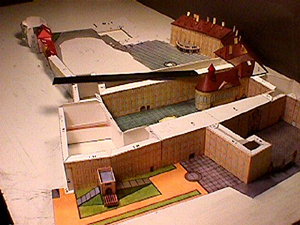
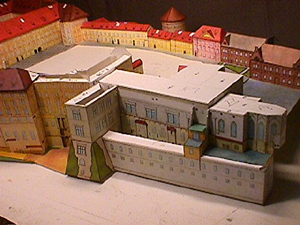
The first section is the area from the Main Gate to the Convent. This area is on the top of a hill so the base sheet has to be glued to heavy card and, according to the instructions, mounted on a supply of Czech Matchboxes! I must admit that I cheated. I glued the base to a thick piece of card and made up a series of card strips cut to the right height of the ground plan. Here you can see the first lot of buildings. The furthest building has the chimneys installed, these were the only ones I put on as I went along because I found that they kept getting knocked off. I will leave the rest of the chimneys until much later.
Here is another view of the same piece. The ruler in the middle is 6 inches. The white area on the base is for St Vitas Cathedral, so when that is in place much of what you see will be obscured.

More buildings along the side of the castle. Notice the size of the tabs and the white areas on the roof for the chimney.
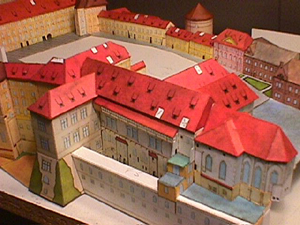
A big jump from the earlier pictures. The main building has a roof and the black front gives the height of the ground. This step gave me the size of the supports I made as mentioned in the introduction.
This picture gives a good idea of the detail. These buildings are under 2 inches high. It also reminds me that the identification of hill and valley folds is a little erratic. Because its so small and the blades became blunt so quickly, making such small pieces almost became a chore.
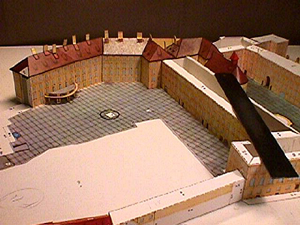
This was more fun. Large walls!. Most of them were made up of more than one part. And this is where I found the next problem. The print quality is nothing like today's kits. As you can see the walls are generally a sort of orange colour. Unfortunately two pieces of the same wall could differ from a reddish orange for one part to a yellowish orange for the other.
Spot the difference in picture 6!
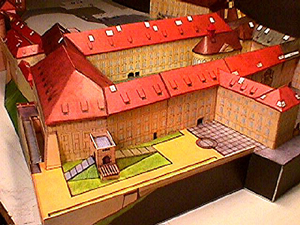
Here is the completed first section. Note there are still no chimneys.

This shows one of the small roofs. You will be unable to see the quality of the fold but believe me, I cut through at least half the card and fold the piece to shape and still the fold line is ragged. The problem is that the card is so thick that the uncut pulls its' self apart, leaving a torn look to the fold. This picture also reminds me to mention that in almost all the smaller parts I cut off the tabs. The card is so thick that butt joints are easy to make and do not double the thickness of the part.

The quality is not too good but I hope you will understand the reason for including the picture. This is one piece, there are many valley and hill folds but no indication of the final shape. The instructions say " prepare part C17" and nothing more. The small line drawing is of little help because most of the piece is hidden. There are quite a few instances of this in the model. Only a lot of luck and plenty of head scratching helped to form it into the right shape.
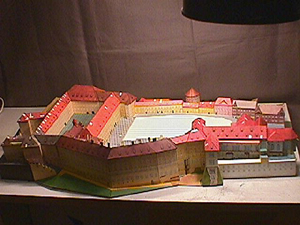
By now you will have followed the "drift" of this review. There's not a lot to recommend it to anyone as a project, unless, like me you like big castles. So far it has been a challenge and constantly reminds me how lucky we are to have the modern crop of kits.
Unless there are more surprises in the next sections, look out next month for the second thrilling episode of a man going quietly mad!
