First Looks For the Month of June 2003
| B-17G Flying Fortress | Published by GPM |
| Designer: | Tadeusz Grzelczak |
| Description: | USAAC Heavy Bomber |
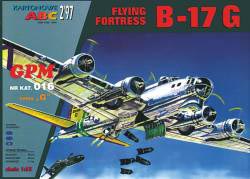
Kit: This 1/33 scale kit is not new, it was published some time ago and is now very hard to find. Since GPM is in the process of re-working most of their kits it is hoped they are doing the same for this great model. The model comes in an A3 booklet that contains eight sheets of colored card stock. Three pages of internal formers that need to be reinforced are included. Three pages of detailed diagrams are included which are necessary as there are no instructions provided. Most of the model is printed in glossy silver, which simulates the aluminum finish of the aircraft very well. Detailed cockpit as well as all crew positions are provided which includes green card stock parts to be glued in the interior. Detailed wheel wells are provided. If you do not want to cut the white parts where the glazing goes and glue transparent material there, Gomix does provide a set of glazing for this model.
Construction: The fuselage must be built section by section. Before each section is completed you need to build the crew positions. Glue the green internal section inside each fuselage section and then glue the completed crew position inside. Once you completed each section with a former in each end you will then glue all the sections together to complete the fuselage. Cut and reinforce the wing formers out, this includes several large ribs to give the wing its depth. Cut and glue the wing skin over the frame and then glue the completed wings on each side of the fuselage. Cut the formers out for the tail section and glue to the rear of the fuselage. When finished cut, roll and glue the skin of the tail section over the formers. Cut the formers out for the four engines and glue to the wing. Cut, roll and glue the engine skins over the formers. Build the turrets, propellers and landing gear and glue to the proper positions.
First Impressions: The glossy paper along with its size makes this a very impressive model. Some care must be used when gluing this glossy paper. Due to its size and some of the complex curves required this is not recommend for the beginner.
| StuG 40 Aus. G. | Published by Fly Model |
| Designer: | Waldemar Rycharo |
| Description: | German WWII Mobile Gun Platform |
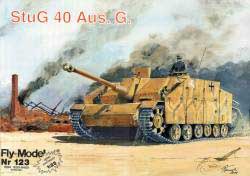
Kit: This 1/25 scale kit comes in A3 format and contains five sheets of colored card stock. Two pages of formers to glue to a heavier card stock are provided. There is a short one paragraph set of instructions in Polish. A sheet and a half of diagrams are provided to help you through the construction. There is also a full page set of four views of the vehicle. On one of the pages there is a diagram on how to build the machine gun and hatch it is attached too. There does not appear to be any interior detail. It appears that Fly Model concentrated on making the exterior of the model as detailed as possible.
Construction: Start construction by building the frame for the body of the vehicle. This consists of many reinforced parts that are tabbed to fit together. This consists of many reinforced parts that are tabbed to give you a very strong interior for the vehicle. At this point I would suggest that you build the bogie wheels and tracks before applying the outer skin of the model. If you do not do this then you will have problems getting the bogies up under the side skin. Once you have the track down start cutting the skin of the tank out and glue the pieces over the frame. Once the skin is on then start detailing your vehicle. Build the hatches, machine gun and main gun and glue to the proper position. Build and position the two filters on the rear of the vechile. Using the templates on the diagram page, cut wires to size for the antennas, tow wires and other parts.
First Impressions: A very nice looking model with plenty of outside detail but none on the inside. Model does not appear to be to difficult too build but the bogies and tracks will take some patience to complete.
| Jeremiah O'brien & ORP Krakowiak | Published by Halinski |
| Designer: | Andrzej Halinski |
| Description: | USN Liberty Ship & Hunt Class Destroyer |

Kit: This 1/250 kit contains two complete ships, the Liberty ship and the British Hunt Class Destroyer. The models come in a booklet of standard Halinski size which is slightly bigger than A4 size. The booklet contains 12 sheets of colored card stock, a sheet and a half of colored parts on regular paper and three pages of formers to be reinforced. One page of templates for masts, yards and other parts to be made from dowel or wire is also included. Instructions are in Polish and 14 pages of detailed diagrams presented in shadow format are provided. There is a two page full side/top view of both ships included. One of the nice features of this kit is that several pages are colored on both sides to show both sides of parts.
Construction: Method of construction of the hull is the same for both ships. Cut all the formers and glue to a sturdy cardboard or card stock. I recommend spot gluing the base of the ships to a piece of wood or plastic to insure there is no warping. Glue the vertical and horizontal formers to the base former. Reinforce the decks of the ships and then glue the decks to the top of the horizontal and vertical formers. Cut and glue the sides of the hull between the base plate and deck. You can now remove the completed hull from the piece of wood or plastic that you had spot glued it to. Build the superstructure for both ships. On the Liberty ship build the gun tubes and guns to go in them. Then the hatches on the deck along with the masts, cranes and winches. On the Destroyer build the gun turrets, secondary and machine guns and radar antennas. Finish your model by building the lifeboats for both ships and gluing to the proper positions.
First Impressions: This is another fine example of the work Halinski is doing in the card modeling world. Very detailed ships that will take time and patience to finish. I would recommend some card ship building experience before attempting this kit.
| XF5F Skyrocket | Published by DeWayne Barnett |
| Designer: | Marek Pacynski |
| Description: | Pre WWII U.S. Navy Experimental Fighter |
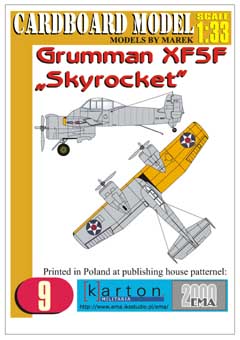
Kit: This model is Marek Pacynski's latest effort in the 1/33 scale. This model has not been previously released in Card. This is a very detailed model, it has a fully detailed cockpit, wheel wells and engine. A colored card stock canopy is provided for you if you do not want to detail the cockpit. If you do not want to detail the wheel wells the areas where they would be is black in the kit so you could just glue the landing gear to the black area. The model is colored in its original experimental colors, silver with yellow wings. Insignia is pre-WWII, blue circle with a white star in the middle and a red ball in the middle of the star.
Construction: The fuselage is built using the "butt and glue" method. In this method you construct each of the fuselage section with a former in each end and when all the sections are finished they are butted and glued together. Before assembling the fuselage sections build the cockpit and glue it in the proper fuselage section. Now cut out the formers and skin for the wing. Glue the formers to a heavy card stock and then assemble the formers. The wing is in three sections, center, right and left sides. Glue the skin for the three sections over the formers and then glue the wing to the fuselage. Cut the formers out for the tail section, glue the skin of the tail section over the formers and then glue the completed tail to the rear of the fuselage. Build the engines and then build the engine nacelles. Make sure you glue the colored piece inside the front part of the nacelle and when finished glue the engine in the nacelle. Glue the engine nacelles to the wings and then build and glue the landing gear into the nacelle.
First Impressions: A great model that will be a nice addition to any collection. Can be built with a lot of detail or without much at all. Appears to be not too difficult to build.
| Campbeltown | Published by JSC |
| Description: | Escort Destroyer/Battering Ram Ship |

Kit: This 1/400 kit comes in a booklet with two ships. One ship is in blue, gray and white camouflage and the other is in light and dark gray. The kit contains two sheets of card stock with one ship on each piece of card stock. There are two pages of history and instructions which are in Polish and a page of detailed diagrams on the back cover. The model I received was from PMI and it contained one sheet, front and back, with English instructions. This may not be true if you buy the kit from outside the U.S.
Construction: Before starting construction of the ship you should cut the base, deck and all hull formers out and glue to a heavy card stock. I recommend spot gluing the base to a piece of wood to insure that there is no warping as you build the hull. Glue the reinforced formers to the base and then glue the reinforced deck to the top of the formers. Now cut out the hull sides and glue between the tabs on the base and the deck. Build the superstructure for each ship and then start building the guns. The difference between the ships is the number and types of guns and the number of stacks. Also the standard Destroyer version has torpedoes while the Ram Ship does not. After building and placing the guns, stacks and torpedo tubes then build the davits and lifeboats. Finish the model by placing the masts, lines and flags on the two ships.
First Impressions: A pair of small ships with few parts. Would be a good model to start learning how to build card modeling ships.
| PzKpfw II Ausf. C | Published by ModelCard |
| Designer: | Dariusz Zygmanski |
| Description: | German WWII Tank |

Kit: This 1/25 kit comes in booklet form. Size is A4 and the booklet contains four pages of colored card stock and two pages of parts on regular paper to be reinforced. One of these pages contains the internal formers for the tank and the other contains the parts to make the treads. There is one page of history and instructions in Polish and the kit I received has a page of instructions in English. Since this model was donated by an individual I can not tell you where the model was purchased. The back cover contains a set of detailed diagrams on one side and on the other side is a three view of the model with parts marked on it.
Construction: Start construction by cutting out all the formers for the hull and glue them to a heavy card stock. When completed glue the formers together to make the hull. Now cut the parts out to make the turret making sure that you do not glue the gun mounting or you will not have a movable gun. Cut out the rest of the parts to skin the hull and glue them over the formers you assembled before. Finish the hull up by cutting and placing the hatches around the hull. Cut the parts out to make the bogies and suspension, assemble them and glue to the bottom of the hull. Finish up your model by assembling the tracks and running them around the bogies.
First Impressions: A very simple little tank with no interior detail. Suitable for someone who would like to learn how to build card model tanks.
| Checiny | Published by GPM |
| Description: | Polish King Castle |

Kit: A 1/250 scale model that comes in booklet form. The kit contains the following A4 pages, six colored card stock, two pages of plain paper to be reinforced and a page of detailed diagrams. There is a page of history and instructions in Polish. Since this model was purchased in Poland there is no English translation. The model appears to be computer generated and the coloring and marking are outstanding. Detail is down to the bricks in the wall and the tiles on the roof.
Construction: The model consists of the hill it was built on and the castle itself. Start by cutting the formers out and gluing them to a heavier card stock to give the internal formers the necessary strength. Glue the formers together and then glue the skin over the formers to make the hill. Now start building the castle itself. Build the buildings and towers and glue to the hill. Build the walls and gates and glue on the hill between the buildings and towers.
First Impressions: Another beautiful kit from GPM. Does not appear to be too difficult to build. Would be a great kit for a beginner and a wonderful model to sit down and teach kids the fun of card modeling.
| Ju 88 A4 | Published by Maly Modelarz |
| Designer: | Bohdan Wasiak |
| Description: | German WWII Bomber |

Kit: This 1/33 scale kit was published by Maly in August of 2000. By this time the paper and inks had much improved over the earlier publications. This model comes in A4 booklet form that contains eight pages of colored card stock. Also included are two sheets of formers on regular paper that are to be reinforced with a heavier card stock. There is one page of history and instructions included but these are in Polish. As in all Maly models I have seen, there are two pages of detailed instructions which will lead you through the construction process. Maly gives you the parts to build a full cockpit and they also provide a colored card stock canopy if you do not wish to display the cockpit. A full landing gear along with the wheel wells are provided.
Construction: The fuselage of this model is built using the "butt and glue" method. In this method you construction each fuselage section by rolling and gluing it together and then glue a former in each end of the section. When all the sections are built you then apply glue to the formers and "butt" them together to form the fuselage. If you decide to build the cockpit and other crew stations, make sure you do that in their sections before assembling the fuselage. Cut the wing formers out and assemble them. Then cut the wing skins out and roll them around the formers, gluing together at the rear of the wing. Cut out the formers for the engine nacelles and then cut the skin for the nacelles out and glue around the formers. Cut the formers for the tail section out and glue to the rear of the fuselage. Cut and roll the tail skin around the formers, gluing at the rear. Build the landing gear and wheels and glue the main gear into the nacelles. Glue the tail wheel to the rear of the model. Build the bombs and bomb attachments and glue underneath the wings. Finish up by building the propellers and spinners and attaching to the front of the engine nacelles.
First Impressions: One of the nice things about Maly is that they give you the opportunity to build a simple or detailed model. If you stay away from the detailing this model is buildable by someone with very little card modeling experience.
| S-2 (Wilczur) | Published by Halinski |
| Designer: | Andrzej Domadzierski |
| Description: | Polish (Former British) Patrol Boat |
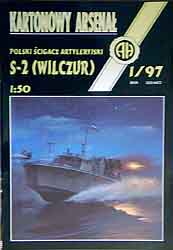
Kit: This 1/50 scale model comes in a booklet that is slightly bigger than A4. This booklet contains four pages of card stock. Three of these are colored and one consists of formers, some of which are gray. There are two pages of regular paper that are about 1/2 formers to be reinforced and other 1/2 diagrams. Instructions are in Polish but there are plenty of detailed diagrams in the booklet to assist non-Polish readers on how to construct the model. The model has one 20mm gun and four 12.7mm guns as well as four depth charges. The colored card stock is of a gloss type paper and is very colorful. Model can be built as a full hull or waterline only.
Construction: Hull of the model is built using the standard "egg crate" method. Cut all the formers out and glue them to a heavy card stock. Assemble all the formers and then reinforce the deck. Glue the reinforced deck to the top of the formers and then glue the bottom of the hull to the bottom of the formers. Cut and glue the sides of the hull from the bottom pieces to the reinforced deck. Build the superstructure and glue to the deck. Build the three gun tubs and then the 20mm and both twin 12.7mm guns and glue into the gun tubs. Build the four depth charges and glue two to each side of the ship. Build the two rafts and glue to the deck.
First Impressions: A very nice looking model that can be built by someone with very little card modeling experience. The large scale of this model will make it a very impressive display.
| Mistel | Published by Fiddlers Green |
| Designer: | Kancho Iliev & Chip Fyn |
| Description: | German WWII Piloted Bomb |

Kit: The Mistel was a Ju 88 with a large explosive connected to the nose. A fighter that was connected to it flew the aircraft to the target. Over the target the pilot in the fighter would direct the Mistel at the target and then disconnect the fighter from the Mistel and fly off. This model was delivered to me in PDF format across the Internet. If you acquire the aircraft in this manner you will need Adobe Reader and a color printer to print the model out on. The kit contains one Fw 190 as the fighter, a Ju 88 that can be built as the Mistel, and does contain the parts to build it as a standard Ju 88. The Fw 190 comes on one sheet of card stock and the Ju 88/Mistel on four sheets. One sheet of instructions and history is provided for each aircraft.
Construction: Both of the aircraft provided use the standard method of construction that Fiddlers Green has established. Fiddler's models do not use any internal formers, you must shape the fuselage sections as you assemble the model. Cut the fuselage sections out and shape them using the guide on the instruction page. Then use the tabs to connect the fuselage sections together to complete the fuselage. On the Ju 88 decide if you want to make into a standard Ju 88 or into the Mistel. The difference being the nose of the aircraft, it will either be the explosive or cockpit and crew stations. Shape the wings and tail section and glue them to the fuselage. On the Ju 88 cut and shape the engine nacelle parts out and glue to the wings. Finish the model up by building the propellers and landing gear and gluing them to the proper positions.
First Impressions: The first thing that struck me about this model was the options that are available for you. To build it as a Mistel, the standard Ju 88 or you can even build it as barrage balloon buster. A good model for beginners and advanced card model builders.
| Northrop YB-49 | Published by Paper Trade |
| Designer: | Cor van Haasteren |
| Description: | USAF Experimental Flying Wing Bomber |
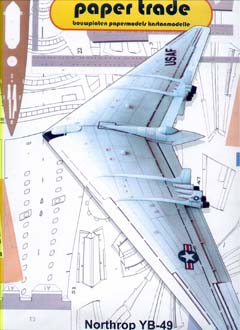
Kit: A 1/50 scale kit that is on paper that is slightly bigger than A4. The model is printed on gloss paper in order to give the metallic finish of the model an aluminum look. Included are 10 pages of card stock that contains the parts to build the model. One of these pages is called the Options page. This page contains the parts to make the landing gear and landing gear doors. The model comes with a four page booklet that contains the history and instructions to build the model. Two of the pages are in German and two are in English. There are two pages of diagrams showing the method of construction and has a listing of all the parts. There is no cockpit or other internal crew positions provided. Canopies are provided in colored card stock, those wanting to detail these will have to scratch build them. The model can be made with movable flaps and retractable landing gear. if you decide to display your model with the landing gear extended, parts are provided to build the wheel wells.
Construction: Since the aircraft has no fuselage construction starts with building the wing. Since the aircraft carried everything inside the wing, the wing is very thick. Paper Trade uses lots of formers and ribs inside the wing to give it the proper strength and shape. The first thing to do is to cut out and build all the formers. Now cut the wing skin out and form it around the ribs and formers. At this point decide if you want the flaps to move. If so add the parts that are needed to do this inside the wing before gluing the wing shut. You also need to do the same thing for the wheel wells if you intend to display the landing gear in the extended position. Build the "stinger" that extends out the rear of the wing and then glue the canopies on this extension and the canopy on the forward section of the wing. Cut and glue the "finlets" on to the top and bottom of the wing. Construct the jet engines and glue then between the finlets on each side of the wing. If you decide to use the landing gear build it at this time. The landing gear can be made to retract up into the wing and extend. Glue the gear into the wheel wells and make the wheels and wheel well doors. Glue wheels to the landing gear and gear doors to the bottom of the aircraft.
First Impressions: I am very glad to see this aircraft made available for card modelers. Even at 1/50th scale this is still a very large model. With English instructions and the diagrams provide those with very little experience should be able to build this model. The only caution I would give is about the glossy paper. Remember you will need to remove the gloss on places were you apply glue.
| Junkers Ju 88 A4 | Published by GPM |
| Designer: | Grzegorz Pomorski |
| Description: | German WWII Bomber |

Kit: A 1/33 scale kit that comes in an A4 booklet. The booklet contains a total of 11 pages. Two pages of detailed diagrams, two pages of formers and bombs that are on regular paper and seven pages of colored card stock that contain the parts to build the model. The kit contains a very detailed cockpit and crew positions as well as a full bomb bay with a full load of bombs. Wheel wells and detailed landing gear are provided. There is one page with some history of the plane and instructions on how to build the model but these are in Polish. The inside of the rear cover has three views that show the position of the outside parts. One interesting thing is that they did not put the swastika on the model but do give you a cut out on regular paper with it on there.
Construction: Start your construction by building all the interior detailed parts. This includes the cockpit, crew positions and the bomb bay. Make your bombs, some of which will go inside the bomb bay and others that will go on racks under the wings. Cut all the formers that are used on the fuselage and wings and glue to a heavier card stock for added strength. Cut out each fuselage section, roll it and glue into a circle. Install formers and connecting strips in each section and when finished glue the sections together to complete the fuselage. Make sure that you glue the detailed internal parts you built first inside the proper sections before gluing them all together. Cut the wing sections out and glue around the wing formers. Glue the wings to the fuselage. Glue the reinforced engine nacelle formers to the wings and glue the nacelle skins over the formers. Build the landing gear and wheels and glue to the proper place under the model.
First Impressions: The interior of this model is highly detailed and will take a steady hand and patience to complete. Model is up to GPM's high standards and card modeling experience is recommended before attempting this model.
| Sturmgeschutz IV (SdKfz 163) | Published by Modelik |
| Designer: | Waldemar Richard |
| Description: | German WWII Tank Hunter |
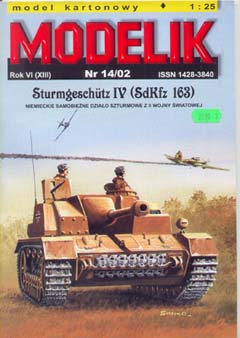
Kit: A 1/25 scale kit that comes in A4 booklet form. The booklet contains 12 sheets of colored card stock with the parts of the model on them. Three pages of formers on regular paper that are to be glued to heavier card stock for added strength and provide form for the model. There are two pages of parts on regular paper that are not to be reinforced. History and instructions are in Polish but there are four pages of detailed diagrams that will lead you through construction of the model no matter what language you read. There is no interior to this model, Modelik has concentrated on detailing the outside which they have done a great job off.
Construction: Start by cutting out all the formers for the hull and gluing them to heavier card stock. When finished glue the formers together to get the basic form of the hull. Now cut the skin out for the hull and glue over the formers. Cut and assemble the parts to build the bogies and suspension and glue to the bottom and side of the hull. Cut all the parts out to make the tracks and glue them together. When finished mount the tracks around the bogies. Build the guns, main gun and machine guns, and mount them on the tank. Cut out and add the hatches and extra track on the top of the hull. There are lots of tools and accessories that now need to be cut out and mounted all over the hull.
First Impressions: A very impressive looking model. Lots of time will be spent on building the bogie wheels and track. You will need patience to do this model justice. I would recommend that you have card modeling experience before you attempt this model.
| Nastawnia Wolsztyn | Published by GPM |
| Designer: | Gregorz Pomorski |
| Description: | Polish Train station |
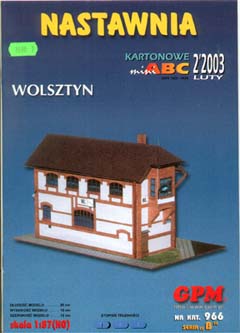
Kit: This is one of a group of "HO" scale buildings that I just received from Poland. It appears that this is the latest fad coming out of the card modeling industry. This model is of a train station that comes in a booklet form. The booklet contains four pages of colored card stock with the model parts on them. There is one page of history and description of the station, I assume, that is in Polish. There is also a page of instructions and diagrams. The instructions are in Polish but the diagrams appear to be explicit enough for non Polish readers. Kit also contains two cars in "HO" scale to be parked by the station.
Construction: Cut the base that the model will be mounted on and reinforce it with a heavy card stock. Cut the walls for the building out. Remove the areas were the windows will go and cut the windows out. Use some type of transparent material to simulate the clear part of the windows. Glue the windows into the sides of the building. Glue the sides of the building to the base and then cut and form the roof. Glue the roof to the top of the sides and then build the chimney and glue to the top of the roof. cut the gratings out and mount them on the indicated doors and windows. Build the antennas and lights and mount them to the sides of the building. Finish your display up by building the two cars that are provided and parking them on the base next to the building.
First Impressions: As with all GPM buildings the artwork on this is fantastic. The detailing on the brick work is awesome. Will take a steady hand to cut the windows and grating out. Does not appear to be to difficult to build.
| 1:35 M3A2 Halftrack | Published by Mega Graphic |
| Designer: | Antonin Krejcir |
| Description: | WWII Halftrack Personel Carrier |
| Reviewer: | Neil Linnell |

Kit: The Czech firm Mega Graphic, perhaps better known for its racecar models, has added an excellent 1:35 scale model of the M3A2 Halftrack to its lineup. (Mega's other 1:35 scale AFV model, a Jagdpanther, was reviewed by Don Kenske in the August '02 issue of this magazine.) The model is nicely printed on 7 sheets of card; the card is a bit on the thin side, and some modelers may wish to scan and print on heavier card. However, given the small scale of the model-- and resulting small parts-- I suspect that the paper thickness is probably correct for this model. Also included in the model booklet are 2 pages of construction diagrams, a few photos of both the model and its real-life subject, and an extensive vehicle history and model instructions. The history and instructions are in both Czech and English; the English instructions appear to be quite good even though they are a translation. The model can be built with 1 of 2 sets of markings, and the chassis/running gear component has the parts for both an easy and an expert version. The model includes a variety of equipment: large caliber machine guns, rifles, ammo boxes, bundled bedrolls, etc.
Construction: One of the great features of this model is that the parts are labeled with color-coded numbers: blue for the hood and driver's cab, green for the crew compartment, orange for the chassis, etc. This makes locating the parts fairly easy. The construction diagrams are color-coded as well, so the modeler really can see which parts belong to which sub-assembly, and how the sub-assemblies fit together to make the completed model. Construction begins with the hood/cab, followed by the crew compartment; these two sub-assemblies complete the body construction. The chassis/running gear is assembled next, and the engine/drive train is added to it. Finally, armaments and equipment are added to complete the model. The photos imply that the body need not be permantly attached to the chassis, enabling the modeler to remove the body and show off all the underside detail that would otherwise be lost.
First Impressions: This is an excellent model of a WWII workhorse. This not a model for a beginner, and is recommended for modelers with some experience. The option to build a simpler version of the most difficult components (running gear) is a nice feature. While the scale, at 1:35, is smaller than the traditional card model AFV scale of 1:24/25, it does not suffer from a lack of detail (and is, in fact, more detailed than some 1:24 models!). The model's scale also makes it a good candiate for use in dioramas-- either with 1/33 card model aircraft or combined with toy soldiers/military miniatures. This model was apparently printed in a "limited edition" run of 1,500 copies, so collectors and AFV fans will want to grab one while they are still available. I hope Mega Graphic adds more models like this one to its catalog.
This column does not cover all the new card model aircraft and ships that have been released this month. It contains only those models that have been sent to me by dealers and designers for review or that I have purchased for review. Due to space restrictions, some models sent in for review may be held over until next month.
Thanks to the following for providing kits for inspection and review:
