This month we finish the turret exterior and
interior.
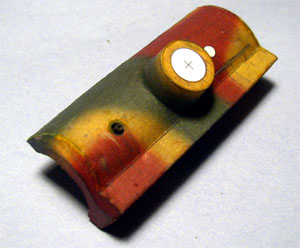
 The next
assembly is the commander's cupola. I truly enjoyed building this assembly;
the cupola the fits were perfect and the end result was a very convincing model.
The handle and the rod that the hatch rotates on were made from paper clips.
The white edges will be painted with watercolors so that they will not
show on the finished model.
The next
assembly is the commander's cupola. I truly enjoyed building this assembly;
the cupola the fits were perfect and the end result was a very convincing model.
The handle and the rod that the hatch rotates on were made from paper clips.
The white edges will be painted with watercolors so that they will not
show on the finished model.
 This
is a very interesting part to build as it is composed of a single outer skin
and three internal ribs with two sidepieces. The part builds up in to
a very complex shape with the late model chin all done with a minimum number
of parts. In the foreground you can see the machine gun port.
This
is a very interesting part to build as it is composed of a single outer skin
and three internal ribs with two sidepieces. The part builds up in to
a very complex shape with the late model chin all done with a minimum number
of parts. In the foreground you can see the machine gun port.
The kit used a black circle to represent the port this begged to have added
detail. I cut the circle out and rolled a tube that would fit inside the
port and then rolled a smaller tube to represent the muzzle of the machine gun
and glued it in side the larger tube
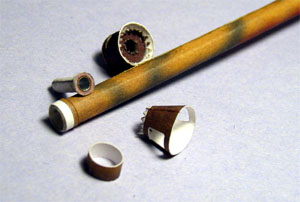 The barrel and muzzle brake (being the business end of the tank) need to
have special attention. The barrel is a single 5-� inch (140 mm) long
tube; I used a strip of 20 lb paper for the attaching glue tab. The thinner
paper makes rolling the tube easer. A thicker paper tab will sometimes
show as a ridge on the side to the rolled part.
The barrel and muzzle brake (being the business end of the tank) need to
have special attention. The barrel is a single 5-� inch (140 mm) long
tube; I used a strip of 20 lb paper for the attaching glue tab. The thinner
paper makes rolling the tube easer. A thicker paper tab will sometimes
show as a ridge on the side to the rolled part.
 The
part closest to the end of the gun tube is a scratch built representation of
the end to the gun tub with a scale bore the bore was lined with aluminum foil
to represent the bore. The part also is useful to keep the end of the
gun tube round. A baffle plate was also added to the front of the muzzle
brake the plate also helped keep the end of the muzzle brake round. All
parts need to be beveled and sanded to insure a good fit.
The
part closest to the end of the gun tube is a scratch built representation of
the end to the gun tub with a scale bore the bore was lined with aluminum foil
to represent the bore. The part also is useful to keep the end of the
gun tube round. A baffle plate was also added to the front of the muzzle
brake the plate also helped keep the end of the muzzle brake round. All
parts need to be beveled and sanded to insure a good fit.
For the beginner paper modeler rolling a long tub can be daunting experience.
To roll a tube, you can use brass tubing as a form; this can be purchased
from your local hobby shop. Start by rolling the part around a large
brass tube and once the part takes the shape use the next size smaller tubing
and roll the part to fit the smaller tube. This is repeated until the
part will keep a shape slightly smaller then you want for the finished part.
After adjusting the part to get straight seam glue the seam in short
steps, some modeler's find that it is easer to glue the seam at one time.
Gluing in short steps allows you to adjust the part between glue steps to obtain
a tight straight seam.


Here we see the finished turret fighting deck the only modifications were
the addition of a set of scratch built radios. The kit did have a radio
set for mounting in the turret but I elected to use the same scratch built radios
that were installed in the hull. I also used a 30-Watt transmitter of
a commander's tank. Also added were a set of deck supports they can be
seen in the front of the turret. The kit has plans for a set of three
(3) deck supports but no instructions showed where they are to be mounted, so
once more back to the reference books.


The bottom of the turret has been modified so that the turret can be taken
apart to show off the detail. The modification consisted of trimming
and beveling the assembly tabs so that the assembly would be easy to remove.
The assembly tabs were painted with future floor wax to stiffen them so that
they would hold their shape.
 The hull
and turret of the model are finished less the small detail parts. Because
the model will have to be handled while the suspension and tracks are installed
I decided to leave off the IR equipment and the antennas, and commanders AA
MG 34.
The hull
and turret of the model are finished less the small detail parts. Because
the model will have to be handled while the suspension and tracks are installed
I decided to leave off the IR equipment and the antennas, and commanders AA
MG 34.  The next stage will be the building of the suspension, bogies and track links.
Lots of circles to be cut, lots of repetitive parts to be made, building
the hull detail parts will break up the tedious assembly of the bogies and track
links.
The next stage will be the building of the suspension, bogies and track links.
Lots of circles to be cut, lots of repetitive parts to be made, building
the hull detail parts will break up the tedious assembly of the bogies and track
links.
Summary:
| Model: | PzKpfw V Panther 1-2/2002 |
| Kit: | Halinski |
| Designers: | Marian Sobel | Scale: | 1/25 |
| Difficulty: | Very complex, very difficult |
| Number of Parts: | Over 3000 |
| Instructions: | Polish, German and English |
| Diagrams: | 4 pages generally good |
| Fit: | Excellent |
| Coloring and Artwork: | Outstanding |
| Printing: | Excellent |
| Resources: | http://www.achtungpanzer.com/pz4.htm#panther
http://www.kithobbyist.com/AFVInteriors/pan/pan.html http://www.militarygameronline.com/Panzer/panther.html "Germany's Panther Tank" by Thomas L. Jentz Published by Schiffer Military History |
