First Looks For the Month of July 2003
| Westland Whirlwind | Published by Cardmodels.net |
| Designer: | Emil Zarkov |
| Description: | British WWII Twin Engine Fighter |

Kit: The first of two new 1/32 models from Dr. Zarkov to be released by Cardmodels.net. The other is a Me 109 which will be reviewed in the August issue of this column. The model I received was electronically transferred in PDF format. If you receive the model in this format you will need Adobe Reader, a good quality card stock and a color printer to print the model out. The kit contains four pages of colored card stock, one of which has optional parts to make the Whirbomber. One page of parts to be glued onto heavier card stock, one sheet of connectors on regular paper. There is a page that is to be printed on transparent material. Do not try this on your laser printer as it will melt the transparent material. Ink jets will not work as the ink will just rub off the transparent material. You will need to find a copier and copy this page on transparent material. Seven pages of detailed diagrams are provided to lead you through the construction of the model.
Construction: Dr. Zarkov's fuselages are built using the former and connecting strip method. You build each fuselage section with a connecting strip and former in one end. When finished building the sections you glue them together using the connecting strips. Be sure that you construct the cockpit and glue it into the proper section before gluing all the sections together. Cut the formers out for the tail section and wings. After you have assembled the formers, cut the skins out and glue them over the formers. The engine nacelles are built the same way the fuselage is. When you have finished the nacelles glue them to the wings. Build the landing gear and wheels and glue the main into the nacelles and the rear to the tail. Build the propellers and spinners and glue them to the front of the nacelle. A colored card stock canopy is provided if you do not want to detail the cockpit.
First Impressions: Without a doubt Emil Zarkov
is one of the best card model designers in the world. He gives the builder the
choice of how detailed they want the model to be. His instructions are very
detailed showing construction step by step. Because of this the model is buildable
by card modelers of all skill level
| Siemens-Schuckert D-III | Published by DeWayne Barnett |
| Designer: | Marek Pacynski |
| Description: | WWI German Fighter |
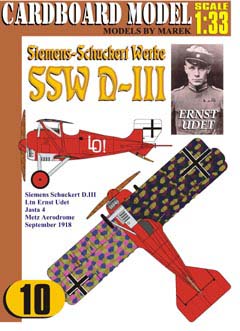
Kit: The latest effort in 1/33 by Marek Pacynski continues to show his expertise in designing card models. The model is available in the U.S. from DeWayne Barnett and will be delivered electronically as a PDF file. You will need Adobe Reader, good quality card stock and an ink jet printer to print the model out. The kit consists of nine sheets, the cover sheet, three sheets of colored card stock that contain the parts to build the model. Two sheets of history and technical data and two and a half pages of instructions. The kit includes a detailed engine, machine guns and cockpit. The model is all red with lozenge wings and has Ernst Udet's markings
Construction: Start construction of the model by building the cockpit which you will insert in the proper fuselage section. The fuselage is built with the butt and glue method, build each fuselage section with a former in each end and them butt glue them together when finished. Cut and reinforce the tail formers and glue to the rear of the fuselage. Then cut the tail skins out and glue over the formers. Cut and reinforce the bottom wing formers out, glue the wing skins over the frame and then glue the wing to the bottom of the fuselage. Cut and glue the filets to the part of the wing closest to the fuselage. Build the wing struts, make sure you have enough reinforcement inside the strut, and glue to the bottom wing. Now cut the formers out for the top wing, reinforce it and glue the upper wing skin over the former. Glue the top wing to the top of the struts. Build the engine and attach to the front of the fuselage. When done cut, shape and glue the cowling over the engine. Build the landing gear and glue to the bottom wing and fuselage.
First Impressions: A beautiful looking little
aircraft. Biplanes are more difficult to build then monoplanes. Because of this
and the detailing of the cockpit and engine I would recommend card modeling
experience before attempting this model.
| Konigstiger (King Tiger) | Published by GPN |
| Description: | German WWII Heavy Tank |

Kit: One of GPM's 1/25 series of tanks that have been released over the last few years. This model comes in an A4 booklet that contains 20 pages. 14 of these pages are colored card stock that contain the parts to build the tank. Three pages of parts to be glued to a heavy card stock to form the frame of the tank. The inside back cover contains instructions and a three view of the tank. Instructions are in Polish but there are three pages of detailed diagrams that will help non-Polish readers in construction of the model. Also included are two pages of color photos some of which show location of parts. As with all GPM tanks there is no interior, GPM concentrates on detailing the outside of their tanks rather than the interior.
Construction: Start by cutting out all the parts that are on regular paper and glue to a heavy card stock. Use these reinforced parts to build the frame for the hull and turret. Cut the parts out for the hull and glue them over the frame you just built. Cut all the parts out for the suspension and bogies. build them and glue to the sides of the hull. Build your tracks and wrap them around the bogies. Cut the parts out to build the turret and glue them over the turret frame. Build the main gun and machine guns and insert them into the turret. The turret can be made to rotate and the gun to elevate. Glue the hatches on the hull and turrets. Build the filters and exhaust and glue to the rear of tank. Finish your model by building the tools and other accessories provided and glue in their proper places on the hull.
First Impressions: GPM's printing is outstanding.
They have gone to computer generated printouts and the detail really stands
out. Not an overly detailed model but the building of the bogies and tracks
will take a little patience.
| Stacja Baranowice SI. | Published by Swiat |
| Description: | Polish Train Station |

Kit: This kit is in a very unusual format. It consists of cards that are 5 1/2 by 11 3/4 inches in size or smaller. Instead of having a sheet with many colors on it what they have done is created a group of small sheets, each one contains one color only. There are 18 sheets of colored card stock in varying sizes. Two sheets of transparencies, one with the outline of the windows on it. One and a half sheets of history and instructions which are in Polish and a two sided sheet with detailed diagrams. Also included in the kit are three sheets of heavy card stock to glue your frames on.
Construction: All formers are on white paper, cut these out and then glue to the heavy card stock that is provided in the kit. Cut the walls of the building out and then cut the openings where the doors and windows will be installed. Cut the frames of the windows out and then glue the transparent portions of the windows to the frames. Glue the windows and doors into the sides of the building. Cut the wall of the building out, assemble the main section of the walls and then the end section which is smaller. Build the entrance ways and attach to the walls. Cut and build the platform and glue around the walls. Cut the roof sections out and glue them together, when finished glue the roof sections on top of the walls. Now add the chimney and sky lights to the top of the building. Cut and glue the name of the station out and glue to the side of the building.
First Impressions: A very interesting model. Swiat
has taken an entirely new direction in developing a card model kit. Parts are
very nicely printed and the model does not look too difficult to build. Even
though the instructions are in Polish, the diagrams are very explicit and should
lead you through the construction with no problem.
| B-36 | Published by Fiddlers Green |
| Designer: | Chip Fyn & Kancho Iliev |
| Description: | U.S. Very Large Cold War Bomber |

Kit: This is the largest model that Fiddlers Green has attempted up to this point. With a 40 inch wing span the model is one of the largest card models that has been released up to now. Fiddlers use a standard scale of 1/60 but print their models to fit on pages not to scale. They do include a WSAM percentage that tells the scale of the model. This model has a WASM of 125% which means the model has to be increased by this percentage to be 1/60 scale. By my figuring this makes the model 1/72 scale. The model is provided on CD or as an electronic download. It consists of 18 pages of 8/12 by 11 card stock and two pages of instructions. The model is designed to be printed out on silver paper so there is very little color on the model itself. Markings and the color of these markings are well done. There is no cockpit or wheel wells provided with the model.
Construction: Fiddlers designs their models without internal support so the shaping of the parts is imperative to maintain the correct shape. On this model they had to use a reinforced spar to attach the very large wing to the fuselage. Cut the fuselage sections out and carefully form them. Each section has tabs on one end and you use the tab to glue the section to the next section. Build the forward canopy and glue to the front of the aircraft. Cut the tail section parts out and form them into the correct shape and glue to the rear of the aircraft. Now cut out the spars for the wings carefully following the instructions on how to reinforce them. It is important that they be strong enough to hold the very large wing. Cut the three wing sections out for each wing and shape them. Glue the three sections together to form the wing on each side. Cut and form the parts out for the six engine nacelles and glue them together and then to the wing. Build the landing gear and wheels and glue to the bottom of the aircraft. Build the two jet engines for each wing and when finished glue to the ends of each wing. Finish your model by making the propellers and radomes and glue to the indicated position.
First Impressions: Even though this is
a very large aircraft it uses standard Fiddlers Green building techniques. This
means that the model is buildable by those who have very little card modeling
experience. The only problem you will have with this model is finding a place
to display it.
| Sd. Kfz. 173 Jagdpanther | Published by Mega Graphic |
| Designer: | Pavel Skokan |
| Description: | German Medium Tank Hunter |

Kit: A 1/35 scale model from the Czech Republic that comes in an A4 booklet. This model comes with instructions in three different languages, Czech, English and German. Three are also a page and a half of diagrams, some in shadow and others are full color pictures. Included in the booklet are five sheets of colored card stock that contain all the parts to build the vehicle. Mega Graphics has a colored code for each part that explains exactly how they are to be cut out and which pieces are to be reinforced. Since the instructions are in different languages including English even I can understand what they want done with each piece. There is no interior for the model. Mega Graphics has concentrated on the detail of the outside of the vehicle. The model can be built so that the main gun can elevate.
Construction: Start by building the bottom of the hull making sure that you reinforce the indicated pieces. Once you get the bottom of the hull done I recommend that you now build and install the bogies and tracks. It is much easier to do it at this point rather than waiting until the top of the hull is installed. If you want the bogies and tracks to move than use some dowel or wires through the bottom of the hull to attach the bogies. Once you have the bogies installed the way you want them build and wrap the tracks around them. Now build the top of the hull and install over the bottom section. Determine if you want the gun to move or not and build accordingly. Install the gun into the hull and start detailing the model. Cut, build and install all the hatches, exhaust and other accessories in their proper places on the hull.
First Impressions: A very nice looking
model. Printing and detail are great. I am very pleased to see this company
including instructions in English as well as the other languages. This sure
makes the construction process so much easier when you have instructions to
follow.
| Kosciot w Chtapowie pw Mitosierdzia Bozego | Published by JSC |
| Description: | Polish Chapel |

Kit: 1/200 kit of a Polish Chapel that comes in a six page A4 booklet. The booklet contains four pages of colored card stock that contain the parts to build the Chapel. One page contains a history of the Chapel as well as instructions on how to build it. This page is in Polish but there is a full page that shows pictures of the model as it is being built with all parts numbered. This page should be enough to assists non-Polish readers in building the model. JSC printed parts of the model on the front and rear cover of the model so if you want what is on the other side you will have to copy that side. A base is provided to place the completed Chapel on. Printing and color on this model are excellent.
Construction: First cut out the base as this is where you will start building the chapel. Next cut out the parts to build the tower and glue them together. Glue the completed tower to the indicated position on the base. Cut and glue the walls and one internal section out and glue around the base. I do not think that any of the pieces need to be reinforced but if you feel that is necessary do so before gluing to the base. Cut and form the pieces of the roof and then glue onto the top of the walls.
First Impressions: A great little model that is buildable
by anyone. No card modeling experience is needed. Would be a great school project
or to be built as a family project.
| Queen Mary | Published by JSC |
| Designer: | Bartosz Czolczynski |
| Description: | British Luxury Liner |

Kit: Even at 1/400 scale this is a large model that is printed on 16 pages of A4 card stock. The booklet it comes in also contains four pages of history and instructions that are printed in Polish. The model that I received, it came from H&B; Precision Models, contained six pages of history and instructions. If you buy the model elsewhere I can not guarantee that these English pages will be included. Both the front and back inside covers include a set of detailed diagrams that show the construction of the hull and location of most of the parts on the ship. Printing and colors are excellent. The printing is so good that you can see the planks on the deck. The hull and funnels are done in red and black and the lifeboats are in green.
Construction: Hull construction on this model is not what JSC normally uses. in this case they use the same method that most other card ship designers use. You start with a bottom base plate and build up from there. Reinforce the base, decks and formers before starting. I recommend that you glue the base plate to a piece of plastic or wood to prevent warping as you construct the hull. Glue the formers to the base plate and then the horizontal stringers between the frames. Glue the deck to the top of the frames and then the hull sides between the deck and base. Cut and build the superstructure and mount on the decks. Cut and build all the funnels and lifeboats and mount in their proper place. Build the masts for the ship, I recommend that you use toothpicks or small dowels for this. Finish the model up by cutting and placing the flags on the model.
First Impressions: Not to difficult a model too
build. I would recommend that you have some card ship building experience before
attempting this model. Just make sure you have the space available to display
the model.
| 1903 20HP Prosper Lambert | Published by Answer |
| Designer: | Darius Zygmanski |
| Description: | Early Sports car |

Kit: A 1/25 scale model that comes in A4 booklet form. The booklet contains three pages of colored card stock which contains the parts to build the model. The inside cover contains a history and building instructions. Both are in Polish but the back inside cover has a detailed set of diagrams which will lead you through the building process step by step. There are also diagrams scattered through the parts showing detailed construction for the parts on that particular page. Colors on this model are striking, greens, yellows, blues, reds and a few others.
Construction: You start building this model by building the chassis. You then add the wheels, which can turn, the engine and fuel tank. Move to the bottom of the vehicle and build the suspension both fore an aft. Build the passenger compartment and then your gear shift, steering wheel and clutch. Once you have all the interior parts to the passenger compartment, build the roof and attach over the compartment. Build the hood which can be left open to show the engine and the spare tire which will go on the rear of the car. Finish off by building the headlights and horns and gluing them to the proper places.
First Impressions: A very impressive little
model. The coloring of the parts really struck me when I opened the booklet
up. A good conversation piece which will make a great display.
| Jak-28PM Firebar | Published by Hobby Model |
| Designer: | Michal Grabowski |
| Description: | Russian Two Seat Interceptor |

Kit: A 1/33 scale model that comes in an A4 booklet. The booklet contains 16 pages, one sheet that has the instructions and history , in Polish, on one side and a three view of the aircraft on the other side. There are two pages of formers on plain paper that are to be glued to heavier card stock to provide internal reinforcement for the model. One page has detailed diagrams with part numbers, the page is printed on both sides. The remaining 12 pages contain the parts to build the aircraft. The model contains a detailed cockpit, wheel wells and landing gear. No colored card stock canopy is provided but there is a template that you can use to cut transparent material to make your canopy. Four missiles are provided to be mounted on the completed model.
Construction: Construction of the fuselage is the connecting strip method. In this method a connecting strip is glued into one end of the fuselage section and then the former is glued into the same end. When all the sections are completed, glue the sections together using the connecting strips. Start off by building the cockpit, then build each fuselage section inserting the cockpit into the correct section. Also be sure that you install the parts for the forward wheel well before connecting the section to the next section. Cut the reinforced tail formers and glue to the rear of the fuselage. When finished cut, form and glue the tail skin around the formers. Cut and install the reinforced wing formers into the fuselage. Cut, form and glue the wing skin around the formers. Build the engine nacelles using the same methods you used in building the fuselage. When finished glue the nacelles to the wings. Build the landing gear and missiles and glue to the bottom of the model.
First Impressions: Hobby model specializes
in producing models that are not normally seen. This is the case with this model.
Not a model for a beginner but a nice model to add to any collection.
| EL.200G | Published by Quest |
| Designer: | Grzegorz Molenda |
| Description: | 1937 Polish Electrain |

Kit: A 1/45 scale electric train model that comes in a booklet in A4 format. The booklet contains 10 pages along with front and back cover. The inside front cover has the instructions and history of the train. The inside and outside back cover of the booklet contains detailed diagrams. One of the inside pages has diagrams on both sides of the page and another has parts to be reinforced along with some more diagrams. Eight pages of the booklet are on colored card stock that contains all the parts necessary to build the model. This is a very detailed model, the suspension and electric connections will take some time to build. Model contains a very detailed inside as well as outside.
Construction: Start by building the chassis and then building the suspension below the chassis. Build the wheels and attach them to the suspension. Start building the inside of the car by using the parts on the paper sheet that should be reinforced to give you the strength needed. There are several gray parts on the card sheets that have double asterisk by them. they are to be double reinforced and then glued to the chassis. After you have all the internal formers done continue to build the inside of the train. Cut the sides, front, back and roof out. Cut the window areas out of the front, back and sides out and glue transparent material to simulate the windows. Build the electric connectors and glue to the top of the train. Finish by building and attaching the car connectors, lights and ladder.
First Impressions: The company indicates that this model has
a difficulty level of three on a scale of three. Not for a beginner but looks
like it will make up into an impressive model that you will be proud to display.
| P-40E Kittyhawk | Published by DeWayne Barnett |
| Designer: | Marek Pacynski |
| Description: | USAAC WWII Fighter |

Kit: Another fine 1/50 scale model by Marek. These models are now available from DeWayne Barnett as singles to be delivered electronically across the Internet. The model is sent as a PDF file so you will need Adobe Reader and a color printer to print the model out. The model comes with a cover sheet, two sheets of colored parts and a sheet that consists of a diagram and history of the aircraft. As with most of Marek's 1/50th scale models, this model has no cockpit nor wheel wells. The canopy is on colored card stock and the landing gear glues to blacked areas on the bottom of the wings and fuselage. Landing gear and wheels are provided.
Construction: The fuselage is built using the "butt and glue" method. Reinforce all the fuselage formers. Cut each fuselage section out and roll it into a circle. I recommend that you cut a piece of stock and glue it along the bottom and use this to connect the two sides. Glue a former in each section of the fuselage and when all the sections are completed, glue them together to complete the fuselage, Glue the intakes to the top and bottom of the fuselage, then cut and glue the canopy pieces to the top of the fuselage. Reinforce and cut the formers out for the tail section and wings. Insert the formers into the fuselage and then cut the wing and tail skins out, form them and glue over the formers. Build the landing gear and wheels and glue to the bottom of the wings and fuselage. Build the spinner and propeller and glue to the front of the model.
First Impressions: Marek's models are not
for beginners but anyone who has a little card modeling experience should have
no problem building the model. A nice model to add to any 1/50 or 1/48 scale
collection.
| The Grand Junction 90 | Published by Heritage Models |
| Designer: | Roger Pattenden |
| Description: | Cornish Beam Engine |
| Reviewer | Mike Stamper |
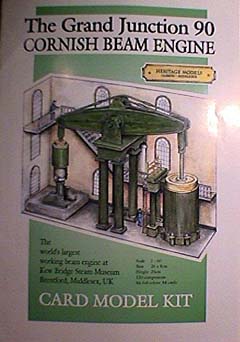
As you can see this is something a little different for me. Rather than the outside of a building it's the inside.
A few days ago I received through the post an envelope, thoughtfully folded in half by our postman. It was a padded envelope with English postage. I guessed that this was the kit I had been waiting for for over a year. I must admit the delay has not been the fault of the British Postal system but more to Roger Pattenden's attempts to get his design perfect before showing it to the world. Roger displayed the prototype at last years Halton Show but he had told me about the idea the previous January.
I opened the envelope and was not disappointed. The envelope contained a copy of Roger's latest kit. His letter said that he was not too happy about the reproduction of the printing but to my eye there was nothing wrong. The kit is in the same format as all of Rogers other kits, namely a polyethylene bag with a folded cover sheet which has the instructions and a detailed background of the subject. This kit contains more pages than any of his previous models, which means that there are many more parts. The artwork is typical R P, that is to say detailed hand painted parts that have been turned into good quality prints on good quality card.
My immediate reaction was to telephone Roger and say thanks for the kit but I can't make it because I don't make round bits, only square buildings. I also said that I would be writing this review and saying that it is well up to his usual impeccable standard and from a fist look seems to be a well executed model. It looks to be much more detailed than most of Rogers other kits, but this is necessary for the subject he has chosen this time.
As you will see in another part of this magazine, I am in the middle of
another project. I generally will not start another model until the current
one is complete. However, the pieces in this kit look so good that it's almost
impossible to resist. So, do I postpone the next part of my current review and
start making my own Beam Engine? You'll have to wait till next month to find
out.
| F/A-18 Hornet | Published by Maly Modelarz |
| Designer: | Bohdan Wasiak |
| Description: | USN Fighter/Attack Aircraft |

Kit: This 1/33 scale model comes in a booklet printed in A4 format. The booklet contains eight sheets of card stock, a page of formers on regular paper to be glued to heavier card stock. Instructions and history are in Polish but there are two and a half pages of diagrams which will lead non-Polish readers through the construction. The model comes with cockpit and wheel wells but there is a card stock canopy if you do not want to go into that much detail. Bombs, Sparrow and Sidewinder missiles are provided. The inks and paper are of a high quality that shows the progress that Maly has made in recent years. The aircraft represents a Navy aircraft of VFA 82.
Construction: The fuselage is constructed using the "butt and glue" method. Construct each of the fuselage sections with a former in each end. Build and install the cockpit and wheel wells inside the proper fuselage section before installing the formers. When you have finished all of the sections, glue them together to made the complete fuselage. Reinforce the wing and tail formers and glue them to the fuselage. Cut the tail skins out, form them and then glue around the tail formers. Do the same to the wing skins. Build the landing gear and wheels and glue to the bottom of the aircraft. If you built the cockpit them use some transparent material and make the canopy. If you decided not to build the cockpit then cut, form and glue the colored card canopy provided to the top of the fuselage. Decide which of the bombs and missiles you want to include on your model, build them and attach to the proper position.
First Impressions: Not a complicated model
to build but I would recommend that you have some card modeling experience before
attempting this model.
Pm 36-2
Published by GPM
Designer:
Grzegorz Pomorski
Description:
Polish Locomotive

Kit: This 1/87 (HO) scale kit comes in an A4 booklet. The booklet contains four pages of colored card stock that contain all the parts to build the locomotive. There are a page and a half of history and instructions in Polish. There are two and a half pages of very detailed diagrams to assist you in the assembly of this model. The model consists of two parts, the locomotive itself and a coal tender. Detail on this model is outstanding, especially the underside of the locomotive. This is one of a series of trains that GPM is in the process of releasing and every one that I have seen are excellent models. The printing and coloring is flawless.
Construction: Start construction with the locomotive. Build the bottom of the frame and then build all the wheels. Cut and fold all the connecting rods out and after attaching the wheels to the frame, attach the connecting rods to the wheels. Build the boiler and glue to the top of the frame. Start detailing the frame and boiler by making the lights, connectors, stacks, whistles and other accessories and attaching them to the proper places. Build the cab with all the controls on the inside. Build the main part of the coal tender and then build the wheels and suspension. Glue the suspension and wheels to the bottom of the tender. Finish off the tender by building the cab to the front. Attach the locomotive and tender together. You might want to get a piece of HO track to display the model on.
First Impressions: GPM is providing us with a
wide selection of types of models to suit everyone's desires. This is not a
simple model. You will need card modeling experience and a lot of patience to
finish this one.
| Focke Wulf Ta 152 H-1 | Published by Fly Model |
| Designer: | Leszek Lewandowski |
| Description: | German WWII High Altitude Fighter |

Kit: This 1/33 scale model comes in a booklet containing 6 sheets of A3 paper and card stock. Two of the sheets are card stock which contains all the parts to build the model. One sheet contains formers printed on regular paper. These parts are to be glued to a heavier card stock to reinforce the model. There are two sheets, printed on both sides, that contain detailed diagrams on how to build the model. The instructions are in Polish so these will be invaluable to non-Polish readers. There is one page of history and instructions, in Polish, and a page that contains three view drawings of the aircraft. There is also a page included that contains some photos of other models available from Fly Model. The model contains a detailed cockpit as well as wheel wells. The diagrams show how to make the flying surfaces movable if you desire to do so. Printing and the color of the markings are very well done.
Construction: The first thing to do is take the sheet with the formers on it and glue them to a heavy card stock. The fuselage is built using the "butt and glue method". Build the cockpit before starting on the fuselage. Build each fuselage section with a former in each end. Insert the cockpit into the correct fuselage section before gluing the formers in or it might be difficult to get it inside the section. Once all the sections are finished, glue them together to complete the fuselage. Glue the wing formers together and then form and glue the wing skin over the formers. Build the wheel wells inside the wings and then glue the completed wing into the bottom of the fuselage. Glue the formers together for the tail section and then form and glue the tail section skins over the formers. Determine if you want the flying surfaces to move before gluing the completed tail to the rear of the aircraft. Build the landing gear, wheels, propellers and spinner and glue to the appropriate place on the aircraft. Finish your model by building all the intakes, gun pods, canopy and wheel well doors.
First Impressions: I have built this model
and had no problems in its construction. It makes up into an impressive model
but is not one I would recommend for a beginner.
This column does not cover all the new card model aircraft and ships that have been released this month. It contains only those models that have been sent to me by dealers and designers for review or that I have purchased for review. Due to space restrictions, some models sent in for review may be held over until next month.
Thanks to the following for providing kits for inspection and review:
