 Initially built to meet basic transportation and communication needs, aerosleds
were first produced in Russia around 1912. As a solution to the problems created
by harsh winter conditions, the aerosled basically consisted of platform mounted
on steerable skis and propelled by an automobile or aircraft engine-powered
rotor blade. As is often the case, it did not take long for this piece of civilian
technology to be adapted for military use. With the outbreak of World War II,
Russian designers came up with several new military aerosleds, including the
open-air NKL-16 and RF-8-GAZ-98, and the full-hulled NKL-26.
Initially built to meet basic transportation and communication needs, aerosleds
were first produced in Russia around 1912. As a solution to the problems created
by harsh winter conditions, the aerosled basically consisted of platform mounted
on steerable skis and propelled by an automobile or aircraft engine-powered
rotor blade. As is often the case, it did not take long for this piece of civilian
technology to be adapted for military use. With the outbreak of World War II,
Russian designers came up with several new military aerosleds, including the
open-air NKL-16 and RF-8-GAZ-98, and the full-hulled NKL-26.
As the hull of the NKL-26 was plywood, however, with armor-plating on the front
only, the two-man crew of the NKl-26 was only slighty better protected than
those piloting its open-air counterparts. While the NKL-26's driver occupied
a seat of relative safety inside the vehicle (and behind the armor plate), the
vehicle commander was perched through a hole in the roof, behind a small rotating
armor shield and armed with a 7.62mm machine gun. The aerosled's engine was
a 5-cylinder, air-cooled radial aircraft engine that was interchangeable with
the NKL-16 aerosled.
Aerosled battalions proved themselves to be quite useful at specific tasks such
as patrolling, chasing a retreating enemy, or moving troops and supplies when
road conditions were unfavorable to more traditional transport means. In some
cases, aerosled units were able to successfully execute suprise attacks on un-fortified
enemy positions. Their limited range and vulnerability to even moderate fire,
however, ensured that the aerosled would be relegated generally to a combat
support role, and not to participate in any kind of frontal assault. Try these
links for more information, including photos and diagrams, on Russian
aerosleds and the NKL-26.
The kit
This kit, produced by the Czech company PK Graphica, consists of 2 pages of
parts nicely printed on good cardstock. The parts have some good weathering
included in the design, so the finished model looks well-worn. There is also
1 page of good diagrams, and a page of instructions in Czech. Construcion is,
for the most part, fairly straight forward, so a lack of English (or non-Czech)
instructions is not a problem.
Vehicle hull
 The
aerosled's hull is put together from two assemblies: an outer skin made up of
5 pieces (including the roof), and the interior compartment (a single
piece). There are no formers or other bracings as they are not needed; the interior
compartment fits very snugly into the outer skin. When the roof is added, the
structure is actually quite rigid.
The
aerosled's hull is put together from two assemblies: an outer skin made up of
5 pieces (including the roof), and the interior compartment (a single
piece). There are no formers or other bracings as they are not needed; the interior
compartment fits very snugly into the outer skin. When the roof is added, the
structure is actually quite rigid.
The interior and exterior pieces have printed windows (bluish in color)
that are pretty realistic looking, but still no substitute for "real"
windows, so I cut the windows out and used some clear film between the interior
and exterior pieces.
 The
interior components are easily assembled and include the driver's seat, the
instrument panel and steering wheel, the fuel tank and fuel filler, and first
aid and equipment boxes.
The
interior components are easily assembled and include the driver's seat, the
instrument panel and steering wheel, the fuel tank and fuel filler, and first
aid and equipment boxes.
 I
installed the interior compartment in the outer skin first, and then put the
individual interior components in place. Note that the fuel filler (the skinny
green cylinder in the picture above) was not installed at this time; once the
roof is installed, the fuel filler can be inserted in the small hole in the
roof and pushed down to meet the fuel drum.
I
installed the interior compartment in the outer skin first, and then put the
individual interior components in place. Note that the fuel filler (the skinny
green cylinder in the picture above) was not installed at this time; once the
roof is installed, the fuel filler can be inserted in the small hole in the
roof and pushed down to meet the fuel drum.
Engine
 The
engine is put together with a series of cylinders and cones, and is mounted
to the hull with a cardstock engine mount. A piece of wire on either side of
the engine completes the mounting scheme. Other bits of wire are used to detail
the engine.
The
engine is put together with a series of cylinders and cones, and is mounted
to the hull with a cardstock engine mount. A piece of wire on either side of
the engine completes the mounting scheme. Other bits of wire are used to detail
the engine.
The massive propeller is also easily assembled, and is designed so that no bracing
with toothpicks is necessary to give it that 3-D look (see pictures of finished
model below).
Skis
 The vehicle's 4 skis are identical. The tedious task here are the 40 (10
per ski) tiny triangle-shaped braces that are attached.
The vehicle's 4 skis are identical. The tedious task here are the 40 (10
per ski) tiny triangle-shaped braces that are attached.
The ski struts are little bit tricky; there are several folds on these small
pieces. It is also important to glue the underside of the strut to the back
of the strut before cutting out the two openings in each strut.
The skis are attached to 2 axles that are run through holes at the bottom of
the hull. I used wooden skewers for axles.
"Wire works" and other details
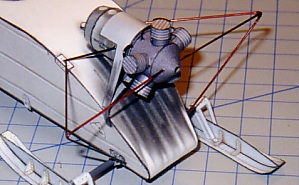 There are a lot of wire pieces that are used to finish detailing the model.
The first bit of wire work I did was the safety fence. The safety fence was
designed to keep folks from exiting the vehicle and walking into the spinning
prop. It is constructed from 2 pieces of v-shaped wire and 2 straight pieces
of wire (one of each on either side. The wire-to-wire joint is the outer point
of the fence, where the end of the straight piece is attached to the elbow of
the v. I used a cyanoacrylate gel, and it worked well and gave the appearance
of a weld. After these pieces were attached, I added another coat of red acrylic
paint, as the first coat (applied pre-assembly) was just not red enough.
There are a lot of wire pieces that are used to finish detailing the model.
The first bit of wire work I did was the safety fence. The safety fence was
designed to keep folks from exiting the vehicle and walking into the spinning
prop. It is constructed from 2 pieces of v-shaped wire and 2 straight pieces
of wire (one of each on either side. The wire-to-wire joint is the outer point
of the fence, where the end of the straight piece is attached to the elbow of
the v. I used a cyanoacrylate gel, and it worked well and gave the appearance
of a weld. After these pieces were attached, I added another coat of red acrylic
paint, as the first coat (applied pre-assembly) was just not red enough.
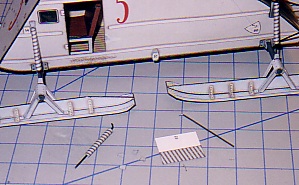 Next,
I put the shock absorbers on. The shock absorbers are simply rolled around a
piece of wire (similar to making an airplane's landing gear) and attached to
the hull at the top and the ski at the bottom. I would have liked for the shocks
to have a little bit more a 3-D appearance; if I were to build this model again,
I would spend a little more time to improve the detail here.
Next,
I put the shock absorbers on. The shock absorbers are simply rolled around a
piece of wire (similar to making an airplane's landing gear) and attached to
the hull at the top and the ski at the bottom. I would have liked for the shocks
to have a little bit more a 3-D appearance; if I were to build this model again,
I would spend a little more time to improve the detail here.
 Finally,
the steering rods (indicated by the red arrows) are attached and the wire work
is done.
Finally,
the steering rods (indicated by the red arrows) are attached and the wire work
is done.
Final details include the door, the headlight, a shovel, and a machine gun.
These are all easily assembled and attached.
Conclusion
This was a fun kit to build. It's not too difficult, and it will be one of the
most unusual models in any collection. It is sure to be an attention-getter
and conversation starter. The design is excellent; all the parts went together
very nicely as designed and I encountered no problems with fit. Highly recommended
to any modeler looking for something a little bit different.


Summary:
| Model: | Aerosane (Aerosled) NKL-26 |
| Kit: | PK Graphica |
| Availability: | Joseph Spinali's Spishop |
| Scale: | 1/25 |
| Difficulty: | Medium |
| Number of Parts: | about 150 |
| Instructions: | Czech |
| Diagrams: | Good |
| Fit: | Excellent |
| Coloring and Artwork: | Very Good |
| Printing: | Very Good |
This model is available from Joseph Spinelli in the Czech Republic.
