First Looks For the Month of February 2003
| Su 34 | Published by Fly Model |
| Designer: | Zbigniew Sajdak |
| Description: | Russian Attack Jet Aircraft |

Kit: Here is Fly Models latest aircraft release in 1/33 scale. The model comes in a booklet in A3 format. The booklet contains nine pages of card stock, one page of colored parts on regular paper and seven sheets of formers on regular paper. There are very little instructions and those provided are in Polish. Six pages of diagrams are provided and will be necessary to build the model whither you understand Polish or not. This is a highly detailed model with complete cockpit and wheel wells provided. No card stock canopy is provided but templates are provided for you to make your own transparent canopy. The kit comes with 11 bombs and missiles that can be mounted on the aircraft.
Construction: This model is a built a little different from most card models I have seen. The fuselage is built more like a ship than an aircraft. You build the main section of the fuselage, the section with the cockpit, by first building a framework and then applying the fuselage skin over the frame. Then build the forward section of the fuselage the same way and glue it to the center section. The rear section is built by rolling and gluing the sections and installing formers inside the sections. Cut out the formers for the tail section and wings and glue to the fuselage. Cut and form the tail and wing pieces and glue them over the formers. Build the landing gear and wheels and glue them into the proper wheel well. Decide on which missiles and/or bombs that you want your model to carry. Cut form and glue the missiles/bombs you want to the bottom of the wings.
First Impressions: This is a very complex and time consuming model to build. I would not recommend it to anyone that did not have quite a bit of card modeling experience or is not willing to spend the time to build this. This will build up to be one the most impressive card models you have ever built.
| Lunar Module | Published by Betexa |
| Description: | Lunar Lander Diorama |

Kit: The kit comes in an 8 1/2 by 13 inch booklet that contains 10 pages. The pages are printed on both sides, the instructions and pictures on one side and the model on the other side. Before starting construction you might want to photo copy the instructions so that you do not lose them in the construction process. The diorama consists of the Lunar Lander, Lunar Rover and the Lunar Landscape. Six of the pages make up the Lunar Landscape where the Lander and Rover can be displayed. The Rover is on one page and the other three pages make up the lander. Two profile figures are provided, one to stand on the surface and the second to sit in the Rover.
Construction: Construction of the model is done in three parts, the Lander, the Rover and finally the Landscape. Starting with the Lander, it is built in three parts. First you will construct the under carriage, the start section and the Lunar Module itself. Begin construction by building the under carriage, when finished build the start section and attach to the under carriage. Cut all the parts out to build the Rover and starting from the framework on up till the vehicle is finished. Build and add the tires and other accessories to finish the Rover. Finally cut out all the Landscape parts and glue then together. When finished you can now mount the Lander and Rover on the Landscape along with the two figures provided.
First Impressions: Looking at the model it appears that it could be built by someone with a little card modeling experience. Would be a great class project or a good parent/child project used for a little "show and tell" about the space program.
| Dornier Do 335A-1 Pfeil (Arrow) | Published by DeWayne Barnett |
| Designer: | Marek Pacynski |
| Description: | German WWII Fighter |
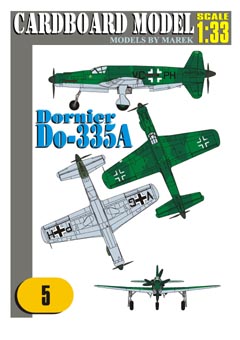
Kit: Another of the new 1/33 scale line that Marek is introducing. This model is available only in PDF format on CD. You will need Adobe reader and a color printer to print the model out on. There are 16 pages on the CD, a cover sheet, 11 sheets to be printed on card stock, two history pages and two pages of diagrams. A detailed cockpit is provided but if you do not want to go into that much detail, a colored card stock canopy is provided. Color scheme is very accurate, the aircraft being two tone splinter green on top and blue on the bottom. Along with the detailed cockpit, detailed wheel wells and landing gear are also provided.
Construction: Start construction with the Fuselage. This model differs from Mareks 1/50 scale in using the connecting strip method rather than the butt glue method he used in the smaller models. Install the cockpit in the correct section before gluing the sections together. If you do not want to make a transparent canopy then just use the colored canopy provided. No pattern is provided for the transparent parts of the canopy but you can easily make the canopy by taping the colored canopy provided to a piece of transparency and cut to fit. Then cut the blue parts of the canopy out and glue the transparent material to the frame that is left. A solid wing frame is provide which should prevent warping, cut and glue the wing frames together and then cut and glue the wings over the frame. Glue the completed wing sections on to each side of the model. Build the tail section, gluing the completed section to the rear of the aircraft. Build the two propellers, gluing one on each end of the model.
First Impressions: A model of a very unusual aircraft that will be a great addition to your collection. Not a model for a beginer but does not require that you be an expert to produce a good looking model.
| 1:24 Skoda 1000 MB | Published by PK Graphica |
| Designers: |
Lubos Kligl & Petr Knotek |
| Description: | Rally Race Car |
| Reviewer: | Neil Linnell |

Kit: This is a neat little model of one of the participants of the 2000 London-to-Sydney Marathon rally race. The kit is brightly printed on two pages of card stock. Also included are a few construction diagrams and instructions in Czech.
Construction: The model is built in two basic assemblies, the
chassis and the body. The chassis, underpan, and suspension assembly has a nice
level of detail without trying to replicate every single part found on the real
thing. In other words, you won't spend a lot of time with a lot of fiddly little
parts no one will ever see. Just the basics, nicely done-- and the front wheels
are steerable. The body goes together with perhaps more pieces than one would
think; this is to ensure that the curves are faithfully replicated. The tricky
parts here are the front fenders; some careful forming and test fitting will
be required to get a good look. There is a set of diagrams that show how these
parts should be formed. This model does not have an interior, so there are no
window pieces to contend with (the windows are nicely printed on the body pieces).
First Impressions: This is a colorful and well-printed
model. It's not really a model for beginning card modelers, but would make a
nice first model for those wanting to give the Czech-designed vehicle models a try.
Ju 87 Stuka
Published by Fiddlers Green
Designer:
Chauncy Green
Description:
German WWII Dive Bomber

Kit: Fiddlers models are not done to any particular scale but they have set a standard called WSAM. WSAM stands for Worlds Smallest Aircraft Museum which is a scale of 1/60th. Normally the model comes with a percentage so you can figure the exact scale of the model. This model has a WSAM of 100% which means it is 1/60th scale. The model comes on three sheets of letter size card with one sheet of instructions. You can purchase the model by itself from Fiddlers web site or order it on a CD with many other aircraft from Fiddlers. If you do order the model over the internet, it comes in PDF format and you will need card stock and a color printer to print the model out. If you want to buy a pre-printed model, PMI usually carries all of Fiddlers models this way. Model is done in two tone splinter green on top and a light blue on the bottom. The canopy is of colored card stock but you can cut the blue area out and glue transparent material for more realism.
Construction: Construction of the model is of the standard Fiddlers method. There are no internal formers for the fuselage but with Chip's designs these are not necessary. Cut out the fuselage sections, roll and glue then together and then glue the sections together using the tabs on each section. Cut and fold the wings, use the jig provide to get the correct "inverted gull" wing shaping of the wing. Cut fold and glue the tail parts on to the rear of the fuselage. The landing gear is fixed with spats, build the landing gear and attach to the bottom of the wing and rear of the fuselage. Eight 50kg and two 250kg bombs are provided. Decide which of these that you wish to add to the aircraft than build and attach.
First Impressions: A good looking model, which should be a fairly easy build. Recommended for beginners in the card modeling hobby.
| P26A | Published by DeWayne Barnett |
| Designer: | Marek Pacynski |
| Description: | Inter-war U.S.A.A.C. Fighter |

Kit: Marek has taken his 1/33 scale P26 and reduced the scale to 1/50 with this model. While the 1/33 model is in inter-war colors, this model is in the colors and markings at the beginning of WWII. This model is available only in PDF format on CD which contains three other models including a 1/50 version of his 1/33 F4U Corsair. You will need Adobe reader and a color printer to print the model out on. There are four pages on the CD, a cover sheet, two sheets to be printed on card stock and a page of diagrams. A detailed cockpit is provided which you will have to build as this is an open cockpit aircraft. Color scheme is olive drab on top with a gray undersides. A detailed engine is provide which must be built. Landing gear is fixed so there are no wheel wells.
Construction: Start construction with the Fuselage. This model uses the butt glue method, you construct each fuselage section and then glue a former in each end. When all the fuselage sections are built you butt glue them together. Install the cockpit in the correct section before gluing the sections together. Cut and glue the wing frames together and then cut and glue the wings over the frame. The landing gear is fixed on this aircraft with "pants" covering the wheel. Build the main landing gear, wheels and pants. Assemble the three parts and glue them to the bottom of the wings. Build the tail section and glue to the rear of the aircraft. This aircraft was the step between the biplane and monoplane. Stress wires were used for the wings because of thinking that went back to the biplane. In order to give your model authenticity use the diagrams provided and glue the stress wires between the fuselage and wings.
First Impressions: Since this is a reduction in scale model with more detail than Mareks normal 1/50 models it is more complex than his usual models. I would recommend building one of his models that were originally designed in 1/50 scale before attempting this one.
| Hawker Hurricane | Published by Kartonoway Arsenal |
| Designer: | Andrzej Halinski |
| Description: | British WWII Fighter |

Kit: This 1/33 model comes in booklet form. The paper size that Halinski uses is slightly bigger than A4, approximately 9 1/2 x 13 1/2 inches. The booklet contains seven sheets, three of these sheets are card stock. One of these sheets has parts on one side and the rear cover on the other. This model was donated by Paper Models International and contains a history/instruction page in English. This may not be the case if you purchase the model elsewhere. Instructions provided with the model are in Polish but there are two sheets of diagrams, printed on both sides, to help you assemble the model. Rendering on this model is very good as is overall printing. A nice touch is that the connecting strips are done in camouflage colors which prevents white lines from appearing between the fuselage sections. A detailed cockpit and wheel wells are provided. No colored card stock canopy is provided, templates are there to build a transparent one.
Construction: Start construction of the fuselage by constructing the frame of the center section. Build the cockpit and glue to the inside of the frame and then glue the skin of the fuselage over the frame. The rest of the fuselage is built using the former connecting strip method. The fuselage sections are cut rolled and glued together, a former and connecting strip is glued in one end and then the sections are glued together. Build the wing frame with the wheel wells inside, then cut and roll the wing skin and glue over the frame. Glue the completed wing section to the bottom of the fuselage. Build the frame for the tail section, skin it and glue to the rear of the fuselage. Build the landing gear and glue into the wheel wells. Finish the model by building the air intake and propeller and glue to the appropriate position.
First Impressions: Another great model from Halinski. The weathering is very striking and this will make up to a model you will be proud to show. Not a model recommend for the beginner.
| A10A Thunderbolt II | Published by Fly Model |
| Description: | U.S. Air Force Ground Attack Aircraft |

Kit: This is one of Fly Models older models and does not have the detail that some of their newer models have. The design and engineering of the model is as good as any of the other Fly models but will be much simpler to build. The model comes in A3 format. It contains four pages of card stock, one page of formers on regular paper to be glued to a heavier card stock for strength. There are very little instructions and those provided are in Polish. Two pages of diagrams are provided and will be necessary to build the model whither you speak Polish or not. A cockpit and wheel wells are provided along with a good selection of weapons to hang under the wings. No card stock canopy is provided but templates are provided for you to make your own transparent canopy. If you do not want to scratch build the canopy a vacuformed canopy is produced by Gomix
Construction: The fuselage and engines are built using the "butt" method, each section is cut and rolled and then a former is glued in each end. When you have constructed all the sections you butt glue them together. Build the engine fairings and glue this assembly to the rear of the fuselage and then attach the engines to the fairings. Cut out the formers for wings, there are several formers that help you get the curved shape of the wing correctly. Glue the formers together and then glue the skin over the wing. and glue to the fuselage. Cut internal supports for the tail section and glue to the rear of the fuselage. Then cut and form the tail section and glue to the former. Build the landing gear and wheels and glue them into the proper wheel well. Decide on which missiles and/or bombs that you want your model to carry. Cut form and glue the missiles/bombs you want to the bottom of the wings.
First Impressions: This is a very big and impressive model. It is not only a good build for a beginner to the "butt" construction method but will make a great addition to any collection.
| M3 General Grant | Published by Super Model |
| Description: | U.S. Early WWII Tank |

Kit: a 1/25 scale model that comes in booklet form. Instructions for the model are in Polish but there is a page of diagrams that will help you in building the model. The booklet contains four pages of heavy card stock and four pages of parts on regular paper. All parts to be reinforced with heavier card stock are marked with an *. The model is not colored as the picture above shows but is in desert camouflage which is a sand and brown. The lettering and marking on the sides of the tank are roughly done, they appear to be done by hand. Super Model provide three unit markings on the back page so that you decide which unit you want your model to represent.
Construction: Construction of the model begins with cutting out and assembling the hull from the heavier card stock provided. After the hull is completed build the turret and guns and attach the turret to the top of the hull and one gun to the front of the tank and the other to the turret. Now cut and form the suspension, bogies and gears to form the parts where the tracks will go. Cut out and glue the tracks together and them run them around the bogies and gears that you built previously.
First Impressions: An older model but the only card model that I know of this widely used tank. A simple inexpensive build which would be good for someone starting in building card model tanks.
| Richelieu | Published by Halinski |
| Designer: | Grzegorz Nowak |
| Description: | WWII French Battleship |

Kit: This 1/200 model comes in booklet form which is or a different size then most card models. Halinski uses a size that is between A3 and A4. The booklet contains 15 pages of card stock, seven sheets of parts to be reinforced on regular paper and two sheets of diagrams. Instructions are in Polish so you will be dependent on the diagrams for construction guides. Parts are provided to build a full hull model or you can build it as a waterline version. Coloring of the ship is mostly gray with tan colored decks. If you build the waterline version the parts below the waterline are in red. Parts are provided to allow you to make the guns elevate and rotate.
Construction: Before starting construction decide if you want to build the model as full hull or waterline. Cut out the formers that are needed to build the frame you will need to build your version. Build the frame in the standard "egg crate" configuration after reinforcing all the formers with a heavy card stock. Glue the deck parts to the heavy card stock and then glue to the top of the frame. Cut the hull sides out and glue them between the deck and base, if waterline, of to the center horizontal former, if full hull. Once the hull is finished, cut fold and glue the super structure to the deck. Now build the main and secondary gun batteries to the deck and then do the same to the anti aircraft batteries. Finish your model by detailing with railings, life boats, masts and other detail provided in the kit.
First Impressions: A very unusual model, I know of no other card model company that made a model of this ship. I would put this model on the same class as the Wilhelmshavener models. A very large model with lots of parts, it will take awhile to finish.
| Renault R17 | Published by |
| Designer: | Eugeniusz Moczuk |
| Description: | French WWI Tank |

Kit: a 1/25 scale model that comes in booklet form. The booklet contains the parts to build the tank and the rail car that carries the vehicle. Also provided are the parts to build the railroad rails which will allow you to build a diorama of your completed model. Instructions for the model are in Polish but there are two and a half pages of diagrams that will help you in building the model. The booklet contains 12 pages of card stock. Printing and coloring of the model is very well done with the colors being green brown and olive. This is a very detailed model with parts to do the interior of the tank, the full suspension system, engine and transmission.
Construction: Construction of the model begins with cutting out and assembling the formers for the hull and then gluing the hull parts around the frame. Build the the interior of the hull before building and attaching the turret and guns. After the hull is completed build the turret and guns and attach the turret to the top of the hull. Now cut and form the suspension, bogies and gears to form the parts where the tracks will go. Cut out and glue the tracks together and then loop them around the bogies and gears that you built previously. After finishing the tank, start on the rail car. Build the frame first and then add the transmission gearing wheels and suspension. Now cut out the parts to build the rails your diorama will rest on. Cut and attach the two pieces of the base together and then form and glue the rails onto the base. When finished you can now put the rail car on the rails and then the tank on the rail car.
First Impressions: Another great model from GPM. Without a doubt one of the best producers of card models in the world. Lots of parts and detail on this model so make sure you have enough time allotted to do justice to the model.
| PM-36 | Published by GPM |
| Description: | Polish Locomotive |
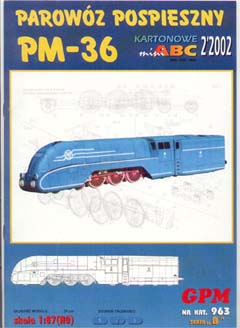
Kit: An HO (1/87) card model of a locomotive delivered in booklet form. The model itself is on four sheets of card stock, also included are two sheets of diagrams. There is one page of instructions but they are in Polish so you will be dependent on the diagrams if you do not read Polish. Looking at the diagrams they appear to be very detailed so the lack of instructions should not be a great hindrance. The kit contains a complete under carriage and wheel set and interior of the locomotive. The model is overall blue with red wheels. Printing and coloring of the kit is outstanding.
Construction: Start construction by building the frame. Them build the transmission, suspension and wheels and glue them to the bottom of the frame. Cut the parts needed to build the frame of the engine, cab and tender and glue all of these together. Now cut and fold the outside skin of the engine, cab and tender and glue over the frame you previously built. Build the interior of the cab including the controls and gauges. Build the connectors and attach to the rear of the locomotive. Finish up by rolling and attaching the stack to the front of the engine.
First Impressions: A beautiful little train engine. Quite detailed but once you get past the under carriage and wheels it does not look that complicated. Will not take an expert to build but I would suggest some card modeling experience before trying this model.
| Alki Point & Destruction Island | Published by Fiddlers Green |
| Designer: | Chip Fyn |
| Description: | Washington State Lighthouses |

Kit: Chip from Fiddlers Green has just released a series of 10 Washington state lighthouses. The lighthouses are available individually on the Fiddlers web site. When you purchase each light house three different sizes will be sent to you, large, small and mini. All are delivered in PDF format so you will need a color printer and card stock to print the models out on. The number of pages that you get depends on the size and lighthouse. I download only the small version of each and all but one came on one sheet of 8 1/2 by 11 card stock. One did require two sheets of card stock. There is a PDF of one sheet which contains the history of the lighthouse and a diagram which shows you how to assemble it. For example the two light houses reviewed here are sold separately but the history and diagrams for both are on the same sheet.
Construction: Construction of both light houses in this review are basically the same. On both you will construct the light house itself and then the building that is associated with the light house. The destruction Island light house is basically a tube mounted on a base with the light on top. The house that attaches to this light house is the simpler of the two, build the sides and then attach the roof. When finished build the joiner, part that connects the lighthouse to the building, and chimney and attach to the building then glue the joiner to the lighthouse. Alki Point differs in that the light house is an octagon and the building is quite larger than the first one.
First Impressions: Elegant little light houses that require no card modeling experience to build. Would be a great project for a parent and child or as a school project.
| Kartonowy Fan | |
| Editor: | Lukasz Wawozny |
| Description: | Polish Card Modeling Magazine |

Review of this will be different since this is a magazine and not a model kit. Even though these magazines are written in Polish I ordered a few of them to see what they were all about. Each of the magazines have either card stock parts to enhance one of the published card models. In the case of this particular magazine it contains an entire model. On two sheets of card stock in the magazine is a full model of a Kubelwagen designed by Fly model. Also included are 1/400 scale drawings of the Yamato. The drawings are top and side view, very detailed and would be welcomed by anyone interested in ships.
The magazine is full of ads by most of the popular Polish card modeling company with pictures of the completed models. There is an article that looks like a conference titled "Gdansk 2000" with displays of card models from, I assume, the participants. There is a three page column that appears to be of the same idea as the column that you are reading. It says new a has short descriptions of a bunch of Fly Model, JSC, GPM, WIR and Super Model.
Even though the magazine is in Polish and there are several articles that I could not read, I am not sorry I got the magazines. It is illustrated enough to give me an idea of what is going on in Poland which is one of the major players in the card modeling industry. The model included and diagrams of the Yamato along with the pictures of completed modes make the magazine worth the money.
This column does not cover all the new card model aircraft and ships that have been released this month. It contains only those models that have been sent to me by dealers and designers for review or that have been purchased for review. Due to space restrictions, some models sent in for review may be held over until next month.
Thanks to the following for providing kits for inspection and review:
