
First Looks For the Month of December 2003
| He 111 | Published by GPM |
| Designer: | Grzegorz Pomorski |
| Description: | German WWII Bomber |
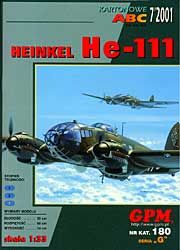
Kit: A 1/33 scale kit that comes in an A4 booklet. The booklet contains 23 pages, 12 of these pages are card stock that contains the parts to build the model. Seven of the sheets are on regular paper that contains the formers to be glued to a heavier card stock and the parts to make the interior of the aircraft. Three pages contain detailed diagrams on how to build the model, two of these are printed on both sides. There is a one page three view of the completed model. This is a very detailed model containing a detailed cockpit, crew compartment and bomb bay. All flying surfaces can be made movable and the landing gear can be made to extend and retract.
Construction: Glue all the formers to a heavier card stock. These formers will be used to give your model both strength and its shape. Build all the detailed parts before starting the other parts of the model. These parts will go inside different sections as you proceed. Cut out the fuselage sections and glue the inside paper sections, at this point I would also recommend that you glue the clear windows into each fuselage section so you can see inside the model The fuselage is built using the former connecting section method. Build each fuselage section, installing the detailed parts inside, and when finished glue the sections together to make the complete fuselage. Build your wing frames, decide if the ailerons are to move, and then cut the wing skins out and wrap them around the frame. Build the engine nacelles, decide if the wheels are to be extended or movable, installing the landing gear inside and then glue to the wing. Build the frame for the tail section and glue to the rear of the aircraft. When finished cut the tail skins out and glue around the frame, Build the propellers, spinners and tail wheel and glue to the appropriate positions.
First Impressions: Another one of GPM's super
detailed kits. Since there is no easy way to simplify this model you need to
have card modeling experience before attempting this model. This being said
this is a super model that you will be very proud to display.
| Striemitielnyj | Published by GPM |
| Designer: | Grzegorz Pomorski |
| Description: | Russsian Armored Train Car |

Kit: This 1/25 kit comes in a booklet that contains 24 pages of A4 card stock and paper. 14 of these pages are card stock that contain parts to construct the model and two contain detailed diagrams to help you build the model. Seven sheets of paper contain formers that are to be glued to a heavier card stock. One sheet of diagrams is provided. The inside front and back cover contains a history and instructions, both of which are in Polish. Half the inside back cover contains templates to cut wires that are needed in the building of the model.
Construction: Cut out and glue all the formers to a heavier card stock and then build the internal frame of the car. This procedure is much the same as building the frame of a ship model. Cut out and glue the reinforcement rings for the turrets to the frame. Cut out the parts to skin the sides, front, rear and top of the car and glue them over the frame. Make sure that you build and glue the machine guns that poke through the sides before gluing the top on. Build the connectors on the front and back of the train, the observation turret and glue these to their proper place. Build the wheels and axles for the car and glue to the bottom. Build the main gun, the machine guns and then the turrets. Mount the guns that go inside and on top of the turrets and then place the turrets inside the reinforcement rings you glued in the frame. If you want these turrets to rotate do not glue the turrets in the ring.
First Impressions: An unusual model that will
surely catch the eye when finished. The large parts will lend themselves to
someone who is just starting in card modeling. Some ship card building experience
will help with this model.
| Wang | Published by GPM |
| Description: | Oriental Church |

Kit: This 1/150 scale church comes in a booklet that contains six sheets of A4 card stock and paper. Four sheets are card stock that contains the parts needed to build the model. The two sheets of paper contain photographs of the model in the different construction phases. The inside back cover also contains photos, this gives you three pages of photos that show you how to build the model. The inside cover contains a history of the church in Polish. The model contains a base which represents the grounds the church sits on and even contains trees to place on this base.
Construction: Cut the base out and glue it to a heavier card stock which will give you a good solid base to work from. Cut out the walls for the model and glue them to the base. Build and glue the extensions on the sides of the outside walls. build the causeway between the church and tower and glue to the wall. Build the dome for the church and glue to the extension and then glue the roof on to the main part of the church. Build the tower and glue it to the base and the causeway which will now be between the church and the tower. Build the outside wall around the building and then the roof sections that go between these sections and the main wall. Build the trees that are supplied with the model and glue them to the base.
First Impressions: A very unique little
model. I can not determine what country it is in but it does seem to indicate
it was an evangelistic effort. Does not seem to be to difficult to build and
would be a fun project for the whole family.
| Fw 190 D9 | Published by DeWayne Barnett |
| Designer: | Marek Pacynski |
| Description: | German WWII fighter |

Kit: Another beautiful 1/50 kit from Marek. The model I received came from DeWayne who sells it individually across the Internet. The model comes in a PDF file that contains four sheets A4 in size. One sheet is the cover sheet displayed to the left. A history and detailed set of diagrams are on another. The model itself comes on one and a half sheets. Since the model comes in PDF format you will need Adobe reader and a color printer to print the model out. I recommend 8.5 by 14 inch 90# Exact Index card stock for printing. All parts to be reinforced are marked with red numbers. No cockpit or wheel wells are provided. Landing gear is glued to black markings on the lower wing and the cockpit is colored card stock.
Construction: Cut out all parts marked with red numbers and glue to a heavier card stock. The fuselage is built using the "butt and glue" method. In this method you build each section with a former in each end and then butt and glue the sections together to make the complete fuselage. The rudder is part of the fuselage assembly so all you have to do to finish the tail is put the elevator former through the fuselage and then glue the skins over the former. Build the engine cowl inserting the engine fan part in the front and then glue to the front of the aircraft. Glue the wing formers together and then the wing skins over the formers. When finished glue the completed wing to the bottom of the fuselage. Glue the wing fillets to the top of wing next to the fuselage. Build the landing gear and glue it and the wheel well doors to the bottom of the wing. Build the propeller and spinner and glue to the engine fan.
First Impressions: Colors are very striking
on this aircraft. The red undersides really catch your eye. As with all of Marek's
models this one is well engineered. Not a difficult model to build but you need
some practice in the "butt and glue" construction method before attempting
this model.
| F4U-5NL | Published by Orlik |
| Designer: | Lukasz Fuczek |
| Description: | WWII/Korean War Night Fighter |

Kit: A 1/50 scale kit from a new company. They have released this model, an early automobile and an early helicopter. Inside the booklet there are diagrams and components to upgrade Marek's 1/50 P-51B. This model comes in a booklet and contains six pages. Three pages of card stock and one of paper contain the parts to build the model. The parts on the paper page are to be glued to a heavier card stock to make formers. There is one page of diagrams printed on both sides. A history and instructions are printed on the inside front cover in Polish. The back cover has pictures of the completed model on both sides. The model has a detailed engine, cockpit and landing gear. A colored card stock canopy is provided as well as a template to make a clear canopy so you can show of the cockpit.
Construction: Before starting construction of the fuselage build the engine and cockpit as they will be glued inside one of the fuselage sections. The fuselage is built using the former connecting strip method. You build each fuselage section with a former and connecting strip in one end. When finished all the sections you glue them together with the connecting strips to complete the fuselage. Make sure you install the cockpit and engine inside their proper sections before gluing the sections together. Build the frames for the wings and glue the wheel wells inside the frame. When finished cut and glue the wing skins over the frame. Each wing skin is made up of three parts with connecting strips to allow you to make the complicated shape of the inverted gull wing. Start from the skin next to the fuselage and work outward. Build the tail section and glue to the fuselage. Build the radome and glue to the wing. Build the landing gear and propellers and glue to their appropriate positions.
First Impressions: One of the most detailed
1/48/ 1/50 scale models I have ever seen. You can eliminate some of the detail
by using the colored card stock canopy and gluing the landing gear to the gray
areas on the bottom of the wing. Even with this, this is a complex model and
should not be attempted by someone who has not had card modeling experience.
| Bv 138 | Published by Fly Model/Gomix |
| Designer: | Tadeusz Grzelczak |
| Description: | WWII German Flying Boat |

Kit: This 1/33 scale model is the latest re-release of the earlier Fly Models by Gomix. Having never seen the original release I can not compare this release to that one. This model comes in booklet form and contains 12 pages in A3 format. Two pages of diagrams one of which is printed on both sides. Three pages printed on regular paper that contains formers to be glued to a heavier card stock. Seven pages of card stock contain all the external parts of the model. The model contains detailed gun turrets as well as a detailed cockpit. No card canopies are provided but Gomix does make a canopy set for this model,
Construction: Since this is a flying boat you will use techniques that are used to build both aircraft and ships. First cut out all the formers that are on the paper pages and glue them to a heavier card stock. Using the formers build the hull/fuselage frame. Build the cockpit and gun turrets and glue into the frame and then cut the skin out and glue over the frame. Built the frame for the tail booms and tails themselves and then cut and glue the skins over them. Build the frames for the wing and glue the wing skins over them, then glue the completed wing to the top of the fuselage. Glue the frames for the three engine nacelles to the top of the wings and then the skins of the nacelles over the frame. Build the wing tip floats and propellers and glue to their appropriate positions.
First Impressions: An interesting aircraft
that we are glad to see available again. Not a model for a beginner and some
experience with both card aircraft and ship building will be of great help in
building the model.
| Dfs 230 | Published by Fiddlers Green |
| Designer: | Chip Fyn |
| Description: | WWII German Glider |

Kit: The latest glider from Fiddlers Green in their glider collection. The model is available as a download on the Internet or can be purchased on FG's CD. Chip has mentioned that he will be releasing a CD that contains all the gliders that he has done. The model comes in PDF format so you will need suitable card stock, Adobe Reader and a color printer to print the model out. The scale of this model is listed as 85% of WASM. WASM is equal to 1/60 so the scale of this model is 1/51or approximately 1/50 scale. The model prints out on two sheets of 8 1/2 by 11 inch card stock. The model parts take up one and a half pages, the other half page contains a history of the aircraft and instructions.
Construction: The fuselage is made up of one piece which you cut out and glue together using the tabs provided. Since FG's models do not contain inner formers you must score and bend the model correctly to get the models proper shape. Once you have the fuselage glued together add the nose plate and deck. Cut out the canopy and glue to the upper portion of the forward fuselage. Cut out the three parts that make the wing, glue the center section to the fuselage and the outer wing panels to the center section. Cut out the wing struts, use toothpicks to give it strength and glue the strut between the wing and fuselage. Cut the tail section out fold and glue to the rear of the model. Construct the struts and glue to the bottom of the model. A set of droppable wheels are provided in the kit and will make a good stand to display your model on.
First Impressions: As with most FG models,
this one is buildable by someone who has never built a card model before. The
1/50 scale of this model makes it one that will fit in with any 1/48 or 1/50
scale collection.
| Yukikaze | Published by Halinski |
| Designer: | Marcin Grygiel & Marcin Dworzecki |
| Description: | Japanese WWII Destroyer |

Kit: The Yukikaze is the latest release from Kartonowy Arsenal which is part of the Halinski publishing house. Halinski's models come in an odd size, this booklet measures 13.25 by 9.5 inches. The booklet contains 14 pages, nine pages contain the parts to build the model. Four of the pages are printed in a dark gray on the backside so that rails and other parts that you can see both sides will have color. Four of the pages have shadowed detail diagrams that show how to build each section of the ship. There are also several pictures of different sections of the ship on the inside of the back cover. The final page has the templates on it for you to make masts, rails and other parts to be made from wire or thread. You have your choice of building the model as a waterline or full hull version.
Construction: Construction of the ship is mostly what we have come to expect from a card model ship. Cut the parts that form the frame of the ship out from the two plain paper pages and glue them to a heavier card stock for strength. Glue the formers together to make the frame of the ship. Be very carefully at this point as any warps will cause the model to be off center. Cut the deck out and glue it to heavier card stock and then glue it to the top of the frame. Cut the hull sides out and glue between the waterline and deck. Build the superstructure of the ship adding the two funnels at this time. If you decided to build the full hull model than this is the time to add the propellers, shafts and rudder. Build the turrets and torpedo tubes and mount them on the deck and superstructure. You can build the torpedoes and mount them on the tubes. Build the lifeboats and anti aircraft guns and mount then on the proper place on the model.
First Impressions: A highly detailed model that
should not be attempted by anyone that does not have considerable card modeling
experience. Halinski continues their highly detailed model line with a vengeance.
| Brad Bouzov | Published by Betexa |
| Description: | 15th Centry Czech Castle |

Kit: Another fine castle produced by the Czech company that comes in booklet form. The booklet contains 10 pages including the front and back cover. You have to included the covers as Betexa prints on every sheet front and back. This means that if you want to keep the instructions, diagrams and history, you will have to photo copy the back sides of the parts page. The booklet contains the history and instructions in three languages, Czech, German and English.
Construction: Cut the base plate out and then cut the indicated places in the center and glue the base to a heavier card stock. Cut and glue the walls to the base and then build the ramparts attaching them to the walls and base. Build the inner courtyard complex attaching the walls and glue the completed complex on to the base. Build the inside courtyard including the breastwork and balconies. Now construct the church that is in the inside court yard and start applying the roofs. Build the towers for the castle and glue to the base and walls. Build and attach the turrets and gables to the completed roofs. Build the enclosed gallery that will go on the top of the main tower and finish the roof of the tower.
First Impressions: A great looking castle
but not one that will be built overnight. You will need time and patience to
do this model the justice it deserves. Let me again emphasize that you do need
to copy the diagrams and instructions before begriming. It can be very frustrating
to be building along and finding the needed diagram or instruction inside closed
walls.
| Su 27 | Published by P-Model |
| Designer: | K. Gondou |
| Description: | Russian Fighter |

Kit: A 1/50 scale kit that is delivered through the Internet as a PDF file. You will need Adobe Reader and a color printer to print the model out. The card stock recommend by the designer is 120 to 160g/m2. I use 90# Exact Index that is 165g/m2 and it seems to work very well. The model consists of 12 pages in A4, 11.69 by 8.28 inch, in size. I recommend that you use legal size, 8.5 by 14 inch, card stock to print the model out. You can use smaller size card stock by using the "print to size" feature in Adobe but the model will no longer be in scale. All instructions are in Japanese but there are four pages of detailed instructions to lead you through construction of the model. The diagrams are numbered and you must follow these numbers as you build the model. The way that Mr. Gondou has designed these models you can not build the models in separate sections as you are normally used to. The model does not have a cockpit and the canopy is of colored card stock. The models comes with a very nice stand so that you are given the choice of leaving the landing gear extended or retracted.
Construction: Construction of these models use what I call the "integrated" method. In this method you start building the model with part #1 and proceed through the last part in the kit. Each step is documented in the diagrams that are provided with the model. I can not emphasize this enough, you must follow these steps in order or you can not build the model. I recommend that you study the diagrams carefully before starting. You will start by building the forward part of the fuselage until you get to the part where the wings are attached. At this point you will glue the wings to the forward fuselage and then continue to build the fuselage from there. As you get to the rear of the fuselage you will glue the tail section into the fuselage and then continue to finish the fuselage. If you decided to build the model with the landing gear down you will now build the landing gear and wheels and glue the finished assembly into the wheel wells. Build the under wing mounts and the missiles that go on them and glue under the wing.
First Impressions: This is one of the early models
from this company. The model uses only two internal formers and the diagrams
are not broken down. Later versions of the P-Models use more formers and the
diagrams are broken down so each step is easier to follow.
| T-37 | Published by Answer |
| Designer: | Tomasz Debicki |
| Description: | Russian Tank |

Kit: This 1/35 scale model comes in a booklet that contains two tanks each in its own color scheme. The booklet contains two sheets of A4 card stock each containing all the parts to compete one tank. Diagrams to help in the construction of the model are on the inside of the front cover. History and technical specifications are also on this page in Polish. I see no instruction in any language in the booklet so you are strictly dependent on the diagrams. The inside back cover contains a view of the top and rear of the completed model with parts marked. Tracks and some other parts are on the inside of the back cover. Parts to be glued to heavier card stock are marked with a "*" and those to be doubled reinforced are marked with "**".
Construction: Cut out and reinforce with heavy card stock all parts marked with "*" and "**". There is no internal structure for the tank, the main body is in one piece, which you cut, score, fold and glue. Now cut the parts out to make the suspension and bogies and glue them to the hull. Go to the inside back cover and cut the tracks out and glue them around the bogies. Build the gun then the turret, mount the gun in the turret and glue the turret into the tank hull. Build the exhaust and the accessories and glue to the top of the hull.
First Impressions: A neat little tank that does
not have too many parts. should be a good starter model for those with little
experience. Since there are two tanks in the kit, it gives you two chances to
complete the model.
| Captain Cook's Birthplace | Published by Fiddlers Green |
| Designer: | Chip Fyn |
| Description: | Thatched English Cottage |

Kit: This is an appealing small model of the eighteenth-century Yorkshire farm cottage in which Captain James Cook was born. (He wasn't a captain at the time, only achieving captainhood much later in life. After this, he set off to discover Australia, or at least map much of it and discover parts of it.) The model is available via download for printing on one sheet of 8.5 by 11 inch card stock. The file is provided to you in Adobe PDF format so you will need Adobe reader to print the model out with. You will, of course, need a color printer and some card stock also.
Construction: The model is simple and has no internal formers. The shape of the model is basically a group of boxes assembled with tabs and glue in the conventional manner. There is no base, which is always a pity as a nice base really helps set off any architectural model, but it would be easy to make your own.
First Impressions: The artwork is clean and colorful in the Fiddler's
Green trademark style and should make for an attractive model. Some information
is included about Cook's early life, which is a nice touch. This would be a
good first architectural model for a beginner.
PZL P-50A "Jastrz�b" (Hawk) |
||
 |
Description: | Prototype Polish fighter (1939) |
| Kit: | Models by Marek 09/2003 | |
| Scale: | 1:50 | |
| Designer: | Marek Pacy�ski | |
| Format: | Downloaded PDF (1.3mb), yielding 4 printed pages: a title page, a page of background, specs and construction diagrams, and two pages of parts | |
| Parts: | Approximately 120 | |
| Difficulty: | Intermediate | |
Kit: Marek's mid-sized creations in the 1:50 scale format just keep getting better. With the PZL P-50A Jastrz�b ("Hawk" or "Goshawk"), he continues a tradition of bringing out unusual, often one-of-a-kind aircraft that are rarely, if ever, made available in other media. Like his earlier CSS-10A, the PZL P-50A was represented by only a single aircraft, produced for evaluation in early 1939, and then lost in a crash while trying to escape during the Nazi invasion later that year.
What makes this kit different from most of Marek's earlier offerings is the inclusion of a far more detailed cockpit than usual and the adoption of connecting strips in places where they were seriously needed in the past (wingtips, wing section joins, etc.). There is a reasonable amount of 3-dimensional engine detail for this scale, as well as an opportunity to substitute clear glazing for the opaque cockpit enclosure.
Construction: Construction follows the "butt-joint" method typically used by Marek in his fuselage designs. If adjoining bulkheads are sanded together to the same outline (right down to the printed line), fit will be near perfect. You may find it helpful to use folded gluing strips on the trailing edges of the wings and elevators to preserve their tapered 3-dimensional nature. Plain paper folded and cut to the appropriate length and width (about 1/8 inch) should work. There are opportunities for additional detail if desired; but the model should build up into a very attractive display piece "out of the box." This is the kind of kit I'd like to take to an IPMS event.
First Impressions: This is an excellent kit that continues Marek Pacy�ski's tradition of very well thought-out models in an intermediate scale for builders with intermediate skills -- or for advanced builders who want a change of pace from 1000+ part kits. I would not recommend it for the absolute beginner, but it's ideal for someone with a few simple airplane kits completed, and an interest in tackling something new, a little more complex, and very unusual. It's high on my to-do list -- and not just because I'm a nut for pre-war Polish designs.
Bill Geoghegan
Mitsubishi A6M2 Zero-Sen |
||
 |
Description: | Single engine JNAF fighter |
| Kit: | P.Model A6M2 Model 21 | |
| Scale: | 1:32 | |
| Designer: | K. Gondou | |
| Format: | Download as a password-protected PDF file containing 6 pages of instructions and diagrams, and 8 pages of parts. Pages are in A4 format and should be printed on A4 or legal size paper. | |
| Parts: | 360 | |
| Difficulty: | Intermediate to advanced | |
Kit: The kit represents an A6M2 "Zero" of the Japanese Naval Air Force from the early days of the Pacific war. Further identification may be contained on the instruction sheets, but the fact that these are in Japanese hides any such information from a non-reader. On the other hand, the instructions themselves consist of six highly detailed, very carefully drawn and sequenced assembly diagrams; and these should be more than adequate once the builder becomes familiar with the general principles of construction used in P.Model kits.
The artwork in the kit is some of the best I have seen for a print-it-yourself model, rivaling some of the better printed kits on the market today. Panel lines and rivet detail are very finely done -- what the plastic modelers like to call "petite" -- there is subtle shadow detail where parts like ailerons join the main structure. Coloring is generally very good, though I think the national insignia may be a little too bright, and the color of the anti-corrosion paint on interior structures is much too green. There is no weathering; the aircraft is "factory fresh."
On the other hand, the kit is a little disappointing in other respects. Perhaps it is the extremely high quality of the artwork, but I was surprised to see only an opaque canopy and no attempt at any cockpit detail. Three-dimensional wheel wells are provided; but there is no engine detail other than 14 simulated cylinders printed on a flat disk. Given the high parts count and the level of exterior detail, I would have expected a detailed cockpit and some attempt at three-dimensional engine detail. The smaller scale models I reviewed in this issue had both. Even without a detailed cockpit, I would recommend cutting out the simulated glazing in the canopy and substituting some kind of transparent material.
Construction: Construction follows a basic tab and bulkhead method, but with the option of cutting away the tabs that are printed as part of the fuselage and wing sections and substituting gluing strips that allow for a much smoother finished surface. Construction diagrams are extensive, as I mentioned earlier, but they have to be studied very carefully if mistake are to be avoided. I would recommend printing two copies of the kit, and using one to practice construction steps that that might otherwise be confusing.
The wings use a long rectangular box structure for a main spar. Each wing section comes in two pieces: one that attaches to the spar on the bottom and folds around its leading edge to form the upper surface, and one that glues to the bottom of the spar and attaches to the upper surface with tabs at the trailing edge. Most of the remaining assemblies appear more or less conventional in terms of construction -- though I am prepared to be surprised when I start on this kit.
First Impressions: All in all, this kit looks as though it will build into a beautiful display model, especially when considering the quality of the exterior art work. It sets a very high standard in this category. The complete lack of cockpit and engine detail is the only major drawback I can see at this point. I would rate the skill level at intermediate for someone who wants a reasonably quick build using the simpler assembly options. More advanced skills may be required if the more difficult construction options are selected, or if one wants to try his or her hand at filling in some of the missing detail.
Bill Geoghegan
Kawanishi N1K1 Kyofu ("Mighty Wind") |
||
 |
Description: | Single engine IJN floatplane fighter |
| Kit: | Kancho's Paper Wings N1K1 | |
| Scale: | 1:48 | |
| Designer: | Kancho Iliev | |
| Format: | Download as 7 PDF files: One 7-page file of background, instructions and diagrams, and 6 files containing one sheet of parts each. Sheets are in the "universal" format and should print on letter or A4 paper. | |
| Parts: | 137 in advanced version | |
| Difficulty: | Beginner to intermediate, depending on options selected | |
Kit: Kancho has broken new ground with several of his recent designs. This one is no different -- an unusual subject, with a wide range of construction options to suit multiple skill levels. The subject is the Kawanishi N1K1 "Kyofu" (code-named "Rex"), which reached only limited production during World War II, and never saw service in its intended role as a close air support fighter for amphibious assaults. Innovations in the design did transfer to far more successful aircraft (the N1K1-J "Shiden," for example), and its indirect impact was substantial.
Construction: Kancho's designs are unusual in that they use none of the more common techniques for shaping an aircraft fuselage. Rather than bulkheads, fuselage segments are shaped by careful gluing of skin segments and additional support provided by the wings, fillets, and so on. The kit has many optional building features. It includes a fully detailed cockpit and canopy suitable for glazing -- or an opaque canopy for those who do not want to build the cockpit interior. Fourteen cylinders of engine detail is available for those who want the extra level of authenticity (even though it will be nearly invisible when complete). Most of the fuselage and wing gluing tabs can be replaced with separate gluing strips for smoother fuselage and wing surfaces. There is also a complete wheeled transporter (40 parts) as an option. All in all, three of the parts sheets are required to build the basic model; the other three contain optional parts for the more advanced version(s).
First Impressions: This is a very interesting subject with a nice level of detail and plenty of options for different skill levels. I would not necessarily recommend it as a first aircraft model because of the careful shaping that will be required on the fuselage, float and pontoons. It should turn out to be a very enjoyable build for someone who already has a couple of aircraft to his or her credit, or who wants to try a higher than usual level of detail in this scale.
Bill Geoghegan
This column does not cover all the new card model aircraft and ships that have been released this month. It contains only those models that have been sent to me by dealers and designers for review or that I have purchased for review. Due to space restrictions, some models sent in for review may be held over until next month.
Thanks to the following for providing kits for inspection and review:
