Background: In January, 1962, NASA announced the commencement of its second manned U.S. space program: Gemini. The stated goals of the program included subjecting man and equipment to space flights of up to 2 weeks, rendevous and docking with orbiting vehicles, and perfecting atmosphere re-entry methods. The unstated goal of the Gemini program was, of course, to catch up with the Soviet space program. The program was a resounding success and included a total of 12 flights.
Gemini 4 lifted off on June 3, 1965 with Commander James A. McDivitt and Pilot Edward H. White on board. The 4 day mission included the first extra-vehicular activity (EVA) by an American astronaut when Ed White left the safety of the capsule and ventured into space for 36 minutes.
For more information about the Gemini program, see the Gemini site maintained by the John F. Kennedy Space Center.
The kit: The 1/24 scale Gemini 4 capsule and service module was designed by Dan Shippey and is offered by his company, Delta 7 Studios. The Project Gemini CD-ROM contains 16 models from the Gemini program, including 1/24 scale mission-specific spacecraft for all manned Gemini flights, 1/24 scale docking targets, 1/96 scale Titan and Atlas Agena rockets, and a waterline model of a "splashdown" capsule.
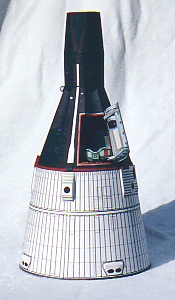
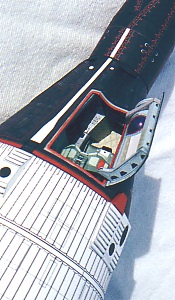
The Gemini 4 capsule and service module model is unique because it is built "hatch open" to reveal a completely detailed interior. The model is presented in pdf format and consists of 7 pages with 88 parts. I printed the model out on Wassau Exact Index 90lb cardstock with an HP DeskJet 722c. The instructions are excellent, consisting of 9 page of step-by-step instructions with photos.
Construction
Capsule and Service Module Exterior
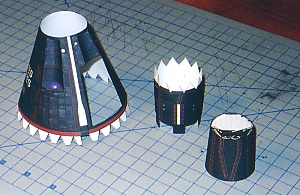
The Capsule is constructed out of 3 cylinders/truncated cones. The main body has window and door openings to be cut out, and window indentation pieces are formed and glued to the inside of the main body before assembling the main body cylinder. Extra care should be taken when rolling the main body as the hole for the door is right next to the edge of the piece. A little extra time and attention is all that's needed to get a good round shape here. The other two capsule cylinders are pretty straightforward.
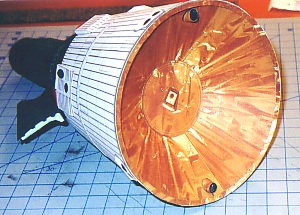
The service module is another large cylinder that is made from two pieces. I decided to cut the tabs off and create a butt joint with the discarded tabs glued underneath the seam for strength. A thin band, also made from two pieces, runs around the service module about two-thirds of the way up from the bottom. The assembled service module cylinder feels large and unwieldy, but the capsule and service module actually fit together quite nicely.
 The last part of the exterior
assembly is the construction of the capsule door. The door is built up from
6 pieces, a couple of which are small and/or have intricate folds. The door
assembly also contains some curves running in opposite direction. The fit is
excellent, though, and the finished door is quite a little model all by itself.
The last part of the exterior
assembly is the construction of the capsule door. The door is built up from
6 pieces, a couple of which are small and/or have intricate folds. The door
assembly also contains some curves running in opposite direction. The fit is
excellent, though, and the finished door is quite a little model all by itself.
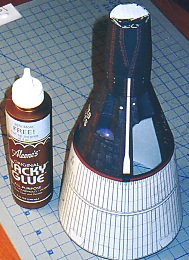
The door is attatched to the capsule from the inside (there is plenty of room to manuever through the open end of the service module), and the red door lip edging (door frame) is added to the inside of the capsule to finish of the basic exterior work.
Capsule Interior
 Capsule interior construction
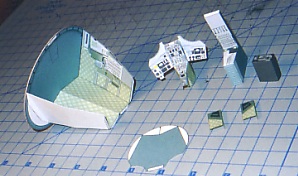
starts with the disc-shaped rear wall. The design calls for the printed rear
wall piece to be doubled onto another piece of card. I decided to laminate the
rear wall onto a thin piece of cardboard instead. This gave the interior structure
some added strength, and also added to the overall rigidity of the finished
model. The interior floor, sides, and front are added to the rear wall to complete
the interior structure. Next, the various control panels and other interior
components are built and added to the interior.
Capsule interior construction
starts with the disc-shaped rear wall. The design calls for the printed rear
wall piece to be doubled onto another piece of card. I decided to laminate the
rear wall onto a thin piece of cardboard instead. This gave the interior structure
some added strength, and also added to the overall rigidity of the finished
model. The interior floor, sides, and front are added to the rear wall to complete
the interior structure. Next, the various control panels and other interior
components are built and added to the interior.
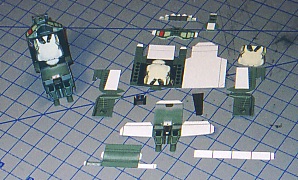 Building the two seats
is the next step, and, like the capsule door, the seats are interesting models
by themselves. Each seat is made from 12 parts, some of them quite small and/or
with complex folds, but everything fits together very well here. It's (almost)
a shame to hide these neat little models inside the capsule interior. The seats
fit snugly into the interior structure and are glued to the rear wall. The two
seats are identical, so you can place the better seat on the right side under
the open hatch.
Building the two seats
is the next step, and, like the capsule door, the seats are interesting models
by themselves. Each seat is made from 12 parts, some of them quite small and/or
with complex folds, but everything fits together very well here. It's (almost)
a shame to hide these neat little models inside the capsule interior. The seats
fit snugly into the interior structure and are glued to the rear wall. The two
seats are identical, so you can place the better seat on the right side under
the open hatch.
 The capsule interior is
placed into the model through the open end of the service module; the rear wall
of the interior lines up close to the seam between the capsule and the service
module. I made a handle for the interior to make it easier to handle during installation.
I simply took a scrap of card about and inch and a half wide and a few inches
long and folded it into a "T" shape, and then glued the crossbar of the T to the
back of interior rear wall. Holding the interior by my new handle, I applied a
bead of glue all the way around the outer edge of the rear wall and put the interior
into place inside the capsule. With my handle, I was easily able to rotate and
align the interior before the glue set.
The capsule interior is
placed into the model through the open end of the service module; the rear wall
of the interior lines up close to the seam between the capsule and the service
module. I made a handle for the interior to make it easier to handle during installation.
I simply took a scrap of card about and inch and a half wide and a few inches
long and folded it into a "T" shape, and then glued the crossbar of the T to the
back of interior rear wall. Holding the interior by my new handle, I applied a
bead of glue all the way around the outer edge of the rear wall and put the interior
into place inside the capsule. With my handle, I was easily able to rotate and
align the interior before the glue set.
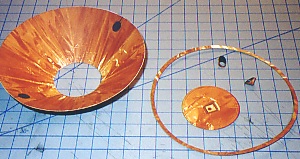
Exterior Details and Thermal Blanket

The model is finished up by adding the several exterior details and the thermal blanket (service module bottom). The exterior details include various thruster packages, vent covers, sensors, etc. These pieces are pretty straight forward to assemble and attach. The addition of these details dispel the impression that a rocket is perfectly smooth; in fact, it's quite bumpy!
The model is completed by closing off the bottom of the service module with the thermal blanket. The thermal blanket is assemble from a flattened, truncated cone, an interior disc, an outer ring, and a couple of thrusters. These parts really give the impression of a shiny metallic foil, even when printed on flat cardstock with an inkjet printer.
 When I inserted and glued
the thermal blanked into the base of the service module, I had a minor disaster.
Next to one of the rear thrusters, at the base of the service module, the service
module wall caved in a little bit, creating an unsightly dent in the model.
(Houston, we have a problem.) I think this happened because I used a liberal
amount of glue on the thermal blanket and it softened the service module wall
enough that it gave in to the pressures pulling inward on it (the thermal blanket).
When I inserted and glued
the thermal blanked into the base of the service module, I had a minor disaster.
Next to one of the rear thrusters, at the base of the service module, the service
module wall caved in a little bit, creating an unsightly dent in the model.
(Houston, we have a problem.) I think this happened because I used a liberal
amount of glue on the thermal blanket and it softened the service module wall
enough that it gave in to the pressures pulling inward on it (the thermal blanket).
Fortunately, I had not yet installed the interior disc into the thermal blanket, so there was still a small hole in the bottom of the service module. I was able to work a cotton ball into the area of the dent, and it pushed the service module wall back into shape, leaving no visible evidence that the problem ever occurred.
 Conclusion
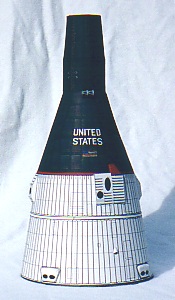
This is a terrific model. The fit is excellent, and the graphics, level of detail, and the "science fact" subject make this a very appealling model. If the other models on the Gemini series CD-ROM are of this quality (as I suspect they are), then I think the CD-ROM is an excellent value.
This model also has a lot to offer for those who want to modify or experiment with the kit. I think the model could be scaled down to 1/48 and still be built with the complete interior. Other modification possibilities include building the model with both hatches open (just print an extra page of door parts) or adding interior lighting.
While the model is not too difficult to build, I think the door and the interior components move it out of the beginner range. A beginner could perhaps get nice results, however, by starting with one of the other Gemini mission spacecraft on the CD-ROM.

| Model: | Gemini 4 Capsule and Service Module |
| Kit: | Delta 7 Studios Project Gemini CD-ROM (16 models total) |
| Designer: | Dan Shippey |
| Availability: | Delta 7 Studios |
| Scale: | 1/24 |
| Difficulty: | Medium |
| Number of Parts: | 88 |
| Instructions: | Excellent, including photos and diagrams |
| Fit: | Excellent |
| Coloring and Artwork: | Excellent |
 Return to the Main Page