
Photos by author
The short history provided with the kit is excellent and provides some little known facts. This Model is Marek Pacynski's model of the YAK-3 done in the colors of the Free French Forces 1944. Models comes on a CD along with one F4U-4 Corsair, one Ki 61 and two Lagg 3 all in PDF format. I used Acrobat 5.0 to read and print the model on my HP932C onto 67 lb. Wausau Exact Index card stock.

CONSTRUCTION:
After gluing poster board to the formers and drying overnight,
assembly starts. The fuselage is straightforward if the formers are sized
to each other.(i.e. B to B)

FUSELAGE:
Attach Parts 2a before installing formers B and C to Part 2. Snip off the
glue tabs from 2a before joining Parts 1 and 2.
After connecting the skin parts with a thin strip of paper, the formers for
the skin are cut out and fitted to the skin. After insuring the 2 formers
of the same latter are equal in size and shape, carefully fit the to
the skin before gluing. This model's formers were either just right, too
large or too small. Adjust by emery board or gluing a 1/32 strip of paper
to the outside of the former. TIP- don't use too much glue to attack the
formers to the skin as the wet glue will stretch the skin and distort the
smooth line of the fuse.
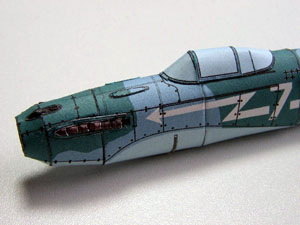
I like to attach all of the rest of the fuselage pieces before attaching the
wings. This makes for easier handling of small pieces such as exhaust
pipes and machine guns. When placing the canopy glue to the line on the fuselage. Trust Marek, It
will fit. The center of the canopy goes on last.

WING:
Wing assembly is standard except for the airscoops at the wing roots.
Assemble Part 15a to the cut out wing. Carefully form Part 16 to a rounded
shape where the scoop is indicated. Then shape the wing and glue Part 16 to
Part 15. Complete the wing gluing and glue the tab on Part 16 to the BOTTOM
of the wing. Let the glue dry and use a toothpick to make the intake hole
rounded. Fit the former parts 15a-c in the wings and attach to fuselage. The scoops
may have to be re rounded. Wing filets should be made concave before fitting
to the model.

Here is the photo of my burnisher-rounder. Insulation
foam wrapped in electrician's tape and a rounded end crochet hook works
really well for this purpose.

TAIL SECTION:
Glue the stabilizers Part 9 to the fuse to provide a firm platform for the
filets Parts 10-11-12. They really add to the rugged appearance of the YAK
model. Stay in sequence and use a glue with some extra "slip" such as UHU
Liquid or Monoaqua. Be sure to join the front edges of these filets to form
a smooth rounded edge.

LANDING GEAR:
A picture is worth----the only way I can describe it. Part 22 attaches to
Part 20 via the wire support strut. Part 21 is glued to Part 22, Part 22 is
tough. The wing must be slotted and holed to accept the landing gear.

PROPELLER:
The blades are glued, edged and rolled around a small piece of wire. Use a
larger diameter wire to curve the blade itself. Three short wires are used
to insert blades in the drilled hub.
CONCLUSION:
Rig a piece of monofilament for the antenna. Insert this into pin holes in
the rudder and canopy with a touch of glue and the model is finished !


SUMMARY
The fit and shapes made possible by Marek's careful design makes his models
a pleasure to build. Careful thought and planning are usually enough to
solve "Pacynski"s Posers" such as the landing gear and exhaust stacks. A
neat a unique model of any interesting period of World War II.
| Model: | Model Cardboard Yakovlev Yak 3 |
| Kit | Volume 9 of World War II aircraft |
| Designers: | Mark Pacyinski |
| Scale: | 1/50 |
| Availability | Models from Marek From DeWayne Barnett |
| Difficulty: | Medium |
| Number of Parts: | 103 |
| Instructions: | None |
| Diagrams: | Good |
| Fit: | Excellent |
| Coloring and Artwork: | Excellent |
| Printing: | Depends on your printer |
