
First Looks For the Month of December:
| Sd Kfz 250 | Published by Pro-Model |
| Description: | German WWII Half Track |
| Reviwer: | Jim Nunn |

Kit: The model is printed on 12 pages of A2 size paper. 8 pages of parts are printed on heavy card stock and 4 pages of assembly diagrams on normal paper. The instructions are in Polish but with the concise assembly diagrams the model should be able to be built with out the need of written instructions.
The kit can be built as either an Sd Kfz 250/1 or as a 250/10. The model represents an early welded type hull. With over 1200 parts and complex hull shape, a complete interior, engine compartment and individual working track links the model would be an intrusting challenge to build. I would rate the model as level 2.5 complexities due to the number of parts.
If the model has a draw back it is the color scheme. It is printed in a solid even desert tan with few markings and no attempt has been made to scale the colors or to weather the model. Needless to say the model would be rather drab when finished and considering all the various types of camouflage used on German armor we would think Pro-Model would have printed the model in a more colorful paint scheme.
First Impressions: Over all I would recommend the model it will certainly go to the top of my to be built pile.
| Sukhoi Su 26 "Cyxon" | Published by DeWayne Barnett |
| Designer: | Marek Pavynski |
| Description: | Russian built Sports Plain |

Kit: This 1/50th kit will comes on a CD with several other models. The models are in PDF format on the CD and you will need a color ink jet printer along with suitable card stock to print the model on. This model prints out on two sheets of card stock, the first contains the description and diagrams. The other sheet has the formers and parts needed to complete the model. No instructions are provided but the diagrams are very self explanatory and will be all you need to build this model. Parts are not provided to build the cockpit or wheel wells and the canopy is in colored card stock. Landing gear is provided and glued directly to the bottoms of the fuselage and wings.
Construction: Before starting construction reinforce all parts marked in red with .5 to .8 mm cardboard. The fuselage is built using the "butt" method, each fuselage section is built with a former in each end and when all sections are finished they are "butt" glued together. Cut the main wing former and insert through the fuselage. Then glue the rest of the formers to the main wing spar. Cut and form the skin and glue it around the formers. Cut, form and glue the wing fillets to the top and bottom of the wings. Build and glue the tail section to the rear of the fuselage and them the landing gear to the bottom on the fuselage. You may want to use wire or a toothpick in the landing gear struts to give them strength also.
First Impressions: A good model to start building Marek's models with. You will not need much experience to build the model, in fact if you take your time it could be built as your first card model.
| Huascar | Published by Kartonowa Flota |
| Designer: | Marek Borawski |
| Description: | 1879 Chilean Monitor |

Kit: Here is another of the 1/250 scale models I received from Kartonwa Flota. The model comes on two sheets of A4 (8.5 x 11.5 inch) card stock. The cover sheet contains diagrams and a history of the ship. The second sheet contains all the rest of the parts to build the ship. Everything is in Polish so you will be dependent on the diagrams when building the ship. Several things have been done to make assembly easier, parts that are to be reinforced with heavier card stock are marked with a red dot. Part numbers are outlined in blue so that you do not get confused with numbers on the parts where other parts are glued. The hull of the ship is black and the decks are light green.
Construction: Construction of the model is of standard ship methods that you see in almost all card ships. The hull is the "egg crate" method, cut the base and hull formers out and reinforce them. Glue the vertical frames on the base and then the horizontal frames to the vertical frames and base. Now cut the deck sections out and reinforce them, then glue the deck to the top of the hull frames. During the above make sure that everything stays straight, you can do this by gluing the base to a piece of wood or pining it to the wood or any other solid material. This is the key to building ship models, if you don't do this than the hull will warp and the model ruined. Now cut out the sides of the hull and glue then between the base and deck. Once the hull is finished now build the super structure, life boats, gun turret and the other details for the deck and super structure. Glue all of these to the proper place on the ship.
First Impressions: The model looks very nice, not overly complicated but appears to be quite detailed. Good model to start with.
| Bell UH 1D "Huey" | Published by CFM |
| Designer: | G. Neubert |
| Description: | Vietnam era Helocoptor |

Kit: A 1/50 kit that comes in booklet form with nine sheets. Five sheets are the history of the aircraft and the instructions. These are all done in German, there are diagrams on each of the components sheets to help those non German speakers who attempt the model. There is a sheet of formers on a heavy card stock, four sheets of colored card stock that contains the parts for the model and a sheet of cardboard. The models is in German Air Force Search and Rescue (SAR). The model is in olive drab with orange SAR markings. Model does not contain parts for the cockpit or templates to make a clear canopy.
Construction: Start construction by building the forward part of the fuselage. This section is built with the "former connecting strip" method. In this method each section of the fuselage is cut and rolled, a connecting strip is glued in one end and then a former is glued in the same section as the connecting strip. Once the sections are completed glue the sections together using the connecting strips. Cut and roll the rear section of the fuselage and glue it to the completed forward sections. Build the tail section and glue to the rear as the fuselage, Construct the engine compartment and glue to the top of the fuselage than build the main rotor and glue to the top of the engine compartment. Build the tail rotor and skids and glue to the model.
First Impressions: A nice looking model that should not be to difficult to build. It will be a little time consuming because of the number of sections in the forward fuselage section. This is neccessry to get the correct shape. Just take your time and you will have a great model when you finish.
| Dar Pomorza | Published by Maly Modelarz |
| Designer: | Patryk Zuzanski |
| Description: | German Built Sailing Ship |
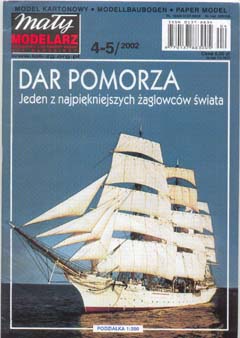
Kit: This 1/200 model comes in booklet form with 15 pages of model parts. Their are several other pages with advertisements for MM. The booklet contains two pages of history and instructions but they are all in Polish. There are three pages of detailed instructions including rigging details that are needed for those who do not read Polish. There are two sheets of sails if you want to put them on the masts. Two pages of formers, the second page contains dead eyes, anchors and other small parts. The majority of the parts for the model are on six sheets of colored card stock. Ships hull is white with red below the waterline and decks are wood colored. Booklet also contains a nice stand to display the completed model on.
Construction: The hull of the ship is built using the "egg crate method". Decide if you want your model to be full hull or waterline, now cut out the sections of the formers that you will need for the type of model you are going to build. I recommend that you first glue the base of the hull to a piece of wood. Then glue the vertical and horizontal formers to the base. Cut and reinforce the deck with heavy card stock and then glue it to the top of the formers. Let everything dry and then remove the frame from the piece of wood. This will insure that you have a nice straight hull with no warping. Cut the hull sides out and reinforce with a thin piece of card stock and glue between the base and deck. Now build the superstructure and masts and glue to the deck. You can stop at this point and start rigging the ship or you can cut and glue the sails to the mast before rigging. The diagrams provided show great detail for the rigging.
First Impressions: A beautiful model with a great set of diagrams. Not a project for a beginner or someone who does not want to spend the time necessary to finish the model. Make sure that you have built several ship models before attempting the model.
| Iron Age Round House | Published by Card Models.CO.UK |
| Description: | Iron Age Round House built in Britian |

Kit: One of the four models sent us from a company producing a series called "Britain through the ages series". The models come in a shrink wrapped package with two sheets of card stock and an instruction/history sheet on regular paper printed on both sides. The model consists of eight pieces and nine figures. Historical information and links to web sites with further information are provided.
Construction: Construction is very simple on these models. Cut the two pieces of the roof out and glue then together. Cut the base sections out and fold the tabs up then glue the roof to the tabs. Cut the entrance out and glue to the base then cut the roof of the entrance out and glue to the entrance and the main roof. Cut out the nine figures and place around the Round House to create a diorama.
First Impressions: A very simple model that is suitable for children or someone trying there hand for the first time on card models.
| Boeing Model 266 (P-26A) "Peashooter" | Published by DeWayne Barnett |
| Designer: | Marek Pacynski |
| Description: | U.S. Army Air Corp pre WWII Fighter |

Kit: Another in Marek's new 1/33 scale. This model is available only in PDF format on CD. You will need Adobe reader and a color printer to print the model out on. There are seven pages on the CD, a cover sheet, four sheets to be printed on card stock, a history page and a page of diagrams. A detailed cockpit is provided which you will have to build as this is an open cockpit aircraft. Color scheme is absolutely stunning, fuselage is blue with red and white stripes down the sides and the wings are yellow. A detailed engine is provide which must be built. Landing gear is fixed so there are no wheel wells.
Construction: Start construction with the Fuselage. This model uses the butt glue method, you construct each fuselage section and then glue a former in each end. When all the fuselage sections are built you butt glue them together. Install the cockpit in the correct section before gluing the sections together. Cut and glue the wing frames together and then cut and glue the wings over the frame. The landing gear is fixed on this aircraft with "pants" covering the wheel. Build the main landing gear, wheels and pants. Assemble the three parts and glue them to the bottom of the wings. Build the tail section and glue to the rear of the aircraft. This aircraft was the step between the biplane and monoplane. Stress wires were used for the wings because of thinking that went back to the biplane. In order to give your model authenticity use the diagrams provided and glue the stress wires between the fuselage and wings.
First Impressions: A very striking airplane in real life and the model does justice to the aircraft. Does not appear to be overly difficult but you will need some card modeling experience before attempting this model.
| Olza | Published by Kartonowa Flota |
| Designer: | Stanislaw Burnat |
| Description: | Polish Freighter |

Kit: This 1/250 model comes on two sheets of A4 (8.5 x 11.5 inch) card stock. The cover sheet contains diagrams and a history of the ship. The second sheet contains all the rest of the parts to build the ship. Everything is in Polish so you will be dependent on the diagrams when building the ship. Several things have been done to make assembly easier, parts that are to be reinforced with heavier card stock are marked with a red dot. Part numbers are outlined in blue so that you do not get confused with numbers on the parts where other parts are glued. The hull of the ship is black and the decks are brown.
Construction: Construction of the model is of standard ship methods that you see in almost all card ships. The hull is the "egg crate" method, cut the base and hull formers out and reinforce them. Glue the vertical frames on the base and then the horizontal frames to the vertical frames and base. Now cut the deck sections out and reinforce them, then glue the deck to the top of the hull frames. During the above make sure that everything stays straight, you can do this by gluing the base to a piece of wood or pining it to the wood or any other solid material. This is the key to building ship models, if you don't do this than the hull will warp and the model ruined. Now cut out the sides of the hull and glue then between the base and deck. Once the hull is finished now build the super structure, life boats, and the other details for the deck and super structure. Glue all of these to the proper place on the ship.
First Impressions: These are very simple little models that are ideal for you to cut your teeth on building ships out of card stock.
| Gemini XII with Agena | Published by Paper Models International |
| Designer: | Dan Shippey |
| Description: | Gemini XII Capsule with Agena Docking Target |

Kit: We removed this series which was sent to us by Delta Seven Studio on a CD. Paper Model International is selling each of the separate Gemini missions pre-printed. This model comes with eight sheets of card stock, a history sheet, five sheets of diagrams and instructions for the Gemini and five sheets of the same for the Agena. This is basicaly two kits, the Gemini and the Agena. The Agena is on three sheets the color is silver and gray with the U.S. flag on the body. The Gemini is on five sheets with the capsule being black and the service module white. The thermal blanket is a copper color.
Construction: Since there are two models it does not matter which one you start with. I will start with the Agena. Start by cut, rolling and gluing the body together. Build the docking adapter then the docking cone. Build the static discharge rind and glue the docking shocks in. Build the secondary propulsion system, small thrusters, and instrument boxes. Glue the thrust cone to the body then the SPS module to the thrust cone. Attach the adapter assembly to the body. Finish by gluing the antennas to the model.
Now we will do the Gemini itself. Cut the main body out and remove window pieces. Cut the parachute bridle out and then assemble the body using the bridle. Build the RCS and slide the toothed adapter into the the RCS. slide the adapter into the main body and then glue the nose adapter into the RCS. Glue the recovery nose section to the RCS and then glue the nose cap in place. Build the service module and attach to the capsule. Build the thrusters and attach them to the service module. Now build the thermal blanket and busy box then attach to the bottom of the service module.
First Impressions: It is not as confusing as it sounds. Step by step diagrams are provided. Even people with no card modeling experience should be able to build this. It would make a great school project.
| Civil War Town House | Published by Card Models.CO.UK |
| Description: | Civil War Town House built in Britian |
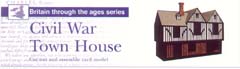
Kit: This is last of the four models sent us from a company producing a series called "Britain through the ages series". The models come in a shrink wrapped package with two sheets of card stock and an instruction/history sheet on regular paper printed on both sides. The model consists of five pieces and five figures. Historical information and links to web sites with further information are provided.
Construction: Construction is very simple on these models. Cut out the three sections of the building, front, mid and rear sections. Fold the sections and glue them together, then glue the three sections together to make the main building. Cut fold and glue the chimney and window sections and then glue them to the main building. Cut out the five figures and place around the Round House to create a diorama.
First Impressions: A very simple model that is suitable for children or someone trying there hand for the first time on card models.
| Nimrod Mk1 | Published by Digital Card Models |
| Designer: | Steve Bucher |
| Description: | Inter war British Fighter |
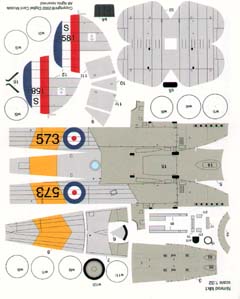
Kit: This 1/33th scale model comes on seven sheet of card stock two of which are diagrams. The model I received was sent to me over the Internet in PDF format. This is an open cockpit aircraft with fixed landing gear. Parts are provided to build the cockpit. The model does not contain any internal formers except for those used in the cockpit. Two large colored areas are provided for you to cut apart and make connecting strips.
Construction: Cut the main fuselage part out. This section contains both sides and the bottom of the fuselage. Fold and glue this section together and then glue the cockpit parts inside the fuselage section. Cut out the three parts of the top of the fuselage and roll and glue to the top of the main fuselage. Cut fold and glue the bottom wings to the fuselage. Build the struts, I suggest toothpicks inside for strength, and glue to the bottom wing. Cut, form and glue the upper wing together, then glue to the struts on the top wing and fuselage.Cut, form and glue the landing gear struts, again I suggest toothpicks for strength, and glue to the bottom of the fuselage and wings. Finish up the model by building and attaching exhausts and wheels.
First Impressions: You should have card modeling experience before attempting this model. Since this is a model that has not been offered in card before, it is well worth building.
| Zamek Pardubice | Published by Erkotyp |
| Designer: | Richard Vyskovsky |
| Description: | Czech Chateau |

Kit: Not being a building builder, this review will be very general. This 1/165 castle comes in booklet form on card stock that is 13" X 9 1/2". The booklet contains 1340 parts on 24 sheets of card stock and paper. Six sheets of instructions are provided but they are in Czech and German. Four pages of detailed diagrams are provided which should be a big help to those who do not speak Czech or German. The company rates this model of having a difficulty of five out of a possible five. The model is very detailed and colorful as you can see in the picture above. The blue, reds and yellows really set this model off. The printing is very sharp and crisp with all parts clearly marked.
Construction: Having never built a card model castle or building I would have no idea on how to proceed with the construction of this model.
First Impressions: At first glance this is a very impressive model. It is not a model that you are going to sit down and put together in a few days. If you plan to build this you better have the time and patience to complete the model. This is not a model for a beginner but rather for a card model builder with experience.
| Junkers Ju 87B (R-1) "Stuka" | Published by DeWayne Barnett |
| Designer: | Marek Pacynski |
| Description: | German WWII Dive Bomber |

Kit: The second of the 1/33 scale Stukas from Marek. I call this model the "Snake" because of the beautiful snake markings down the sides of the aircraft. This model is available only in PDF format on CD. You will need Adobe reader and a color printer to print the model out on. There are 11 pages on the CD, a cover sheet, seven sheets to be printed on card stock, a history page and two pages of diagrams. A detailed cockpit is provided but if you do not want to go into that much detail, a colored card stock canopy is provided. Color scheme is very accurate, the aircraft being two tone splinter green on top and blue on the bottom. One large bomb is provided to be placed under the fuselage along with the swivel that swings it clear of the propeller.
Construction: Start construction with the Fuselage. This model differs from Mareks 1/50 scale in using the connecting strip method rather than the butt glue method he used in the smaller models. Install the cockpit in the correct section before gluing the sections together. If you do not want to make a transparent canopy then just use the colored canopy provided. No pattern is provided for the transparent parts of the canopy but you can easily make the canopy by tapping the colored canopy provided to a piece of transparency and cut to fit. Then cut the blue parts of the canopy out and glue the transparent material to the frame that is left. Cut and glue the wing frames together and then cut and glue the wings over the frame. The wings are in two pieces in order to make the inverted gull wing. Start from the section closest to the fuselage and work out. The main landing gear is fixed on this aircraft with "pants" covering the wheel. Build the main landing gear, wheels and pants. Assemble the three parts and glue them to the bottom of the wings. Build the tail section and propeller and you are finished.
First Impressions: An outstanding example of this very important aircraft of WWII. Not recommend for the beginner, you should have experience in building card models before attempting this model.
| Off Road | Published by Walter Ruffler |
| Designer: | Walter Ruffler |
| Description: | Motorcycle Rider Automata |

Kit: An Automated card model of a motorcycle rider in which the motorcycle front and then rear wheel lifts and then the rider rises off the seat. The rider can be made as either a female or male. The model comes with four sheets of card stock, one sheet, front and back, of instructions, a piece of dowel and eight round toothpicks. Printing is very nice and sharp and the colors of the model really stand out. The instructions are in English and the diagrams are very detailed.
Construction: Start by building the box that the motorcycle will be mounted on. Inside the box you will build the crank support that goes inside and then the crank which will turn the entire automata. Use the toothpicks for the crank and handle then the large dowel for the crank slider. Now build the motorcycle frame, front wheel supports and wheels. Assemble these parts using toothpicks to mount the wheels. Build the drivers body using the toothpicks at all joints to allow movement. Build and attach the head, either male or female as you desire. Now put the entire model together and see if it works, if it does not there is a troubleshooting guide provided.
First Impressions: Cute little model that would be a great project for a parent to do with their children.
| Aerosane NKL-26 | Published by PK Graphica |
| Reviewer | Neil Linnell |
| Description: | WWII Soviet Armored Sled |

Kit: This 1/25 scale model is of a very interesting subject: the Soviet NKL-26 armored sled. The vehicle is built from the unlikely combination of a wedge-shaped hull, four skis, and a rotary aircraft engine. The harsh environment of the winter campaign of 1942-43 proved that these vehicles were actually quite useful. The kit itself consists of 2 pages of parts printed on good quality cardstock, instructions in Czech, and a few construction diagrams. The printing is crisp and clean, and the model has been weathered (and shot at!). There are also a lot of parts to be made from wire (not included).
Construction: Construction of the kit starts out using basic methods. The hull and interior are assembled first; there are several nice interior components included. The engine is built from a series of cylinders and attached to the hull. This is where the extensive use of wire parts begins, continuing as the skis and the sled's suspension components are constructed. Modelers used to working exclusively with white or tacky glues will have to branch out, as there are some "wire-to-wire" joints to be created. Final details include a very nice looking propeller and various hull details such as lights, hand tools, and a machine gun.
First Impressions: The interesting subject matter and good production qualities make this a model well worth building and displaying. Recommended for builders with a moderate amount of experience.
This column does not cover all the new card model aircraft and ships that have been released this month. It contains only those models that have been sent to me by dealers and designers for review or that I have been purchased for review. Due to space restrictions, some models sent in for review may be held over until next month.
Thanks to the following for providing kits for inspection and review:
